What happens if you reinstall windows. Step-by-step instructions for reinstalling the operating system
If the performance of your computer has decreased or something in its operation no longer suits you, then the solution to this problem may be re Windows installation. For many, the very idea of reinstalling the system may sound somewhat scary, but in reality there is nothing difficult about it. This manual will help you in this process.
We will tell you how to reinstall on Windows 10, Windows 8 and Windows 7.
Important warning: If you decide to perform a “clean install” (installing the system on HDD, from which all files are first deleted), then before that you need to create a backup copy of all your files, music, photos and videos, as well as save settings and applications.
In addition, it is also possible to reinstall Windows “on top” of already existing system. Although, in this case, it will most likely be about an update, during which you will not have to part with your files and applications. However, it is worth considering that this method is still less effective in combating problems that interfere with the loading and operation of the system, since such a reinstallation may retain residual virus files. Also keep in mind that Windows 8 has Refresh and Reset functions that can also be useful.
How to reinstall Windows 10?
Before you begin the reinstallation, you'll need to link your Windows 10 product key to your Microsoft account if you haven't already done so. Otherwise, after reinstalling, you may have problems reactivating Windows 10. This system does not always have a license key, and if you upgraded from Windows 7 or 8, then your system will definitely not have one.
So go to Settings > Update & Security > Activation. If in this section you only see the message “Windows system is activated with a digital license” and nothing else, in this case your system is not linked to a Microsoft account. To fix this, go to Settings > Accounts > Your data. Select "Sign in with a Microsoft Account" and follow the further prompts. If you did everything correctly, then in the “Activation” section the status will be changed to “The Windows system is activated using a digital license linked to your Microsoft account.”
Reinstalling Windows 10 on a working computer
If you can log into Windows 10, then select the Settings tab from the Start menu, and then go to Update & Security. In the “Recovery” section, find the “Reset your computer to its original state” option - with its help you can save or delete personal files, and then reinstall the system.
In addition, just lower in this section you will find the “Advanced recovery options” option, which will help you perform a clean installation of Windows.

Reinstalling Windows 10 on a non-working computer
If you are unable to sign in, follow these steps.
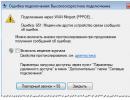
First, turn on your computer and wait for any message before the system logo appears. Some laptops and computers come with a "hidden" hard drive that stores the entire backup copy Windows. Typically, this will look like a message like “Press F10 to use recovery options.” Every computer is different, but there is always an option to restore the system to factory settings. With its help you can delete all data from hard drive, and then transfer the hidden version of Windows back to your hard drive - in this case, your computer will return to its original state.
You can also press F8 several times to open the Advanced Boot Options menu.
If none of these methods help, try the following:
1. Download Microsoft's Media Creation Tool, which will create a bootable disk or flash drive with Windows 10. To do this, you will need to use a working computer if yours is not logged into the system. This disc can also be used for reinstallation, so save it for future use. Additionally, you can use this disk to update your existing system: to do this, simply run Windows system 7 or 8 and open the Setup.exe file saved on the disk.
2. Connect the USB device to your computer and turn it on. However, before you do this, make sure that you have created a backup copy of your files, since this operation will erase all data from the C drive. If you did not take care of this in advance, then you will need to remove the hard drive and connect it to a working device, after Why create a copy of the files stored on it.
3. If the computer does not boot from a USB device, go to the BIOS settings: to do this, immediately after turning on the computer, press Delete or F2, then find the item regarding boot order in the parameters and set your USB device as the preferred one for boot .
4. Once your computer boots from your installation media, you will see the Windows icon, followed by a screen where you can select your system language. Just follow the further instructions. Special attention You should pay attention to choosing the right hard drive for installing the system. If this new disk, then it will be completely empty.

Once the installation begins, your computer will restart. You'll see a Windows icon and a large circle-shaped progress bar. Watch the installation process carefully as your computer will restart several times and at some point may ask you to remove your boot device.

How to reinstall Windows 7?
Below are instructions on how to reinstall Windows 7 using DVD. However, the system on some PCs can be reinstalled using Disk and Partition Recovery. To do this, simply follow the manufacturer's instructions.
If you are reinstalling Windows on the same hard drive where it was previously installed, then you have two options: Upgrade and Clean Install. The first option will save all your files, but may not solve existing problems. The second option will wipe everything off your hard drive and you'll lose all your data, so back up everything you don't want to lose.
Also, don't forget that after installation you will need to activate Windows using your product key (5 groups of 5 characters after "CD Key"), so make sure you can find it stuck somewhere on your computer. If you do not have such a sticker or the symbols on it are impossible to make out, you can recognize it using the Magical Jelly Bean Keyfinder program.

Having dealt with all this, turn off your computer, insert the Windows disk and boot it. Ideally, the system should boot using it. If the system boots in its normal mode, then you will need to go to the BIOS menu and in the settings, note that you want the computer to boot from the disk.

After you have booted your computer using boot disk, Windows installation will begin. On the first screen, you will need to select the language to install, the time and currency format, as well as the keyboard layout.

After this, the system will prompt you to select the installation type from the two offered. If you select "Full installation (advanced options)", you will completely reinstall the system. You can also try Upgrade to install Windows on top of your existing system. In this case, all your files, programs and settings will remain intact. However, as mentioned earlier, we will select and perform a “clean installation”.

After this, the system will specify where exactly you want to install Windows. Sometimes the system shows only one drive, in which case you just have to select “Next”. If you are offered several disks, then select the one that comes first in the list (as a rule, it has the largest amount of memory) and click “Next”.

After this, the installation of Windows 7 will begin. To show progress, you will be presented with a list of actions, thanks to which you can monitor the progress of the work. Installation may take some time. Usually the longest time is “Complete installation”, so be patient and do not turn off your computer.

Finally, you will be redirected to enter your account details. In addition, you will need to activate the system using the license key that you entered earlier. This can be done a little later, as soon as you connect to the Internet.

Next, you will need to select computer protection settings (we recommend selecting “Use recommended settings”), set the date and time, and also configure the network type by selecting “ Home network».

The system will now be accessible, but the desktop will look slightly different, as it will be completely empty. Therefore, the next thing you need to do is reinstall the applications you need.

Go to Task Manager (found in the Start menu) and check that all drivers are installed correctly. If you see a red exclamation mark next to any device, go to the vendor's website and download latest version, which is suitable for your computer. To do this you need to know the make and model motherboard, as well as models of other critical components, such as the video card.

Even if you see that the system shows no problems, then for components such as the video card, motherboard chipset or Touchpad laptop, instead of standard drivers, installed Windows, it is better to install special drivers from the manufacturer.
In addition, the manufacturer may have utilities specifically for laptops that are not reinstalled during a clean installation of Windows. For example, for some laptops there are special utilities that do not allow the battery to be charged to 100%, thereby extending its life.
Every Windows user has at least once encountered the need to reinstall the system on their computer. There are different reasons: critical failure of system files, PC infection with viruses, decreased performance, transition to a new version of the OS, and so on. But in any case, it is important to carefully prepare for the reinstallation process and decide on the method of its implementation.
Preparatory stage
If you decide to install “clean” Windows, then first of all you need to create bootable media from which the OS will be installed. You also need to save important user data first, since the reinstallation process will format the disk and delete all existing files.
Creating bootable Windows media
This step is necessary if you do not have a licensed installation Windows disk. In addition, not all modern PCs have a CD/ DVD disc Gadfly, in this case you need to first create a bootable USB drive. To do this, you will need to follow several steps.
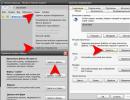
- Go to the official Microsoft website and download a special utility called Media Creation Tool. By clicking on the round icons with pluses inside, you can get additional information on downloading Windows and creating bootable media
- Launch the Media Creation Tool program and, after accepting the license agreement, select “Create installation media for another computer.”
 Using this utility, you can also, if necessary, update an already installed system
 - In the settings window that appears, check the box next to “Use recommended settings.”
 Select recommended (default) Windows boot options or set them manually
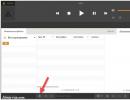
 - The program will offer two options for creating bootable media: burning to a USB flash drive or burning a bootable CD image as an ISO file. We choose the first option.
 Before clicking Next, be sure to connect the USB device to your computer
 - Wait for the Windows 10 system boot process and bootable media creation to finish, after which you can exit the Media Creation Tool.
 The bootable media recording process time depends on the speed of the PC and the speed of the Internet connection
 - Ready. You can begin installing Windows using a bootable USB media.
Video: How to create a bootable USB drive with Windows 10 operating system
Saving data before installing Windows
- documents, photo and video materials from the “My Documents”, “Video” and “Images” folders;
- bookmarks of Internet browsers, which are stored on disk in the following path: “C:\Users\User_Name\AppData\Browser Name” (it is better to save the entire folder);
- files downloaded from the Internet (sometimes these files remain in the “Downloads” folder);
- saves for video games (located in the path “C:\Users\User_Name\Documents”).
The easiest way is to copy all the data to another hard drive. If you only have one hard drive, you can save the files to a USB flash drive, CD or DVD, or to cloud storage(for example, on Yandex.Disk).
Options for reinstalling Windows 10
So, the preparatory stage has been completed, now you can proceed directly to installing Windows 10. The choice of installation method depends on several factors: in a working or inoperative where your current system is located, and whether you want to keep the current license and files on the disk.
Let's consider the possible options.
Reinstalling Windows 10 from the desktop This is the easiest way to reinstall the system, in which you can start the installation immediately after loading the OS, directly from the desktop. To do this, you will need to insert a bootable USB drive and wait for it to autostart, and then run step-by-step installation
- After selecting the language and keyboard layout of the OS to be installed, click on the “Install” button.
 Using bootable media, you can also restore your existing Windows system
 - Next, you will be asked to activate the installed version of Windows and accept the Microsoft license agreement.
 If you do not have an activation key, you can skip this step and activate Windows later, within 30 days after installation
 - The installer will then ask you to choose how to install the system. There are two options:

- After selecting the installation method, the installer will ask you to indicate the location where the OS will be installed.
 The “System Reserved Disk” partition is created automatically and is necessary for creating backup copies of Windows installation files
 - After clicking the “Next” button, the multi-step Windows 10 installation process will begin.
 The update installation process can only be started when there is an Internet connection.
 - Upon completion of the installation, the user will see a standard set of system settings (account, launch options, etc.), which can be changed if desired.
 For optimal operation of the installed system, it is enough to use standard parameters
 - After completing the setup procedure, the installed Windows system is ready for use.
 If the Windows installation did not complete automatic update system components, including drivers, then upon first boot all standard components (sound, network, etc.) will be marked on the taskbar with a “cross” icon
The author of this article, based on personal experience, wants to warn you that when you select the “Update” installation type, the installer will save not only files and settings, but also the folder with old version Windows, which will “lie like a dead weight” on the hard drive, taking up an impressive amount of space. Therefore, if you want to save the data, but at the same time carry out a complete replacement of the system, then it is better to make a copy of all the necessary files to a spare medium (as described in the “preparatory stage”). In addition, you can use an alternative option for installing Windows by performing a system recovery rather than an installation. This method will save all settings and files, but will “roll back” the OS to its original state, removing all third-party applications.
To perform a system restore, you must:
- Open the Windows Control Panel and select the Recovery section.
 You can also open the Recovery settings window using the Windows search bar
 - In the window that opens, click on the “Start” button in the “Return the computer to its original state” option.
 If you previously had a previous version of Windows installed, you can return to it during the recovery process
 - Next, the system will offer a choice of two options for starting the recovery. You need to select “Keep my files”.
 When you select “Delete everything”, you will perform a complete system rollback, deleting not only applications, but also all data
 - After the recovery process is completed, the PC will automatically restart.
Video: How to return your PC to its original state using the Restore function
Reinstalling Windows 10 through BIOS settings
It may happen that your system has stopped booting and you cannot reinstall it from the desktop. In this case, installation of the system is possible only through the BIOS settings (a set of built-in firmware in any PC). Such an installation can be divided into two stages: connecting bootable media through the BIOS and the OS installation process itself.
- To connect bootable media, you must:
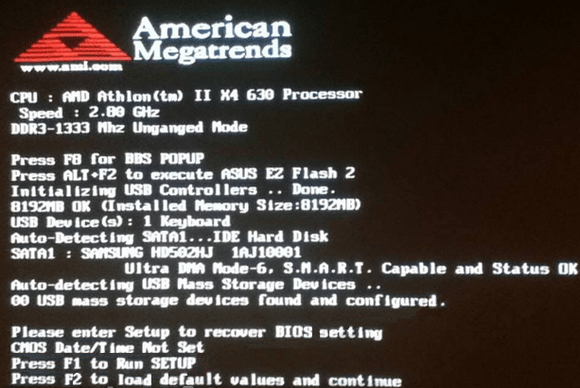
 Insert the bootable USB drive into the USB connector. After starting the PC, press the appropriate key to enter the BIOS settings (usually information about which key to press to enter the BIOS settings is displayed at the bottom of the screen). Call key BIOS settings
 - depends on the PC motherboard model
 In the BIOS settings window that appears, select the Boot category.
 - Navigation through the BIOS settings menu is carried out using the arrow keys. On the menu hard drives (Hard Disk Drives) select the line 1st Drive, press Enter and in the appeared context menu choose USB device
 . Then press the F10 key to save the settings and restart the PC.
 - If the boot device is not a USB drive, but a CD or DVD, then you need to prioritize the corresponding drive
- While the computer is booting, a message like: Press any key to boot from USB will appear. Press Enter.
 The standard Windows installation process will begin.
The process of installing WIndows through the BIOS settings is no different from installing the system from the desktop
Recently, the author of this article has repeatedly heard complaints that some users cannot enter the BIOS settings: the required key is not displayed on the PC start screen. The whole point is that in the latest models Motherboards are increasingly using their own BIOS startup settings. Therefore, in order to open the PC hardware settings without interference, you need to know the motherboard model.
Table: list of hotkeys for launching BIOS settings for different motherboard models
| Motherboard brand/model | Hotkeys for launching BIOS settings |
| ABIT | Delete |
| Acer (Aspire, Altos, Extensa, Ferrari, Power, Veriton, TravelMate) | F2/Delete |
| Acer (older models) | F1 / Ctrl + Alt + Esc |
| ASRock | F2/Delete |
| Asus | Delete |
| Biostar | Delete |
| Chaintech | Delete |
| Compaq (Deskpro, Portable, Presario, Prolinea, Systempro) | F10 |
| Compaq (older models) | F1/F2/F10/Delete |
| Dell (Dimension, Inspiron, Latitude, OptiPlex, Precision, Vostro, XPS) | F2 |
| Dell (older or different models) | Ctrl + Alt + Enter / Fn + Esc / Fn + F1 / Delete / Reset twice |
| ESC | Del/F1 |
| eMachines (eMonster, eTower, eOne, S-Series, T-Series) | Tab/Delete |
| eMachines (older models) | F2 |
| Foxconn | Delete |
| Fujitsu | F2 |
| Gigabyte | Delete |
| HP (Alternative, Tablet PC) | Esc / F2 / F10 / F12 |
| HP (OmniBook, Pavilion, Tablet, TouchSmart, Vectra) | F1 |
| Intel | F2 |
| Lenovo (3000 Series, IdeaPad, ThinkCentre, ThinkPad, ThinkStation) | F1/F2 |
| Lenovo (older models) | Ctrl + Alt + F3 / Ctrl + Alt + Ins / Fn + F1 |
| MSI | Delete |
| Pegatron | F2/F10/Delete |
| Samsung | F2 |
| Sony | F1/F2/F3 |
| Toshiba | F1/Esc |
Video: How to install Windows 10 using an external boot device
How to keep your activation license after reinstalling Windows 10
Microsoft Corporation in latest version I made sure that my OS ensured that after reinstalling the system, the license would be activated automatically. To do this, the user needs to link their system license to their Microsoft account. To do this, follow these steps:
- Open the Start menu and click on the Settings tab.
 You can also open the Settings settings by pressing the hot keys WIN+I
 - Going to the "Update and Security" section, select the "Activation" setting. Then click on the “Add account” line.
 By clicking the "Learn More" link, you can get Microsoft help on activating Windows
 - By filling out the user registration form and activating your account via email, you will link Windows license to the created Microsoft entry.
 After clicking the “Next” button, you will receive an email notifying you that your Microsoft account has been activated.
 - After reinstalling Windows 10, log in to your account Microsoft entry, and your OS will be activated automatically (this will also be written in the “Activation” parameter settings).
 After creating a Microsoft account and logging into it, an entry will appear in the OS activation field stating that Windows is activated
Reinstalling Windows is usually planned in advance, but sometimes an unexpected set of circumstances leads to it. In any case, before you begin reinstallation, you should carefully prepare for it. Connect bootable media and backup hardware to copy and save user data from the system drive. Even if reinstalling Windows is caused by a critical failure that causes the computer to stop booting, you can get out of this situation using the BIOS hardware settings.
Sooner or later, every user encounters operational problems operating system Windows. And although it is only improving every year, over time various system garbage and errors appear, which are very difficult to get rid of. The simplest solution in this case is to reinstall the OS. There are two ways to do this. Either roll back Windows to factory settings, or completely demolish the old system and install a new one in its place. In our opinion, the second method is slightly better, because there are fewer problems with it due to the fact that you do the installation yourself current version. We have already talked about, so this time we will talk about installing a clean OS.
x64 or x86: how to choose the bit depth of a new OS
Today, all processors have one of two architectures: x64 and x86. All new stones support both types of architectures, but older models, even though compatible, can only work with a limited amount of memory. But this applies to completely “bearded” microchips. In general, the recommendations are as follows:
- Install a 64-bit operating system, if the processor supports more than 4 GB random access memory, and you have more than 4 GB of RAM installed.
- Install a 32-bit operating system, if the processor does not support 4 GB of RAM or if you have less than 4 GB of RAM installed, despite the CPU's capabilities.
Before installing a fresh OS, you can look at the type of current system. Here, by the way, you can see both the processor model and the amount of RAM. To do this, right-click on the “Start” icon in the lower left corner of the screen and select “System”.
Based on this information and the above recommendations, select the type of new OS and create a bootable USB flash drive.
Creating a bootable USB flash drive
On the official Microsoft website, download a utility called MediaCreationTool, with which we will create bootable media. Launch the program and select the appropriate item.

Next, select the desired OS parameters, a drive with a capacity of at least 8 GB onto which the image will be downloaded, and wait until the software downloads the necessary files. The process can take a long time and is highly dependent on Internet speed. Please note that all data on the flash drive will be erased. There is no point in deleting MediaCreationTool, because it is a portable version that does not require installation and you can return to its help again in the future. After downloading, the utility can be closed. Then you need to restart your PC and start from the installation media.
Booting your computer from installation media
At boot time, you must press the key that is responsible for launching the settings Motherboard BIOS fees. The BIOS settings menu is entered by pressing certain keys or even key combinations, and depending on the motherboard manufacturer, these buttons may be different. In the list below you will find all the keys arranged in descending order of frequency of use:
- The “DEL” delete button is the most common one.
- The “F1”, “F2”, “F8” or “F10” keys are also quite often used.
- The “TAB” button, which is located on the left side of the keyboard and, in addition to its name, is indicated by two multi-directional arrows, is used much less frequently for the purposes we are considering.
- If none of the above buttons work, use the combination of simultaneously pressed buttons “Ctrl” + “Alt” + “Esc” or “Ctrl” + “Alt” + “S”.
If you did everything correctly, you will be taken to either the BIOS settings menu or the boot device selection menu ( Boot Menu). Boot Menu is part of the large functionality of motherboard firmware. With its help, you don’t have to delve into numerous settings items, but immediately boot from the desired drive. If you get into the BIOS itself, then find the Boot tab, and in it, accordingly, the Boot Menu, in which you also select the desired drive. After that, save the settings and go to reboot using the F10 key.
Operating system installation
- If you did everything correctly, then after the reboot you will see the Windows 10 logo, and after some time a menu will appear allowing you to select the OS language, time and currency format, and keyboard layout.
- In the next window select "I don't have a product key". If you already had an activated operating system, it will be activated automatically the first time you start it after installation. That is why, in this case, it is important to choose the version of the OS (Home, Pro, Education, and so on) that was already installed before. If you skipped this step, then return to the paragraph “How to choose the bitness of a new OS.”
- After selecting the system type, a window will appear asking you to select the installation type. In any case, we recommend selecting “Custom: Windows installation only (for experienced users)". If you have only one hard drive installed, then first save all the necessary files on a separate volume. It is recommended to store important data on one drive and install the operating system on another, but if you don’t have this option, then it’s okay. You can leave one volume untouched and delete everything else. Including small sections that the system creates to suit its needs. After removing all unnecessary partitions from the unallocated area, create a volume of a size that will be allocated for the new OS. In the future, using a hard drive manager or third-party utilities, you can resize partitions. Click “Next” and the installation of the operating system will begin. The installation process will be performed in several stages with a reboot.
 After the final download, all you have to do is configure the new OS for yourself. Select geolocation, confirm keyboard layout, select theme, enter account Microsoft (if it exists) and other similar operations that everyone customizes for themselves.
As you can see, the OS installation process is very simple and does not require any outstanding skills from the user. Microsoft cares about its users and every year it simplifies its products more and more. In one of the following publications, we will tell you what you should do first when starting a reinstalled operating system.
Many laptops are sold with a pre-installed version of Windows 8, which, as practice has shown, does not suit a large number of users. In addition, Windows OS of any version sooner or later becomes clogged and also requires reinstallation. Also, reinstallation is often caused by various problems with computers, for example, if it does not turn on or if it is locked. Despite the fairly large number of steps involved in reinstalling Windows, even the most inexperienced user can install the OS using these instructions.
Preparing for reinstallation
The first thing you need to do is select the disk partition to install Windows. As a rule, a hard disk partition of at least 50 GB is allocated.
If your computer already has an operating system, you should save all the necessary documents in order to reinstall the OS without losing data.
To install the OS, you will need an 8 GB DVD or flash drive, on which a bootable installation will be created.
Selecting the OS version
The most common and stable version The OS from Microsoft is Windows 7, in some cases it can be reinstalled on Windows XP. The most decisive factor in choosing Windows is the availability of the necessary drivers. To check for which OS version your laptop has drivers, you need to go to the developer’s official website and look in the support section.
Most modern laptops have drivers only for Windows 88.1, some of them are also suitable for Windows 7, unfortunately, the correct operation of all devices cannot be guaranteed.
For correct operation, it is recommended to install exactly the system for which the manufacturer provided drivers.
If your laptop has more than 4 GB of RAM, you should choose the system bit size - 32 (x86) or 64 (x64). To use more than 4 GB of RAM, it is recommended to select Windowsx64. After selecting the Windows version, you need to download it. It is advisable to upload an image as close as possible to without adding additional software. This version of Windows will be more stable and will not cause additional problems during installation of the operating system. The most common option is the Windows 7 Maximum license.
Video: How to install Windows 7
Creating a boot disk or flash drive
You must upload the image in ISO format; most options are provided in this extension due to ease of use when creating bootable flash drive or disk.
To create you will need Windows program 7 USB/DVD Download Tool, which can also be downloaded from the Microsoft website.
Install the program and proceed to the main steps:
- run the program;
- Click “Browse” and specify the location of the Windows installation image in ISO format. Clicks “Next”;
- in the next menu you need to select the type of media on which the Windows installation will be recorded - USB or DVD. If the disk drive does not work or is missing, then there is only one option left - USB drive;
- Next, you should select the disk on which the recording will be made. After selection, you must click “Begin Copying”;
- For a flash device, the program will ask for confirmation of formatting, for which you need to click “Erase;
- The program will display a corresponding message about successful recording.
How to completely reinstall Windows 7 on a laptop
After creating the disk or flash drive, you can reboot the computer. Do not forget that all data on the disk on which you will install Windows will be deleted. You should also take care of your Internet connection settings; you can contact your provider or record the data yourself.
To begin installation, you must restart your computer and set your device to boot from the Windows installation files.
Setting up BIOS for installation
When reinstalling the operating system from a flash drive, you must set the boot priority from a specific device, in this case, flash drives or DVD drive A. This operation is performed for installation on a computer both without an operating system and with it. Fortunately, most modern laptops have a feature to quickly select a device to boot from. To call this menu when booting the laptop, a specific key is used.
Using this table you can select a button for your device:
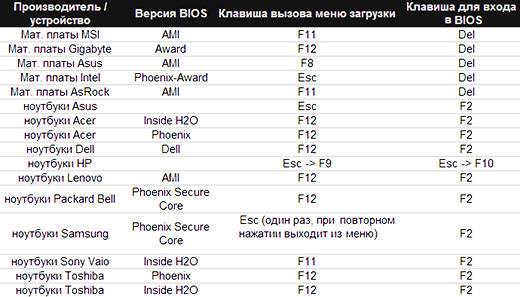
By clicking the button, the computer will present a window for selecting the device from which it will boot first. In our case, we choose a DVD drive or a USB drive.

There is a more complex installation option via BIOS on an empty laptop or with an installed OS. To do this, when starting the devices, go to the BIOS (the button is indicated in the table provided). BIOS from different manufacturers has some differences, so the location of the settings may differ from those shown.
In the BIOS, go to the “Boot” or “Advanced BIOS Features” section and set the parameter to First Boot Device your device is a USB drive or DVD drive. To save the settings, press F10 and select “Save and Exit”. Thus, installation is performed from Dos via a USB flash drive or via BIOS from a disk.

Reinstallation process
After completing all the settings in the BIOS, you can proceed to installing the OS. If all actions are performed correctly after booting, the system will display the message “Press any key to boot from...”. To continue, press any key and wait for it to load.
In this case, we will look at installing Windows 7; other versions have minor differences, but the principle of operation remains the same:

- in the first Windows installation menu, you must select a language, then click “Next”;
- in the next section, click the “Install” button;
- if the downloaded image includes several OS configurations, for example, “home basic” or “maximum”, then the installer will offer to choose one of the options;
- in the next menu you must confirm your agreement with all items.
Selecting the installation type
- the program has the ability to update Windows, in which all files will be saved in a separate folder. Despite this convenience, it is recommended to select the “Full installation” mode. This option provides installation of the most stable and “clean” operating system;

Formatting a partition
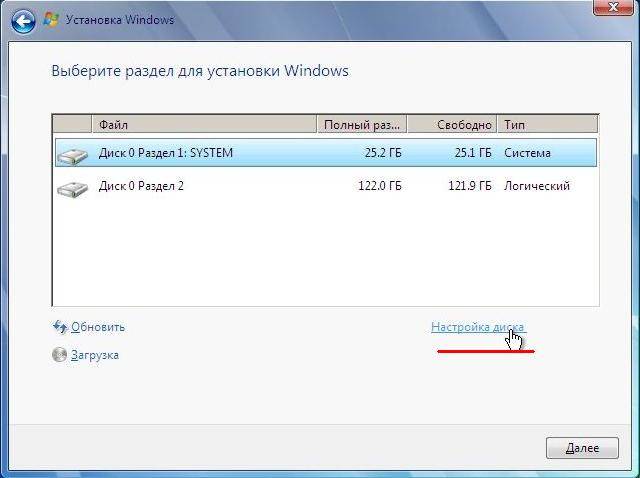
- After selecting the installation, the program will prompt you to select the disk partition in which Windows will be installed. In this menu, you can format or distribute space between your hard drive partitions by opening a set additional options"Disk Settings".
Unfortunately, these operations will delete all information from the disk. This function allows you to create disks of the required size, for example, if your laptop was purchased without an axis, its hard drive is not “broken.” Don't forget to format everything empty disks after performing operations with hard disk partitions. After completing all the steps, select the disk and click “Next”.
- after copying, the system will prompt you to enter the user name, computer name, and password;
- as security settings to ensure computer protection, you should select “Recommended settings”;
- after selection, set the time, date and select “Home Network” in the Internet connection menu.
Attention! When you restart your computer, you should remove the disk or flash drive to avoid reinstalling Windows.
At this stage, the Windows installation can be considered complete. Now you can install drivers, as well as various software and utilities. If you have changed the computer startup settings in the BIOS, we recommend that you set it to start from the hard drive first.
Reinstallation nuances if there is another OS
How to install Windows 7 on a laptop after Windows 8? Reinstalling an OS with Windows 8 does not make any difference if there is another OS from Microsoft on the hard drive. The only recommendation is to install the new operating system on the same partition in which the current OS is located.
Video: Why Windows won't install
How to reinstall Windows 7 with problems? If your Windows does not start, you will need to use another computer to create a disk or flash device. Since the installation is performed without Windows startup, then problems with the previous OS will not interfere with the installation.
This article describes in detail the process of how to reinstall Windows 7 on a laptop without a disk by formatting your hard drive partition. Thanks to detailed description, even users with little experience will understand the principles of installing Windows 7 instead of 8. Reinstalling a new operating system allows you not only to get the desired OS version, but also to get rid of a large amount of software that is reinstalled by the laptop manufacturer.
>Most laptop users are faced with situations where they need to reinstall the operating system, often while keeping the licensed Windows. This publication discusses several methods of how to reinstall Windows 7 on a laptop, and also talks about the nuances of the process of installing the OS on laptops from different manufacturers.
Restoring the system using a Windows 7 backup
Most of the manufacturers mobile computers create backup storage for 7 distributions or any other OS. Reinstalling Windows 7 on a laptop from these memory areas is done using built-in utilities.
To start the reinstallation, reboot your laptop and press:
- for Windows on an HP laptop on F11;
- on ASUS laptop on F9 immediately at the start of loading;
- for Windows 7 on Lenovo laptop to F11;
- On an Acer laptop, the key combination Alt + F10 is suitable;
- for Windows 7 on SAMSUNG laptop to F4.
After pressing the desired key, instead of the standard Windows 7 boot, the OS recovery interface will open:
After downloading the program, follow the instructions to restore Windows.
But remember that all settings will be reset, and data from the previous copy of the system may be deleted.
Reinstalling from disk
When reinstalling from disk, remember that to restore the license you need to use a distribution kit with exactly the same OS as was installed previously. You can find out the version of the installed system on the sticker, which is usually located on back side laptop. By the way, the license key for your copy of Windows is also located there.

Remember that when you reinstall, a new operating system is deployed from the disk, and to avoid problems in the future, you should delete the data from the previous Windows.
This is accomplished by formatting the system partition, so take care in advance to transfer all the necessary data from the selected hard drive volume to install Windows. It is not advisable to transfer installed programs, since this will lose connection with the registry, and many of them may not start. Don't be lazy, install them again after replacing the OS.
Distribution installation disk does not include drivers for all laptops, so download drivers for your device in advance from the manufacturer’s official resource. If this is not done, then after installation there is a high probability of the following problems occurring:
- The network card does not work;
- Wi-Fi does not work;
- Applications do not launch.
If you reinstalled the OS without this, then to troubleshoot network equipment you will have to download the driver distribution kit using another computer and transfer them using removable media, so before reinstalling, do not forget to play it safe and download drivers for network card and Wi-Fi module.
To begin the installation process, insert the disc into the drive and restart your laptop. After your computer starts, open the boot menu and select boot from DVD.

This dialog is called up on most laptops using the F12 key, and on HP devices the combination F9 + Esc is used.
Often on older computers this function is missing, so you will need to open the BIOS and edit the boot priority yourself. To go to the BIOS on laptops, manufacturers use the following keys:
- Acer, Asus, Samsung, Lenovo - F2;
- hp - F10 + Esc .
If the brand of your device is not in this list, then find out the actual key for it on the window that loads when you turn on the PC.
The BIOS interface from different manufacturers is not similar in appearance, but the sequence of actions for changing the boot priority is almost identical. Navigation through the windows of a running BIOS of all versions is carried out using the arrows on the keyboard and the Enter, Esc, +, - keys.
Sequence of actions for BIOS AMI:

Sequence of action for BIOS Phoenix-Award:

Windows installation
After making a change to the BIOS and rebooting, a dialog will appear with the message: “Press any key to boot from CD or DVD.”

Further installation of Windows 7 is not difficult, do the following:
- Press any keyboard key.
- Wait until the file unpacker completes; a screen with the entry “Windows is loading files...” is displayed.

- In the dialogue " Windows installation» Specify the language and click on the Next button.

- In the window that appears, click on the large Install button.

- Select the version of the system to install that has a license code. You will need to enter it after reinstalling Windows 7.

- Agree to the licensing terms.

- Select installation method - " Full installation».

- Select the drive volume on which you are going to install the OS and prepare it by clicking on the item " Disk setup».
 There are situations when a reserved drive partition is present in the list; be sure to select another volume.
  If you have disks with a capacity of more than 250 GB, it is worth splitting them into several. Typically, a separate partition of up to 100 GB in size is allocated for system installation.
- Format the selected drive partition. A warning will appear that all information on it will be deleted. Confirm your consent, because you have previously saved all the necessary data. Wait for the installation to complete and click on Next.

- Wait for the installation process to complete; on average, it lasts from fifteen to twenty-five minutes, the duration depends on the configuration of the laptop.

- Fill in the fields provided with your username and PC name.

- Protect your account with a password, or you can skip this step.

- Enter the key copied from the sticker on your laptop.

- Select your security options.

- Set the date and time.

- If you have a network connection, specify the connection type.

Reinstalled Windows is ready to go. If you changed the boot priorities in the BIOS, return the hard drive to first place in the list, otherwise the computer will constantly try to start from the DVD.
Reinstallation from a flash drive
Many compact PCs, such as netbooks, do not have a DVD drive. Therefore, the question arises of how to properly reinstall Windows 7 on them. The answer is simple - use removable media.
To reinstall from a flash drive, you need to download the Windows 7 distribution image in ISO format and write it to this media using a special utility. Remember, in order to properly reinstall a licensed Windows system, you need to download a container with the same OS version. The flash drive itself must have a capacity of at least four gigabytes.
Burning Windows to media using the most popular utility among analogues Ultra ISO is performed according to the following algorithm:

The installation flash drive is ready, but to start the installation, you need to select " USB-HDD" How to set up the BIOS is described above, all steps are similar, you just need to select another entry from the available list. Further installation is no different from installing Windows 7 from DVD.
Often after reinstalling Windows does not work. To solve this problem, take another OS distribution and repeat the installation process. In addition, many users ignore the need to format the partition and reinstall the seven on a disk that already has an installed copy of the system. Avoid this as it can also cause problems.
Conclusion
This article covered reinstalling Windows 7 in several ways. If there is no backup copy, then this procedure should be carried out from a disk on which exactly the same version of the OS is recorded. Some laptops do not have a CD-ROM, so reinstallation can only be done using external media, for example, a flash drive.
Video on the topic