PC configurator with performance testing. How to choose computer components
So, you have a desire to build a computer that fully satisfies your personal requirements, you have a certain amount of money to buy components, but... it all ends with your desire, you are not sure what and how to do next.
If no questions arise with this, and the components have already been purchased, then you can immediately start reading the article
STEP 1: What kind of computer do you need?
To build a computer from scratch yourself, first you need to decide what the future computer will be used for. Let me make a reservation right away that for ease of understanding, here and further we will use the following concepts:
Office computer– a simple low-power computer, designed primarily for working with office applications, not designed for powerful computer games.
Gaming computer– a powerful computer for processing graphics or running heavy games, for working with heavy programs.
What exactly should your computer be like? Maybe it will be a gaming PC. Or maybe you need a computer for working with office applications, for typing, and you don’t plan to process heavy graphics on it. This stage is one of the most important stages, because It is now that the approximate future configuration is being determined, and most importantly, how much money will have to be spent on assembling your future computer. For example, it makes no sense to spend a lot of money on assembling a top-end monster on which you only plan to work with text, and vice versa, assembling a simple computer for games will most likely greatly disappoint you.
STAGE 2:AMD orINTEL?
So, you have decided what kind of computer you need. Now the time has come to decide on the future platform on which the computer will be built. It will be either Intel or AMD - the final price of the computer depends on the choice of platform, as well as which processor will be used in the future computer.
I won’t dare to say which is better, AMD or Intel; there have been fierce debates on this topic on the Internet for a long time. Each platform has its own advantages and disadvantages, but if we characterize them in general terms, we can say that the AMD platform produces cheaper computers with approximately the same power as the Intel platform. If you want to save money, or are limited on a budget, then I recommend taking a closer look at AMD, as a result you will get a pretty good computer for less money. Intel is better suited for gaming systems, Intel processors generally show better performance in games. If you're not building a computer for gaming, then AMD is probably the best choice.
STEP 3: Where is the most convenient place to select components?
The easiest way to select components for your computer is to use the price lists of stores in your city. I use the websites of large stores, which have information about the availability of components, prices, and reviews.
You can, of course, order everything through online stores, but personally I don’t find this method convenient. Ultimately, it's up to you how and where you buy your components.
STEP 4: Select the central processing unit (CPU)
So, we open the website of a computer store, or look at the price list and look for a processor for our future computer. You should not buy the cheapest processor if you plan to build a powerful computer. We pay attention to the processor clock speed, number of cores, cache levels. You can look for reviews about any processor that interests you.
More processors in the store are marked as OEM or BOX/cooler, be sure to pay attention to this! OEM processors do not come with a CPU cooler, while BOX versions come with a simple cooler. For gaming systems, this is not the best option, since the standard cooler often does not cope with the task, so it is best to look for the OEM version, and then separately purchase a good processor cooler for it. The BOX version is also suitable for an office or work computer. Remember that you will pay more money for the BOX version of the processor, because... the overpayment is for the cooler included.
In general, choosing a processor is a very important undertaking, and this is a rather large separate topic, which I will cover in future articles.
Once you have decided on the processor, remember its name socket, as well as its thermal package (in watts) is very important information; it will be useful to you in the future when choosing a motherboard and cooling for the CPU.
STEP 5: Selecting the motherboard

The choice of motherboard is carried out taking into account which processor you selected in the previous step. Namely, what socket your processor runs on. Simply put, you can now select only those motherboards that have the exact same socket as the processor you choose. If the sockets of the processor and motherboard are different, you will not be able to install the processor on the motherboard.
When choosing a motherboard, focus on the following characteristics:
- board form factor (ATX, microATX);
- RAM type (DDRx, where x is DDR version) and maximum supported frequency;
- number of SATA ports and their speed;
- version of USB interfaces;
The first two characteristics are very important - they determine what kind of case for the system unit you will need, and what kind of RAM you can install, so remember them.
Another important point is the presence of an integrated graphics processor. For example, if you have it, you can save on buying a video card if you are assembling a regular office computer.
Advice:On the motherboard manufacturer's website you can find a list of supported, tested compatible processors and RAM models.
STEP 6: Select RAM
 Selecting RAM is not that difficult. The main thing to remember is that it must be exactly the same type that the motherboard you choose supports. For example, it will not be possible to install DDR2 memory into a motherboard slot designed for DDR3 memory.
Ideally, you should choose memory with the maximum frequency supported by the motherboard. Supported memory frequencies must be found in the motherboard description.
Now about the main thing - the amount of memory. For a simple office computer, which will not have any special performance requirements, the simplest memory with a minimum volume of 1-4 gigabytes is sufficient. Your gaming computer should have 8 GB of memory or higher.
Advice: If you are going to install more than one stick of RAM, then I strongly recommend buying memory in sets. The set usually comes with 2 or 4 strips. This will allow you to avoid many troubles associated with computer operation in the future.
STEP 7: selecting cooling for the CPU
 Cooling for the central processor can be with a universal mount, or maybe with a specialized one for a specific socket. When choosing cooling, look at the supported sockets (the socket of the processor you choose should be there), as well as the power dissipation in watts - it should be equal to or higher than the thermal package (TDP) of the processor. If the CPU heatsink is weak, it may cause it to overheat.
For gaming systems with a powerful processor, it makes sense to buy good cooling, the power dissipation of which significantly exceeds the TDP of the processor.
Also pay attention to the height of the cooler if you want to install a tower-type cooler. If it is too high, this will need to be taken into account when choosing a computer case.
STEP 8: Graphics Card
 If you are assembling a gaming computer, then this is as important a step for you as choosing a processor. If this is a simple office computer for which graphics performance is not important, then you can do without purchasing a video card at all. Many motherboards have an integrated graphics processor, and the monitor can be connected directly to the motherboard. If the board does not have a monitor output, then you can either look for a motherboard with integrated graphics, or buy a simple video card.
The situation is completely different if you are building a powerful computer for graphics processing or gaming - you simply cannot do without buying a good gaming video card.
First you need to decide on the base manufacturer of the video card. There are two of them - NVidia and AMD. AMD is as always - cheap and cheerful, for less money you get approximately the same (and sometimes higher) performance as a similar NVidia video card. However, AMD lacks technologies such as PhysX, CUDA, and other interesting things that only NVidia video cards have.
I consider it pointless to argue about which video card manufacturer is better; you yourself can search the Internet for reviews about certain video cards and make your own difficult choice.
When choosing a video card, do not only go for video cards with a large amount of memory. Pay attention to the memory bus bandwidth, this is a fairly important parameter - the higher it is, the better.
Once you have made your choice, remember the length of the video card; this may come in handy later when we select the system unit case. Otherwise, it may happen that the video card you choose simply will not fit into the case.
STEP 9: Hard Drives
 The main parameters of a hard drive are speed and capacity. The loading speed of the operating system and all other programs depends on the reading speed. In the vast majority of computers, the biggest bottleneck affecting boot speed is the hard drive. Therefore, if the speed of loading the system and programs is critical for you, take a closer look at solid state drives - SSD drives. Unlike classic hard drives, they have no mechanical elements - these drives are like a large ultra-high-speed “flash drive” with a SATA interface.
Due to the high cost of SSD drives, they often resort to using at least two drives simultaneously - an SSD and a classic HDD. You can install the operating system and programs on the SSD, and use the HDD to store your files.
Personally, I recommend using an SSD on any computer if your budget allows. As practice shows, even old laptops from 5-7 years ago with an SSD installed instead of an HDD seem to gain a second life and work much faster, not to mention new computers. The SSD has virtually no effect on performance in games, but it has a fantastic effect on the response speed of the system and all programs. J For example, on a fairly powerful computer with an SSD installed, the Windows 7 operating system, including a bunch of startup programs and plus Kaspersky antivirus, is completely loaded in 7-9 seconds!
But SSDs also have one drawback: once you get used to the speed of work on an SSD, you will no longer be able to calmly work on any other computer with a regular HDD; it will seem too slow to you. J
STAGE10: CD/DVD-ROM

Everything is simple here - if you plan to use laser discs (CD, DVD, Blu-ray, etc.), then you definitely need a disk drive. Personally, I haven’t used it for a long time, since you can install the operating system from a flash drive, and all the necessary drivers are on the Internet.
In general, of course, it is better to install a CD-ROM, especially if you have no experience in assembling and configuring computers. The discs that come with the components will help you out a lot at first.
When choosing a CD-rom, you should pay attention to the supported disc formats.
STEP 11: select the system case
 It’s quite easy to choose a case - choose the one you like best. The main thing is to consider which components you chose in the previous stages. Pay special attention to what size motherboard you have. For example, if it is ATX size, then the case must support installing an ATX board. Additionally, do not forget that if you choose a tower cooler for the processor, it may not fit in a small case - carefully look at its dimensions. Also pay attention to the dimensions of the video card so that it can be installed in the case without any problems.
Cases come with or without a pre-installed power supply. If for an office computer the option with a pre-installed unit is still suitable, then for a gaming computer be sure to choose a case without a power supply, it can then be calculated and purchased separately.
STEP 12: calculating the power supply

The power supply is one of the most important parts of the computer; it determines how all other components of the system will work, how protected they will be from voltage surges and other misfortunes of electrical networks. What you definitely shouldn’t do is try to save money on a cheap power supply, no matter what kind of computer you build.
Pay attention to power supplies with energy efficiency labels 80plus, they come in five types: bronze, silver, gold, platinum and titanium. If the block is at least marked with the 80plus label, then this is already good.
Those labeled titanium are, accordingly, generally the best power supplies; they provide up to 95% efficiency. And this, in turn, speaks about the quality of manufacturing of the power supply - such a unit consumes less energy than other similar units with lower efficiency.
Look at what connectors the power supply has, they should be enough to connect all devices. Be sure to pay attention to the power supply diagram of the motherboard and processor! If the motherboard, for example, has a 24 pin power supply, then the unit must have a 24 pin power output (or 20+4 pin, this is the same). The same goes for processor power. Also pay attention to whether there is an additional power connector on the video card and whether there are the necessary connectors on the power supply.
The power supply must provide power higher than that consumed by all the computer hardware at peak load. Otherwise, at best, the computer will simply turn off. In the worst case, it’s better for you not to know what will happen, just take my word for it.
STAGE 13: additional and very necessary little things + peripherals
You may also need:
- fans for air ventilation inside the case;
- thermal paste
- cables, cables, adapters;
- periphery
Fans must be purchased if the case you choose does not have them. Choose the largest fans that your chassis can support. The larger the fan, the more air it will be able to move, while making less noise than its smaller counterparts.
Thermal paste will be needed to install the cooler on the processor. Typically, a boxed processor comes with thermal paste, but as practice shows, it is better to buy high-quality thermal paste and use it.
You will also need SATA cables to connect hard drives and CD-ROMs. Motherboards often come with several SATA cables, so keep this in mind.
I did not move the periphery into a separate stage. The choice of periphery is a purely individual matter. You can choose a keyboard, mouse and monitor without my help
STEP 14: Check
The final stage of choosing components is a mental check to see if you have chosen everything you need correctly? Check again all components in size so that they can be installed in the case without problems, check that there are enough slots on the motherboard for all components, whether you have enough wires on the power supply and whether there are all additional wires for connecting disks and CDs. ROM, for example, SATA cables. Despite its apparent simplicity, do not ignore this stage. It’s better to check everything again now than to later try to exchange the wrong part you bought for the one you actually need.
If someone doesn’t understand something, welcome to the comments.
Hi all! The other day, one of my clients asked me to help with choosing a ready-made system unit in a digital supermarket. No matter how I tried to dissuade him, explaining that assembled computers are almost always chosen incorrectly, and the prices for such products are greatly inflated, he remained his ground, and only after I calculated in detail the cost of the system unit, as if we were assembling it ourselves, and compared the resulting price with the price tag of an already assembled PC, my client agreed with me.
Friends, the whole point is that I know this “cuisine” from the inside. Almost always, a finished system unit is assembled from horribly matched components that could not be sold at retail, for example, along with a low-performance processor, a powerful video card can be installed in such a computer (it is because of this that the PC will be called a gaming one), but this video card will never perform at full capacity due to a defective processor. As for the quality of components, the story is similar. In particular, you will not be able to determine the manufacturer of the RAM and video card, and the processor cooling system will be factory-made and very noisy, the SSD solid-state drive will be from an unknown Chinese “Fast Disk”, and the power supply will have no name at all; you will not find it on a small microATX motherboard the PCI connector you need, and on the front panel of the ugly case of USB 3.0 ports, instead of two case fans you get one and you can hear it humming a mile away. And most importantly, the price of this monster will be around 50 thousand rubles! You will be surprised, but if you assemble the system unit yourself, it will cost 10 thousand rubles less and the quality is undoubtedly better. Yes, I agree that in some cases you can find a decent ready-made computer with normal components, but its price will always be more expensive than if you assembled it yourself.
Selection of computer components
First, let's decide on the assembly sequence. In most cases, the components of a future computer need to be selected in this order: Processor->Motherboard->Video card->Power supply->Cooler->RAM->Storage devices->Case. A lot of links can be included in this chain (external devices, additional PCI cards, additional coolers, and so on)
CPU
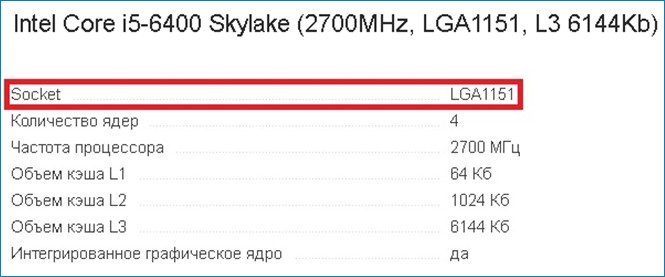
Let's get started! The very first one in line is . We start with the computer heart because components such as a video card, motherboard and cooler are selected for it, and not vice versa, but first things first. The modern computer market is teeming with a huge variety of processors from which you will have to choose. Personally, I chose the i5 6400 because it is powerful and inexpensive (11 thousand rubles), moreover, it is very easy to overclock (overclock) and operates at frequencies above 4.3 GHz.
So, after you have settled on a certain model, you basically need two things: remember the socket of this processor (a socket is a connector where the processor is inserted) and decide whether the processor will be overclocked ( ).
If you decide that you will overclock, then you will need a specific motherboard with a z170, z270 chipset (a chipset is a set of chips that coordinates the joint operation of all components).
Motherboard
We need to know the socket type of the processor for . Now we have smoothly arrived at the second step. In general, the motherboard offers the buyer the largest and most diverse set of functions and characteristics relative to other components. Everyone decides for himself how many slots for RAM he needs, the number and variety of ports on the panel, SATA connectors, etc., etc. That is why you should approach its choice very carefully and prudently. I decided that I would drive the percentage. Accordingly, I need a motherboard on a z170 chipset (or z270) and with 1151 sockets. I set my sights on Asrock z170m pro 4s (price 7 thousand rubles).

If you don’t plan to overclock, then take any motherboard you like with the functionality and socket that suits you. Also, don’t forget to look in the “supported processors” column, in my case the i5 processor is on this list, everything is fine. Next, if you plan to install two or more video cards, make sure that the motherboard supports SLI/CrossFire mode and It had the required number of PCI-Express x16 slots.

The next thing you need to pay attention to is the type of RAM supported (DDR 2, 3, 4), the number of RAM slots and its maximum possible volume. This information will be useful to us directly when choosing the memory itself.

Now look at the parameters “Main power connector” and “Power connector for the processor”.
The main connectors are of two types: 20 pin and 24 pin. The processor power connector is 4pin, but 8pin is better.

Another characteristic we need is the form factor of the motherboard. There are four main types in total (not taking into account various modifications): mini-ITX, microATX, ATX, XL-ATX. Their main difference is their sizes. When selecting a case, for the most part we will be based on this parameter.

In my case, a MicroATX motherboard, when choosing it, I was guided by the fact that they are usually cheaper and it had everything I needed, why overpay for additional slots and connectors that I will never use (for example, I don’t need PCI slots).
Video card
Now let's move on to dessert - the video card!
When selecting components, let me again remind you that it is when matching each other, and not choosing, that the main parameters are the dimensions of the card, the recommended power of the power supply and additional power connectors. We will need to know the dimensions later when selecting a case, and the rest of the information will be needed when selecting a power supply unit, which is next in our line. By the way, the video card should be selected, as I wrote above, for the processor, because it is the processor that reveals the full potential of the video card, and not vice versa.
In my case, the GeForce GTX 1060 3GB is ideal for the i5 6400.


power unit
So, . The main criteria for selection are power, types and number of power connectors. The recommended power of the power supply is indicated in the specifications for any video card on the manufacturer’s website, plus, if you are going to overclock the equipment, you need to buy an even more powerful unit. And there should always be a small reserve, because later it is possible to upgrade the system or purchase additional devices that also require energy, albeit small.
As for the connectors, everything is simple. Let's look at the motherboard specifications, which we talked about just above. Main power connector and power supply for the processor. We select a block in accordance with these criteria. In general, the most universal power supply, regarding the type of connectors, is considered to be a unit with 24pin main power and 8pin processor power.
Also, do not forget about additional power supply to the video card, it can be 4, 6, 8, 12pin. Not all cards need it, but there are more and more of them now. Again, look above, in the specifications for the video card, everything is written there. Based on all these parameters, I chose a modest Aerocool KCAS 600W.


CPU cooler
Now we have reached. Here, we look at the socket that must match the motherboard socket, compatibility, dimensions, and connector type.

In my case, the DEEPCOOL GAMMAXX 400 tower cooler has socket 1151 and is compatible with an i5 processor.
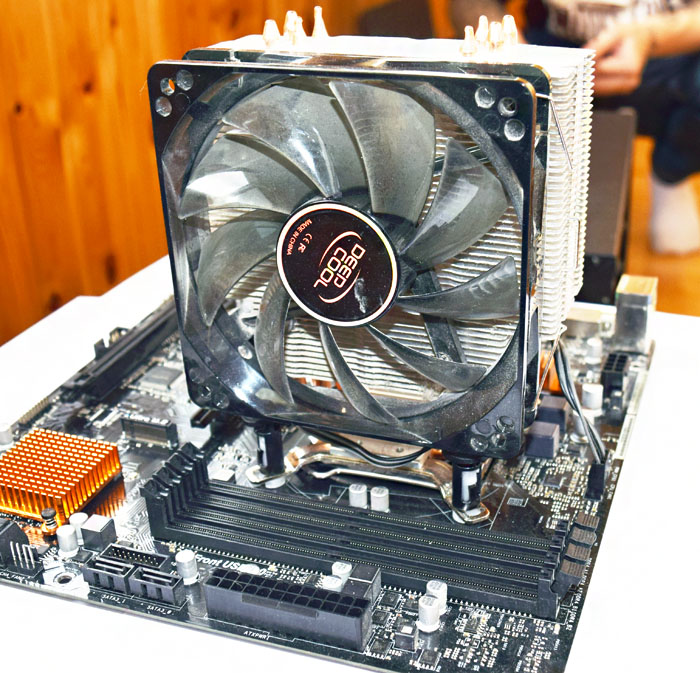
Of course, there are universal coolers that fit any socket, but still don’t forget to look at this parameter when choosing. Next are the sizes. We are mostly interested in the height, because if the cooler is too high, there is a chance that the side wall of the case will not be able to close, be careful. In general, there are two types of coolers - tower and box. Tower coolers have a better cooling system and are installed mainly on overclocked hardware. The vast majority of boxed ones are installed either on office or weak gaming computers. So, if you choose a box cooler, then you don’t have to worry about the size, but if you choose a tower cooler, then be sure to pay attention to its dimensions. And lastly, this is the type of connector (CPU FAN), with the help of which the cooler receives the necessary energy from the power supply through the motherboard. They come in 3pin and 4pin. Now many will say that you can put a 3pin connector into a 4pin connector, and with the right skill and desire, vice versa. But I advise you to take a cooler with a connector in accordance with the connector on the motherboard.

RAM
That's it with the coolers, let's move on to the RAM. It must be selected based on parameters such as: memory type, speed indicators and frequency. Everything is simple with the type and frequency of memory. Motherboard specifications always indicate these two characteristics, which we have already highlighted above.
Based on this, I selected two AMD Radeon R7 Performance Series sticks of 8GB each.

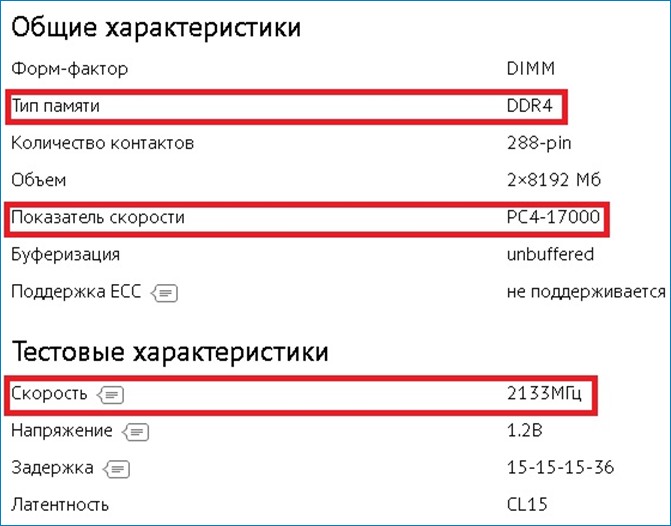
Now about the speed indicator. Let's return to the processor for a moment. The specifications for it always indicate its throughput.
Ideally, the total speed of RAM should be equal to the maximum possible throughput of the processor. In my case, the memory speed is 17000 MB/s.
Since I have two sticks, we multiply 17,000 by 2 and we get 34,000 MB/s.
I hope I didn't explain it too complicated and you understood me. If something is not clear, I will be glad to answer you in the comments. Also, do not forget about the maximum possible amount of memory supported by the motherboard. Although in current realities, few people may need more than 64GB of memory. Oh, I almost forgot about the two-channel mode. If, for example, you need 8GB of RAM, take two sticks of 4GB each. In dual-channel mode, the speed of processing and transmitting information is faster.


Well, I think everything is clear here, nothing needs to be explained. This concludes our selection. Finally, I want to say that selecting components is a very painstaking and tedious task, but in my opinion it is worth it. Be careful, do not rush, and you will be happy in the form of saved finances and a powerful computer.
For those who decide to build their own computer from scratch, rather than buy a ready-made system unit, it will be useful to know how to correctly assemble individual elements into a single workable whole. I present to your attention a guide on how to assemble a computer.
What to buy
The first step is to buy the minimum required kit to start the computer
- frame
- source
- motherboard
- CPU cooling system
- RAM
- Video card (discrete is not always required)
- HDD
It is necessary to understand that all purchased items must be compatible.
When purchasing a motherboard and a processor, the socket (in other words, the platform where the processor is inserted) on the board and the CPU must be the same. This parameter is always indicated in the technical specifications, for example, Intel Core i3-4130 has an LGA1150 socket, we can easily install it on the ASRock H81M board. It is also necessary to take into account the connector for RAM; at the time the article was published, the most common is DDR3, therefore, you need to buy DDR3 memory.
We start with the case, which will be the “home” for all other components. After unpacking, unscrew the side panel.
We see ready-made holes for mounting the system board. All you need to do is “try on” the board to the holes and secure it. There are a lot of holes, since some cases are designed for motherboards of different sizes (form factors).


However, before attaching the motherboard, you need to install some elements on it.
Installing an Intel Processor and Cooling System
Open the processor socket using the latch shown in the figure. The thing is quite delicate, you don’t need to make a lot of effort.

After opening the slot, pay attention to the processor. In the case of Intel, there is a special edge and a guide on the motherboard that will prevent you from inserting the processor incorrectly. Which makes our life much easier; those who are familiar with electronics know how to tinker with microcircuits in order to solder them correctly to the board. As a rule, there are no guides on the board, only a dot in the corner of the chip indicating the first leg.


After installing the processor, we complete the procedure by protecting the socket: we close it in the same way as we opened it before.

The next important step is connecting the cooling system.
A cooler is often included with the purchased processor; if it is not there, the processor manufacturer has a list of recommended ones for connection.
You definitely need to remember about thermal paste. Some radiators already have thermal paste applied; if it is not there, you need to apply it.
Please note that the cooling system is secured using four latches. They should fit perfectly into the holes on the board, in the corners next to the socket. 

Actually, we install it in the holes, and begin to press without much effort until you hear four clicks. 


All we have to do is connect the fan to the power system; on the board the connector is designated CPUF AN, so we connect it to it) 

If you bought cooling separately, you decided that the standard one is not enough for you. Then you will definitely need to apply thermal paste. Simply apply a small amount to the center of the processor and spread it over the entire surface using an old credit card or discarded plastic card to precisely fit the surface of the processor and cooler

Note: When buying a cooling system, do not forget to peel off the film

System Installation with CPU and Heat Sink - AMD
Consider that in the case of an AMD CPU, installing a cooling system 
First, unlock the socket by pulling the metal handle directly adjacent to the edge

The legs of AMD processors are positioned so that they can be inserted into the slot in only one way: as in the case of Intel, it is impossible to install the processor differently than the manufacturer intended. Inserted and secured. 
Then apply thermal paste... 
Combining the processor plane and the base cooling system

The mounting methods for coolers are different, and they are all indicated in the manual; there should be no difficulties. In our case, next to the socket we have a plastic base with protrusions. The metal mount comes complete with cooling. 

Installing memory (RAM)
The last element we can install in this phase is the RAM.
To do this, you need to find the RAM slots located next to the processor socket.

Before installing memory, you should check your motherboard's manual to find out which slots to install in first (if the number of modules is less than four). In our case, these are blue slots. Opening the latches

Inserting modules properly


After installation in the memory slot, return the plastic latches to their original position

At this stage, you should receive a motherboard with a processor, cooling and memory modules. Let's put everything aside for a while and move on to the case and power supply.
Installing the power supply
The power supply is installed at the bottom of the case. 
Secure it with the fan DOWN.

This position provides it with ideal operating conditions: the device constantly has access to cold air from under the body and at the same time excludes the entry of warm air, which is thrown out of it onto other elements, and nothing is heated additionally.
On the rear panel of the case, secure the power adapter by screwing four bolts.

If the power supply does not have removable wires, then we simply pass all the wires through rubber bushings to the rear panel of the case.
If it is modular (removable cables), then you first need to connect the necessary cables, including PCI Express power (for the video card) and SATA (for storage media). 


Only now we pass the entire bundle of wires from the power supply through rubber hoses behind the tray with the motherboard.
Installing the motherboard into the case
We insert the board into the case; there should be a specially allocated place in the case for it. 
We do not install any gaskets or pads, we only use the set included in the kit (bolts plus stands) 
Then you need to connect the external USB ports located on the front panel, as well as the Power and Reset buttons, two indicators indicating the activity of storage media and power.
First we look for a connector labeled as USB, then we connect the plug

And then find the pins (JFP1) associated with the buttons and LEDs, connect them to the connector, according to the markings nearby. 


Installation media (HDD/SSD)
Speaking about mounting hard drives, again, everything is individual. In our case, we have a rack with plastic slides. We attach the hard drive to these slides and insert it into the rack. 


The next necessary step is to connect the media/media to the motherboard using SATA signal cables, as well as supplying power to them.

To do this, find small connectors on the board labeled SATA. In the instructions for the board, we check which of them are the fastest (SATA 3 - 6 Gb/s), and it is to them that we connect the disk on which we will install the system, especially if the system is installed on an SSD. Other media will be fully satisfactory and have a slower speed (SATA 2 - 3 Gbit/s). 

First of all, connect the power cable, and then the signal cable
Installing a video card
The video card is the last item (within the basic configuration) that needs to be installed. 
Look for the first free PCI Express x 16 port (blue, closer to the processor cooling system in the photo below). First, let's look at the traffic jams. 99% of currently available graphics cards require the space occupied by two dies on the back 

As with memory module slots, the PCI Express slot has small protrusions that will prevent you from misplacing a video card. You simply have no choice, you will do everything right. 

Then we attach the video card. 

Connecting power to the motherboard
The motherboard is powered through two wires. One of them is a 24-pin connector, shown in the picture below. Located on the right side of the board, next to the RAM. 
The second cable is for powering the heart of the computer – the processor. insert it into the slot located in the upper left corner.

All that remains is to “feed” our video card. The most energy-intensive (but powerful) models require two plugs, as can be seen in the photo.


Before closing the case, you need to check the operation of the power button, reset button and LED information (the part that tells you that your computer is on, and others that indicate HDD / SSD activity).
Results
The idea that there is something extremely complex in the assembly is wrong. It really takes a lot of effort to ruin something. Equipment manufacturers take care of user convenience by introducing physical restrictions: the processor can only be inserted into the socket in one position, and it is impossible to connect the power connector to the wrong side or to the wrong connector. The worst thing that can happen is that you might forget about one of the cables. But don't worry about this: the computer won't do anything, it just won't start until the wires are connected correctly. Good luck!
Key unit of system performance. The choice of model determines the speed of calculations, performance, choice of tasks, and more. At your choice, both inexpensive, productive 2-4 core solutions for the home, and the most powerful 6-12 core processors for rendering and modeling
The motherboard is the base of any computer and the basis for other components. This is what the system is built on. A multilayer printed circuit board with an abundance of connectors and expansion slots integrates components such as a processor, video card, RAM and disks.
An inexpensive, but very important element of a PC, on which the stability of the processor, which is prone to overheating under intense loads, depends. Regular CPU cooling will protect you from artifacts and computer breakdowns. Key characteristics of the cooler - noise level, rotation speed and bearing type
The graphics core is a key node for processing data related to the rendering of 3D objects. This is an indispensable component of any gaming computer or graphics station. Powerful video cards are demanding on the quality of the power supply, as they can consume up to 300W of energy.
A mechanical drive that is a permanent storage of all information on a computer. Its characteristics are determined by the spindle speed (5400/7200rpm) and capacity. The latter figure can range from 500 GB to 10 TB. You yourself determine the tasks assigned to the HDD.
SSD
Solid State Drives (SSDs) are devices for storing data with incredible speeds for reading and writing information, which are significantly faster than a conventional HDD. They are also distinguished by their quietness and the absence of mechanical components that can fail.

A metal case in which all the elements of the system unit are collected. The choice of model will determine the compactness of the PC, the quality of cooling, the amount of space for installing components and the free space for further upgrades. Some cases come with pre-installed power supplies.
The most important element of a computer, powering all key components of the computer (processor, video card, disks, cooling systems). High-quality power supplies additionally protect the PC from short circuits, power surges and static.
Software and operating system are key components of the system that connect all the components of the PC together, making them work correctly. Install only licensed software to protect yourself in the future by receiving official support from the manufacturer.
Additional options
PCI/PCI-E controllers LPT, COM, 1394 FireWire, SATA, USB 3.0. Devices for connecting any memory cards. Bluetooth adapters. Fan rotation controls, classic and with touch control. Additional USB controllers on the front panel 3.5”; 5.25“
A sound card is a great alternative to the analogue built into the motherboard. The discrete board will fully reveal the potential of speaker systems, add modern interfaces for connecting speakers and allow you to get the effect of complete immersion in a movie or game.
Modding
Services
Setting the backlight of all components in the system unit. Fans, case, tape, motherboard - everything will shine in one color. Configuration is carried out only if you have a licensed Microsoft Windows OS
Periphery equipment
The monitor is your window to the world of information. TN, PLS, IPS matrices with LED backlighting, a delay of 1 ms and the ability to display images on a screen with a diagonal of 22, 24, 27, 30 or more inches. Want to get more experience from your favorite game? Take a closer look at gaming models with refresh rates of 120, 144 and even 240 Hz.
An input device and a faithful companion in most modern games. We offer office models with minimal functionality, multimedia models with additional keys, and gaming options. Mechanical or membrane switches, with or without backlight. Find an option you like.
An optical or laser mouse is an indispensable PC component with which you will open folders, move documents, surf the Internet, and interact with programs and games. Wired or wireless models. Strict office ones, or gaming ones with additional keys. Choose a model to suit your palm.
The speaker system is a sound signal output device and an excellent companion when watching multimedia content, as well as playing your favorite 3D games. Organize a home theater by connecting a speaker system to a sound card and enjoy movies and music. Gain an advantage in games by hearing your opponent's footsteps from afar.
A convenient tool for communicating on the Internet and silently listening to music. An indispensable attribute for video calls, conferences, group voice chats. Headphones will allow you to watch movies or enjoy your favorite performers in crowded places, without distracting others from their daily activities.
Power protection is extremely important in areas with regular power outages. An uninterruptible power supply will allow the PC to operate stably without unexpected shutdowns. A characteristic sound signal will make it clear that it is time to end the session and save changes to the documentation so that the work is not in vain.
For those who decide to assemble a computer in the IRON.NET online store, there is a permanent offer - computer assembly for free!
The client receives a system unit fully prepared for further work, assembled from the components that you previously selected in our online PC configurator. If you additionally ordered a software package or operating system, they will also be installed and debugged. Each offered computer is thoroughly tested for performance under maximum load. If the customer wishes, we update the BIOS, change the standard thermal interface to a better one, check stability under overclocking and more. ATTENTION! We assemble computers only from our components. Assembly from your components is NOT carried out
Build the optimal PC build using the online configurator
An undeniable advantage of our PC configurator is the ability to select not only the main hardware components, but also peripheral devices. The online store "ZHELEZA.NET" presents both new and current models of monitors, speaker systems, keyboards and mice. Use your imagination by purchasing elements of your future computer in the same style. Our team of specialists will not allow you to get confused in the variety of products. Assembling a computer with compatibility testing will not be particularly difficult for the company’s specialists.
Select components? What could be simpler
The range of components offered on the market is growing and expanding every month. On the one hand, deciding on the choice of hardware becomes problematic. On the other hand, you have an excellent opportunity to find exactly the component that best suits the tasks assigned to the future system. Assembling a computer using an online PC configurator is the easiest and most affordable way to generate an individual model that fully meets specific requirements. Our service will allow you to find the optimal hardware without overpaying for unnecessary functionality and unclaimed options. At the same time, he will tell you how to avoid unnecessary expenses when choosing a motherboard or video card for a specific processor. If you want to purchase a gaming computer in a top-end configuration without overpaying, try replacing some components (GPU model, cooling system, case, disks) to avoid brand markup. Today there are no bad manufacturers, but there are extremely undervalued ones.
Discover the makings of a system administrator in yourself
Assembling a PC yourself will teach you to understand the components and their characteristics, which will greatly facilitate the task of subsequent upgrades. You will be able to filter out components that do not match your socket and chipset, find current product models, and build a springboard for further PC upgrades. Our compatibility-checked PC configurator will automatically remove unsuitable parts if you want to build a computer from scratch, but do not have enough experience for this purpose. Remember that each system requires a special approach: Home (multimedia) - a good video card, a large amount of memory, high-quality acoustic components; Office – fast processor for quick data processing, capacious HDD; Gaming – a powerful graphics subsystem, an overclockable CPU (and a corresponding motherboard for it), a large amount of RAM, a fast SSD. Workstation for graphics processing - everything is identical to a gaming PC, but with an even larger amount of RAM and impressive data storage (Raid array of several HDDs).
Advantages of the online configurator of the online store "ZHELEZA.NET"
Using the configurator on our website, you can assemble a PC for any need. The cost of the system unit is displayed automatically, and therefore you can always choose a cheaper or more expensive alternative, depending on the previously set budget. It is not necessary to add all the items presented in the categories to your cart. You may already have a HDD, motherboard or GPU. All that remains is to select the missing spare parts, focusing on those already available, and assemble a system that is optimal in all respects. Do you want to save your configuration? Nothing could be simpler. You will return to it as soon as you have time to finish or rework the assembly.
Expert help at the click of a finger
Having difficulties during the virtual assembly stage, or don’t know which processor is suitable for your tasks? Contact the team of specialists at the online store “IRON.NET” in any convenient way: mail, telephone, instant messengers, social networks. Ask a question and receive a comprehensive answer. By assembling a system using the PC configurator, you do not overpay additionally for assembling, diagnosing, configuring and testing your computer - we provide all these services free of charge. You always know what you spent your money on. Place your order now and become the owner of a brand new system unit, or maybe a fully assembled computer. We will always be happy to help.
- 1. System unit - how to choose components?
- 2. Installation of the processor, RAM and cooling system.
- 3. Applying thermal paste to the processor
- 4. Installing the motherboard into the case
- 5. Connecting the case controls to the motherboard
- 6. Installing the power supply
- 7. Installation of drives
- 8. Installing a video card
- 9. Laying cables and completing work
Each of us has at least once encountered a situation where, having trusted a sales consultant, we chose a ready-made personal computer, and after a few months we realized that for the same money we could have purchased a much more productive option. To ensure that a similar story does not happen to any of our readers in the future, we have prepared instructions on how to assemble a computer yourself.
This process actually turns out to be much simpler than many non-technical users assume, but it still has a number of nuances, which we want to dwell on in detail in our material. We’ll start with a brief reminder of what a computer consists of and how not to make a mistake in choosing components.
System unit - how to choose components?

When a buyer walks into a computer hardware store and sees the breadth of choice of motherboards, processors, video cards and other components, it seems to him that in order to connect all these devices together he needs to have at least a doctorate in technical sciences. But not everything is so bad, computer hardware manufacturers took care of us and many years ago adopted a single standard - Advanced Technology Extended, which unifies all the computer hardware.
Selecting components is the most difficult task when assembling a PC, much more labor-intensive than connecting them together, but this material is dedicated to the latter task, and you can find a comparison of the characteristics of video cards and processors in our other publications.

The basis of our entire future system is the motherboard, as its name suggests. It has virtually no effect on performance, but is responsible for the proper operation of all components of our computer.
The entire process of assembling a PC essentially consists of connecting components using connectors and wires to the board, and therefore you should first evaluate what kind of computer you would like to have as an output and, based on this, choose a motherboard with a certain number of RAM cells suitable for desired processor socket and so on. Another important characteristic of the motherboard is the form factor - the size of the case you will need depends on it, so be careful and when purchasing a large E-ATX board, do not expect to fit it into a compact case.
Installation of the processor, RAM and cooling system.
To build a computer at home, we suggest starting with an “open bench” rather than immediately installing your components into the case without knowing whether the system works or not. The process is as follows: we connect all our parts to the motherboard, update the board firmware, install the operating system and test the resulting assembly for errors and conflicts. If they are not identified, then we are happy to install it all in the case.
Let's start the process by installing the heart of our future PC - the processor. We must remember that the two market leaders in processor production - AMD and Intel - fundamentally use different socket designs; the former have the contact pins on the processor, while the latter prefer to place them in the socket.

To install an AMD processor, you need to lift the metal lever, insert the legs into the holes provided for them, and then return the lever to its original position. Thus, we will close the processor contacts with the socket contacts and securely fix this position.

When installing Intel, you should lift the lever and the clamping cover, and after installing the processor, do these steps in reverse order. Both types of processors should be installed in a strictly defined position, which is indicated by arrows on the processor itself and the motherboard socket.

As for cooling the processor, you need to remember that they are all installed differently and the only reasonable action would be to strictly follow the instructions. For example, AMD has a passion for fasteners using plastic lugs, while Intel, in principle, does not use such a design solution. In general, most processor coolers are quite universal, and therefore can work with chipsets from both companies, but be careful when choosing - there are also models that are loyal to only one brand.

Do not forget that many coolers can be installed in two positions, which determines which wall the heated air will exit through - the back or the top. Therefore, before installation, weigh the potency of both options and your body and choose the most productive one.

After we have secured the radiator and installed the fan on it, all that remains is to connect the power connector to the corresponding connector on the board, called CPU_FAN. More expensive motherboards can provide two similar connectors designed for two coolers at once.
So, to complete the initial work, all we have to do is install the RAM modules into the DIMM slots. Each stick has a security key that prevents you from inserting it the wrong way around; also, you will not be able to insert memory of one type, for example DDR3, into a slot on the motherboard that is not intended for it. Thus, installing RAM is the simplest process in the algorithm for assembling a personal computer.

Most processors have a dual-channel set of RAM, and therefore it is recommended to insert an even number of sticks. It must be remembered that a fairly large processor cooler may block the RAM slots on some motherboards, and therefore it is worth thoroughly studying their compatibility before purchasing.
Applying thermal paste to the processor
Many beginners make a common mistake and think that assembly consists solely of assembling parts a la a construction set. No less important for the performance of the processor than itself and the cooling system is thermal paste, which helps their tandem demonstrate maximum performance. As a rule, a small layer is already applied to the fan base, so this is not necessary during first assembly.

However, if it is missing, simply add a couple of drops of the composition and spread them in an even layer over the area of the heat distribution cover of the CPU. On the contrary, excess will reduce the thermal conductivity between the processor and the cooler, which will negatively affect the performance of the computer. If you decide to assemble a computer with your own hands, then at least do not harm it.
Installing the motherboard into the case
The main line when choosing a case for you should be the one that is responsible for the supported form factors of the motherboards. The following are the maximum possible sizes of installed components - believe me, when the time comes for wiring, you will thank yourself for choosing the most comfortable case in which you can install all the desired hardware without unnecessary manipulations.

To install the motherboard, you first need to tighten the external and internal threaded mounting nuts. As a rule, all the bolts and nuts come with the housing, they are standardized, so it is unlikely that you will need to look for something unique to install your assembly. Having secured the plugs and tightened the nuts, you can move on.
Connecting Case Controls to the Motherboard
The panel of a standard case is usually equipped with on/off buttons, as well as USB ports and a headphone jack. As a rule, these interfaces are located at the bottom of the motherboard, and therefore we find them and connect them to the case.

The set of wires is very standard:
- PWR_SW is responsible for the on/off button;
- RESET_SW activates the reset key;
- HDD_LED (“plus” and “minus”) activates the drive activity indicator;
- PWR_LED (“plus” and “minus”) is responsible for the operation of the computer status indicator.
Installing the power supply
It's time to install the power supply and connect the cables to the motherboard. All connectors have keys that will prevent incorrect connection, so even an inexperienced user can handle it. Each connector speaks for itself, and if it says SATA on it, then it is probably intended for a device with the same interface.

Recently, the power supply compartment has been located at the bottom of the case for better ventilation, so make sure that the wires are long enough for components located in the part of the video card remote from the unit. After installing the unit, we stretch two main cables - a 24-pin cable to the motherboard itself and an 8-pin cable to the processor. When purchasing a power supply, we advise you to immediately purchase a bundle of nylon ties so that your bundle does not get confused between PC parts.

Installing drives
There are several drive form factors: 2.5-inch, 3.5-inch and solid-state drives with an M2 connector. The latter are installed on the motherboard itself, but the first two must first be installed in the case.

Installing a drive into a slot with a slide is as simple as installing RAM, and therefore we will not dwell on this point in detail. All that remains is to connect cables to them from the motherboard and power supply unit, which have a SATA connector.

If you want to install an optical drive, then the algorithm is the same - we fix it in the 5.25-inch bay, remove the front plug and supply power.
Installing a video card
Since we set out to assemble a PC correctly, we cannot do without a paragraph dedicated to the video card. It is installed last and the power cables are pre-wired for it. The graphics accelerator needs to be installed in the very first PCI Express x16 port, but modern video cards take up two or even three slots, so access to the downstream port will be blocked.

After these procedures, all that remains is to remove the two plugs on which the radiator will be installed, and also tightly screw the video card to the motherboard and the back cover of the case. The number of power cables will depend on the power of the video card and in extreme cases you will have to add cables to the power supply or use adapters.
Laying cables and completing work
The entire list of components has been combined into a single system, so it’s time to put the finishing touches on it. If the assembly is standard, then you just need to choose what to connect the coolers to: the motherboard, reobass or power supply. After this, you just need to carefully lay the remaining cables and tie them with nylon ties, and then close the housing cover.

After that, we connect a monitor and other peripherals to the system unit, install the operating system and use the brand new assembled computer.
We hope that our material on how to assemble a computer yourself will help you save money and choose the most successful combination of elements, without paying attention to the tricks of computer equipment sellers!