How to find a common language with the ASUS RT-G32 router. Step-by-step setup of the Asus RT-G32 router to the Internet Connecting Wi-Fi router Asus rt g32
Today everyone has a smartphone, tablet or laptop. These devices traditionally connect to the Internet via WiFi. Wireless routers are designed to solve the problem of distributing access inside an apartment or office.
ASUS RT G32 router is a popular model among users
Traditionally considered most suitable for use at home or in small offices. They provide stable communications and work with any providers present on the Russian market. provided an affordable price combined with reliable connection quality. Setting up the ASUS RT G32 WiFi is easy, but novice users cannot always cope with it. Let's look at how to configure the ASUS RT G32 Beeline router.
One of the largest providers, Beeline, uses an L2TP connection to authorize the network, and this causes minor difficulties for users.
Here are the steps to install the router:
- Preparatory, including downloading and installing new firmware and checking the network connection configuration.
- Direct connection to the router and firmware.
- Create a connection to the network.
- Setting up a Wi-Fi network.
WATCH THE VIDEO
Preparation
The first step is to download the latest firmware from the ASUS website. Go to the device model page through the “Products” menu and select the “Support” link at the top, and then click on the “Download” item. In the software section, the new version is presented with the number 7.0.1.26. To download, select the “Global” link and save the resulting file.
- Run the command “ncpa.cpl” from the window.
- Select the local network connection you are using and call its properties.
- Let's move on to changing parameters for TCP/IP 4.
- Set both switches to auto mode.
- router;
- power unit;
- documentation and cable for connecting to a PC.
Let's look at how to connect the ASUS RT G32 WiFi router to a computer. The router has 5 ports on the back panel. One of them is signed by WAN, a cable installed by the provider’s specialists is connected to it. 4 LAN ports are designed to connect a PC and other devices, one of them is connected to a computer. We connect the network adapter for the ASUS router to the electrical network.
One of them is signed by WAN, a cable installed by the provider’s specialists is connected to it.Important! You should not establish an Internet connection on your PC, either during setup or after. The connection will be established by the router.
Step 1. Check for yourself the parameters of your ISP - Internet service provider, which will need to be entered on the router configuration page:
- On what Protocol your operator provides you with Internet ( PPTP, L2TP, PPPoE, - Static or Dynamic);
- Automatically or manually your PC is assigned an IP address and DNS;
- Is access provided via Login and password;
- Is there a connection between the PC’s network card and the operator’s server? physical address (MAC address).
Step 2. In the properties of the local network connection, in the properties Internet Protocol Version 4 (TCP/IPv4), if you see numbers, you should copy them into a notepad, and then set the automatic configuration of the IP address, mask, gateway and DNS from the provider:
- Start – Control Panel – Network Connections or Network and Sharing Center – Change adapter settings – Local Area Connection – right-click properties:
Step 3.Physical adress You can find out if you right-click on the icon:
- Local network connections – Status – Details – In the window, third line in the list – Physical address
Let's start setting up the router (router)
Turn on the router, insert the cable from the operator into the connector INTERNET, we connect with a cable (usually included in the kit) the network cards of the router (LAN connector 1) and the PC (Ethernet network card connector). The router should light up at least power diodes (PWR), active first port and WLAN ( AIR), although it happens that the latter is disabled in the router settings. Before setting up, we recommend that you perform a complete reset of the router by holding the button in the hole on the back for about 10 seconds. Reset.
Setting up the RT-G32 wireless router
Step 1. Launch on PC Internet Browser(default, Internet Explorer, but there may also be Mozilla Firefox, Google Chrome, Apple Safari or Opera). In the address bar we indicate the IP address of the router, which is usually indicated on the bottom of the router: http://192.168.1.1
To enter the router configurator, use Username, usually, admin And Password – admin, but it’s better to check the information on the bottom of the router or in the instructions for use.

Step 2. If your provider provides you with Static IP address and exactly 192.168.1.1 , which matches the IP address of the router, in this case you should enter the section “ LAN"and change the router IP address to 192.168.100.1 , then press “ Apply"and reboot the router:

Step 3. After changing the address, you can begin the basic configuration of the router. On the page in the section " WAN» from the list, select your operator’s protocol and specify the IP address parameters WAN:


According to Figure 6, you can change the network name default whatever you like. We choose encryption in order to protect our home network from connections from inquisitive neighbors :) WPA-PSK TKIP - reliable encryption that will ensure our security. All you have to do is come up with and indicate a password in the “ WPA Preshared Key", remember it and write it down in your notebook.
Step 6 Click " Apply", after applying the network parameters, click "", then " Exit»
After the reboot is complete, our router is ready for service.
WHEN SETTING UP YOUR WIRELESS NETWORK, THINGS TO BE CONSIDERED:
- We recommend changing the Wi-Fi signal broadcast channel from automatic selection to a specific one, for example, 6 or 9 .
- To achieve maximum data transfer speeds over the network, do not use encryption types
Back in 2009, sales of the Asus RT-G32 router started. Setting it up is a fairly simple operation, and a novice computer specialist can handle it. It is precisely its order for different operators that will be given in this material.
Router Niche
By the standards of 2009, the router in question could easily be classified as a mid-level network solution. Now the requirements have changed significantly, and only the most budget devices include the Asus RT-G32, discussed in this article. The setup is, of course, quite simple, and there are no problems with it. The key advantage of this budget router is its cost, which currently amounts to 1000-1200 rubles. Taking into account the fact that this product has already been tested by time and has managed to show itself mainly only on the good side, such a price is completely justified.

Specifications
The Asus RT-G32 boasts typical technical parameters for an entry-level network solution. The WiFi setup in this case is standard, and there is certainly nothing overly complicated about it. The number of wired ports in this device is 5, and all of them are RJ-45. One of them is blue and labeled WAN. The maximum speed in this case can reach 100 Mbit/s. It is to this that the wire from the network traffic provider is supplied. The other four are yellow and labeled LAN1 to LAN4. Local devices of this network are connected to it, which may include game consoles, televisions, computers, laptops and other equipment. As in the previous case, the highest transmission speed is 100 Mbit/s. One round socket is intended for connecting an external power supply. The wireless part of the network is implemented using the Wi-Fi standard. At the hardware level, it is implemented by a single antenna, and the transmission speed in this segment can reach 150 Mbit/s.
First stage of setup: connection
The first step is to fully connect the Asus RT-G32. The settings are identical for all providers. First, you need to connect the power supply to the AC mains and the corresponding socket on the router. Then we connect the cord from the provider and connect it to the port marked WAN. Finally, if necessary, we connect all wired devices of the computer network to the router. Separately, it should be noted that the computer must be connected directly to the router using a twisted pair cable to any LAN port for configuration. Moreover, it can be either a desktop computer or a laptop. After completing the setup, this connection is not required and can be removed with the equipment turned off. In the future, it can be replaced with a more convenient and practical Wi-Fi.

Setup procedure for Beeline
First, let's look at the procedure for setting up the Asus RT-G32 router for the Beeline cable provider. Setting up Beeline requires setting the following parameters:
1. After turning on and finishing loading such components of the computer system as a router and a personal computer, on the latter we launch any browser that is available. In its address bar we type the device address: 192.168.1.1. After this, press Enter.
2. Then you need to wait for the control panel to finish loading. In this case, the interface will have two active fields. One of them is “Login”, and the second is “Password”. In each field you must enter the character set admin. After filling out both fields, click the “Login” button.
- “WAN connection” - “Dynamic IP”;
- if necessary, set the port to which the IPTV set-top box is connected;
- in the next field we indicate that the IP address is set automatically and obtained from the provider;
- then set automatic connection to DNS.
4. After this, save the changes made by clicking the “Apply” button and wait until the network node reboots.
5. After the router has finished loading, select “Network Map”. It is mandatory to set the following parameters:
- set the name of the network at your discretion in Latin letters;
- sub-item Security level - select WPA-Personal from the drop-down list;
- in the next Encryption drop-down window set the value TKIP+AES;
- then in the KEY field we set a password for connection at our discretion; it can consist of Latin letters and numbers - there must be at least 8 of them.
6. Click the “Apply” button again and wait until the device reboots.
7. After this, Asus RT-G32 is properly configured. The Beeline connection setup is complete.

Algorithm for MTS
The configuration algorithm for the MTS network router Asus RT-G32 is not so different. Setting up MTS, as in the case of Beeline, begins by entering the setup menu according to the previously described method. Then, in the menu item called “Advanced settings”, select the WAN subsection. It sets the following parameters:
- Connection type - PPPoE.
- Automatically obtain network address and DNS.
- We set the username and password that are specified in the agreement with the cable provider.
- If necessary, we also indicate the LAN port to which the IPTV set-top box is connected.
We save these parameters and wait for the router to reboot. After this, you need to configure the wireless connection using the same algorithm as in the case of Beeline.
Configuration for Rostelecom
In this case, the setup procedure is identical to that previously given for MTS. Moreover, this is based on the same PPPoE protocol for Asus RT-G32. Setting up Rostelecom requires the same steps. The only thing you need to remember is that the password and, of course, the login are entered from the contract.

Results
The fact that the network router discussed in this material has been successfully sold for more than 5 years speaks volumes. This is a whole era for the world of electronic technology. At the time of the start of sales, this solution was considered to be at an average level. Now the Asus RT-G32 belongs to the budget segment. Setting up is a very, very simple operation that even a novice and poorly trained user can certainly handle. To do this, it is only sufficient to fully complete all the previously indicated steps for each operator.
In order to get to the router’s web interface, you need to open your Internet browser and type 192. 168.1.1 in the address bar, Username - admin , Password - admin(provided that the router has factory settings and its IP has not changed).
Changing the factory password
Default: Login admin, password admin.
In the router interface, you need to go to the tab Extra options, select tab Administration and click on tab at the top System.
In field New Password Enter a new password. It must be repeated in the next field.

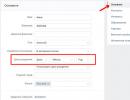
Setting up Wi-Fi on the router
In the router interface, you need to go to the tab on the left Extra options Wireless network.
We set the parameters as follows:
- Field SSID: Enter the name of the wireless network. The value in this field cannot be changed.
- Authentication method: WPA-Auto-Personal
- WPA encryption: TKIP
- WPA Preshared Key: you must enter any set of numbers from 8 to 63. They also need to be remembered so that you can specify them when connecting to the network.
- Click the button below Apply

Setting up an Internet connection
In the router interface, you need to select the tab on the left Extra options, in the list that opens, select WAN.

Setting up a PPPoE connection
- WAN connection type: PPPoE
- Yes
- Username: Your login according to the contract
- Password: Your password according to the agreement
- MTU: 1472
- Save the settings with the button Apply.

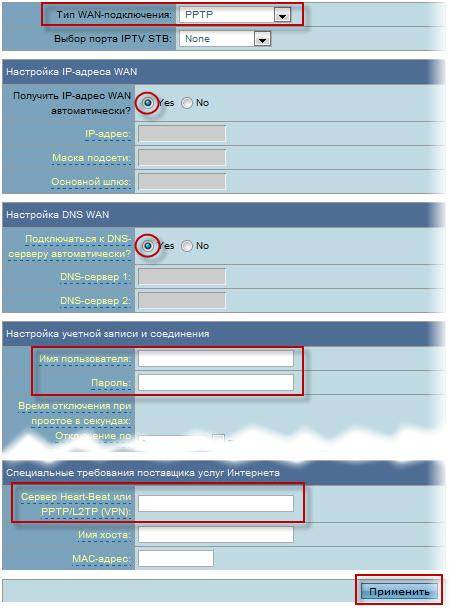
Setting up an L2TP connection
- Connection type - L2TP
- Select IPTV ports- yes, select a port or two if you use Beeline television. You will then need to connect your TV set-top box to the selected port
- Get an IP address and connect to DNS- automatically
- Username and Password- login and password from the contract
- PPTP/L2TP server address -
- The remaining parameters can be left unchanged. In the hostname, write something in English. Save settings.

Setting up PPTP (VPN) when automatically obtaining a local IP address
- WAN connection type: PPTP
- Get a WAN IP address automatically: Yes
- Connect to the DNS server automatically: Yes
- Username: Your login according to the contract
- Password: Your password according to the agreement
- enter the IP address or name of the VPN server according to the contract
- Save the settings with the button Apply.

Setting up PPTP (VPN) with a static local IP address
- WAN connection type: PPTP
- Get a WAN IP address automatically: No
- IP address: We enter your IP address according to the contract
- Subnet mask: We hammer in the mask according to the contract
- Main gate: We drive in the gateway according to the contract
- DNS server 1: And DNS server 2: enter your provider's servers (Rostelecom Omsk DNS 1: 195.162.32.5 DNS 2: 195.162.41.8)
- Username: Your login according to the contract
- Password: Your password according to the agreement
- Heart-Beat or PPTP/L2TP(VPN) server: enter the IP address or name of the VPN server according to the contract
- Save the settings with the button Apply.

NAT when automatically obtaining an IP address (DHCP)
- WAN connection type: Dynamic IP
- Save the settings with the button Apply
Checking Internet connection status

Saving/restoring router settings
After setting up, it is recommended to save them so that if problems arise, you can restore them. To do this you need to go to the tab Additional settings, menu Administration;, Restore/Save/Load settings tab.
- To save the current router settings, you must press the button Save. The settings file will be saved to the specified location on your hard drive.
- To restore settings settings from a file, you must click the button Choose File, specify the path to the settings file, then click the button Send.
Attention! Button press Restore will restore factory settings!

The RT G32 router is designed for broadcasting Internet traffic wirelessly and wired. Setting it up takes about 5-10 minutes for an experienced user, but a beginner will have to follow the instructions.
By setting up the router, you can use the home Internet from any mobile device without any wired connections. You just need to log in to the Wi-Fi network.
In this article you will learn how to configure the ASUS RT-G32 router.
Connecting a router
The package contains all the elements necessary to connect the router:
- complete cord (jack-jack) for connecting the device to a PC;
- power unit;
- the router itself.
The picture shows all the necessary ports.
To connect, you must perform the following steps:
- plug your Internet cable into the designated “INTERNET” port (usually it is marked with blue edges);
- The supplied cord must be used to connect any output “LAN” port of the router to the corresponding connector on the computer;
- Plug the mains charger into the “DC 12V” power connector.
Thus, we implement the chain: Internet - Router - PC. In this case, an additional path will be a separate power source.
Authorization
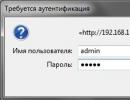
To go into the settings of the ASUS RT G32 router, open your browser and enter http://192.168.1.1 in the address bar.
After pressing Enter, a window will appear asking for authorization:
- Login (User name);
- Password.
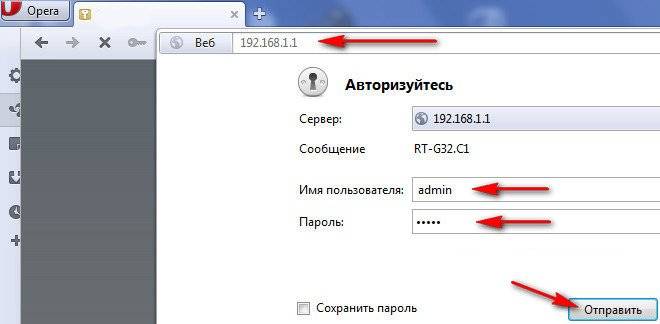
Before the first setup, you must enter the value “admin” in both fields. By default, this is both login and password at the same time.
In the menu that appears, select the interface language. The language selection is at the top of the page between the general information and the exit panel.

Internet setup
This is the main adjustment that will allow the router to receive and send traffic to your ISP. It will require detailed information about your Internet connection.
Most users prefer not to carry out such an operation themselves and give money to those who will do it for them.
There is nothing terrifying here. But think about it, is it worth paying decent sums for actions that, once you gain experience, will take no more than 5 minutes?
If you come to the right conclusion and take up the matter yourself, read the general information. In fact, there is little of it, and therefore it is easy to learn.
- Each provider uses one of the allowed connection types:
- PPPoE;
- L2TP;
DHCP.
This information is indicated in the “WAN” menu (the very first item).
- You need to follow the chain to get to this menu:
- "WAN";
"Internet connection".

Here you specify the type of connection.
The setup procedure is greatly simplified if your provider uses dynamic IP technology. If you have this technology, just specify the connection type “Dynamic IP”. Then the router will automatically gain access to the Internet.
In other cases, you must further follow the instructions. If you do not understand where to get the information to fill out the required fields, contact your provider by phone.
It can also be placed in your written contract (account details with the provider).
- PPPoE connections (Rostelecom, Dom.ru)
- When setting up a WAN, for example, for the Rostelecom provider, you should use the following parameters:
- select PPPoE as connection type;
- in the IP address settings, set to receive automatically;
- connection to the DNS server should also be automatic;

in the account fields you must indicate your login and password issued by the provider;
Be sure to enter "rostelecom" below in the "Hostname" field.
After entering the data, check the visual prompt and click “Apply”.

L2TP connections (Beeline)
After selecting L2TP (L2TP + Dynamic TP) as Beeline data transfer type, continue filling out the fields:
Please note that for Beeline you must specify the server and hostname.
PPTP (VPN) when automatically obtaining a local IP address
Specify communication technology:
- Internet setup;
- connection type.
Make the settings:
- “YES” to automatically obtain an IP;
- “YES” to automatically connect to DNS;
- enter the login and password received from the provider;
- fill in the Server.. field in the service provider block (the data is indicated in the contract or you can check with the provider over the phone).
PPTP (VPN) with a static local IP address
This technology does not provide for automatic data acquisition. Therefore, you will have to enter all the information manually. Use the written agreement with the provider as your source.
Proceed to setting up the Internet by selecting the appropriate connection type:
- Internet setup;
- connection type.
- automatic IP acquisition – “NO”;
- specify the IP address;
- Subnet mask;
- main gate;
- DNS server 1 and 2;
- indicate the login and password for the provider;
- fill in the Heart-Beat or PPTP/L2TP(VPN) Server field.
Video: setting up a router
NAT when automatically obtaining an IP address (DHCP)
This is the same data transfer technology that does not require any additional information.
The only configuration step is to specify the connection:
- proceed to the options menu;
- select the WAN connection type Dynamic IP.

After making your selection, click “Apply” and use the Internet.
Setting up IPTV on the ASUS RT G32 router
This manipulation is carried out if you want to broadcast programs to your TV via the Internet via wire. After all, it’s much easier than paying for a separate television service.
Before directly setting up IPTV, make sure that the corresponding port is specified in the WAN connection (find the port number under the cord that you plugged in to broadcast TV). This item is located immediately below the connection type.
- Route.

Indicate "YES" everywhere. After a couple of seconds, the TV will play the image.
If the image does not appear, consider several possible reasons:
- your provider does not provide this function (check with your service provider);
- the device parameters do not match the parameters of your TV (which happens in rare cases);
- The provider uses a special connection type.
WiFi
Setting up a wireless network is the final step in preparing the device for full operation. The only exceptions are the additional capabilities of the device.
To install a Wi-Fi network, follow the chain:
- wireless network;
- are common.

There are many fields here, some of which are required to be filled in:
- SSID is the name of your Wi-Fi network (you can specify anything);
- by selecting “YES” or “NO” opposite Hide SSID, you will determine whether the network will be visible to mobile devices when searching;
- The country code nominally identifies the location;
- the channel establishes the connection flow and, if you have many networks nearby, you should independently determine the free channel to avoid interference with the Wi-Fi connection (if there are no networks near you, select “Auto”);
- authentication method – security level (the most common is WPA2);
- WPA preshared key is your password for using Wi-Fi.
Video: ASUS Wireless Router RT G32
To complete the setup, click Apply and reboot the router. After which it will successfully distribute traffic wirelessly.
Setting up a connection with the DC++ client
When using a router, in most cases the problem occurs when working with the DC++ client. This problem is caused by the fact that the traffic translation function is redirected from the computer to the router. And this complicates interaction with torrents.
To fix this problem, go to the menu:
- Virtual server.
- “YES” on the item enable virtual server;
- service name – any;
- choose the range of ports yourself (for example, 3211 or 3333);
- the local IP address corresponds to the one on which the DC should operate;
- local port – any from the specified range (it must be unoccupied);
- protocol – BOTH (you choose both).
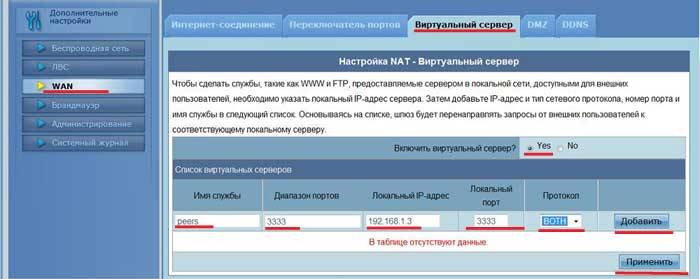
To finish, click Add and then Apply.
With this you have completed the first step. Now proceed to the second one.
Client DC synchronization:
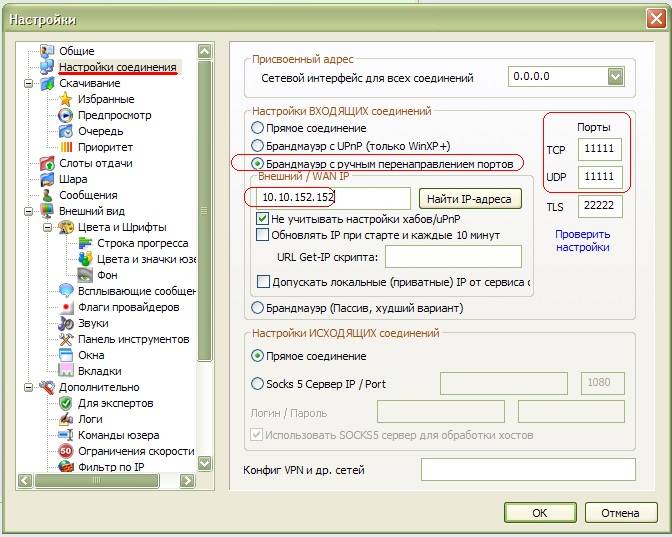
- connection mode – firewall with manual port forwarding;
- indicate your external IP address in the field (you can find out through the router “System log” “System status”);
- TCP/UDP ports – indicate the one that was selected in the preliminary configuration of the virtual server on the router (3333 was indicated as an example).
After the operations performed, the problem should be resolved.
Saving or restoring settings
Quite often it happens that the device settings are lost.
There may be several reasons for this:
- accidental change of settings;
- There is an error in the router firmware.
To avoid repeated manipulation of settings, you should use the recovery function.
To do this, you need to follow the menu chain:

Note! If the router firmware is faulty, there is a possibility that you will not be able to use the admin panel. For such cases, there is a “Reset” button on the back panel of the device. It is located deep in the case and therefore you will need to use a thin object.
Here you will see all three available operations:
- restore – will lead to a complete reset and return to factory settings;
- save – allows you to make a copy of all settings in a special file on your hard drive;
- load (can be Send) – will help return saved parameters from the saved file.
Don't panic if the settings are lost for some unknown reason. If you did not foresee such a situation the first time, be sure to save the next time.
Firmware update
Firmware is the software side of the device, which is responsible for its functionality. The router you purchased may not match the latest firmware. But the updates contain fixes for problems found in previous versions.
To update the firmware, you must first find this file on the manufacturer’s official website. All you need to do is specify the operating system version and download the file.
Then go to the router menu:

In the "New Firmware File" field, click "Browse.." and select the downloaded firmware.
After clicking Submit, the router should update and reboot on its own. If the reboot does not occur, do it yourself.
Important! If you updated the firmware, the router will have to be configured again.
Setting up the ASUS RT G32 Wi-Fi router is quite simple. The manufacturer did a good job with visualizing the menu so that the user could understand where the required tab is located. Using this approach, you can make the settings yourself after just 3 manipulations.
It should be remembered that information that is not included in the options offered by the customizer is 100% likely to be found in the agreement with the provider.
>