Deleting the cache. How to clear cache on PC or laptop
When we prepare our website for presentation to the audience, we try to work out every little detail. The appropriate font, social button design, logo, and color combination all need to be thought through and implemented.
However, whatever the visual design, the technical characteristics are much more important, and one of the most significant is performance. It is to improve this parameter that webmasters set up caching.
Acting as ordinary users, we do not encounter problems setting up caching of our resource. However, situations often arise when you need to know how to clear your browser cache. This article will discuss when and how to do this.
What is browser cache
Traveling across the World Wide Web, we visit a huge number of sites where we view text, pictures, and videos. When a web page is opened in a browser for the first time, all information ( text and graphic) is downloaded from the server on which the resource is located.
If the webmaster has configured caching, then after the first viewing the data will be saved in a special section on the hard drive of the user’s computer ( this section is called the browser cache).
You can evaluate the possibilities that a cache provides by observing the most common occurrence - loading the main page of a resource using the mobile Internet. Type any query in the search and follow one of the links. When the web resource page loads, go back and follow the link again.
The main page of the site will appear on the screen much faster. The reason for this is as follows: the browser loads data from a cache that is located in the memory of your device, which, you see, is much closer than a server far away.
It is also worth noting that not all site content is cached. Cache settings are set by each webmaster at his own discretion. If the information resource is created using a CMS ( WordPress, Joomla, Drupal), then the developer, as a rule, has access to ready-made caching solutions in the form of plugins ( which have standard settings and often do not need additional settings).
In the WordPress CMS, for example, the WP Super Cache and W3 Total Cache plugins have gained wide popularity.
When you clear the cache, you delete all graphic and text data received from previously visited sites. That is, when loading pages of information resources, the browser will again take all data directly from the server.
Now that it has become clear what it means to clear the browser cache, let’s look at the reasons for the need to perform such a procedure:
Why clear the cache
When you are faced with the development of an information resource, clearing the cache is such a familiar and regular procedure that it is carried out absolutely “automatically” ( because the site changes all the time, and the result needs to be seen immediately).
If you consider yourself as a user, then in this case the need to clear the cache arises much less often. However, without deleting the cache, you will not see many updates on sites ( After some time, of course, you will see, but this could be a month, or maybe six months, depending on how long the site cache is stored by the webmaster).
Also, do not forget that copies of pages saved by the browser have some weight. In addition, each browser has its own cache, that is, by opening a web resource in Google Chrome and then in Firefox, you will create 2 copies of the same pages on your computer. And if thousands of sites are visited, and the cache has not been cleared for several months, then the space occupied by the copies will be quite significant.
Clear cache in different browsers
Let's look at deleting the cache in some of today's popular browsers:
- Internet Explorer:
- Mozilla Firefox:
- Google Chrome:
- Opera:
Mozilla FireFox, expand the menu section called “Tools” and click “Delete personal data”. Instead of these manipulations, you can press the key combination CTRL + SHIFT + Delete. In the delete dialog, make sure there is a checkmark next to the “Cache” item, and also check to see if the types of data you would like to save have any checkmarks. Click the "Delete" button to start the cleaning process.
In Internet Explorer, click the Tools section in the menu and select Internet Options. In the window that opens, go to the “General” tab and click the “Delete” button placed in the “History” section. A new window will open with the heading “Deleting browsing history”, where to start the cache clearing procedure there is a “Delete files” button - click it.

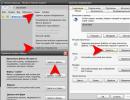
In the Opera browser, open the menu, go to the “Settings” section and select “Delete personal data”. In the window that opens, under the warning text about the possible consequences of clearing browser storage, there is the inscription “Detailed” - click on it to expand the data being deleted. Make sure that the “Clear cache” item is checked, but the data that needs to be saved is not. Click the "Delete" button to begin stripping.

In the Google Chrome browser, click the wrench icon in the upper right corner of the window and select Options from the menu. Then go to the “Advanced” page and click the “Delete browsing data” button to see a dialog box to clear the stuff stored by the browser. In the drop-down list, select the history depth to which the cleaning should be extended, make sure that the “Clear mess” checkbox is checked and nothing unnecessary is checked. Click the "Clear Browsing Data" button to begin the cleaning process.

Each of you has probably heard that Microsoft operating systems are gradually becoming cluttered and require clearing the cache. This happens for various reasons: for example, the accumulation of temporary files, browser activity, or traces of program installations.
In this article we will talk about how to clear the cache on a computer or laptop running Windows XP, 7, 8 or 10. You will learn about the types of temporary files, their location and, of course, options for cleaning, which we will do manually , using the OS itself or through additional software.
 Computer, browser and network caches come in different types. The main ones include:
- DNS cache. Requests from the OS itself and the servers accessing it are stored here. This type of temporary files is used in order to avoid wasting time on generating a repeat request. The cache is cleared completely only when the DNS is completely updated;
- Thumbnail cache. The name of this cache translates as “thumbnail”. The British meant caching previews of pictures, icons, etc. As a result, thumbnails of any files are loaded almost instantly. Naturally, such data must sometimes be cleaned;
- RAM cache. RAM also stores files to speed up the operation of its components. Sometimes they are not deleted and remain hanging, taking up useful RAM space;
- browser cache. If the browser's web page and all its elements were to be loaded anew every time, it would take a very long time. In order to speed up the process, the developers introduced caching of videos, animations, images and other elements. As a result, the cache can “grow” greatly over time and needs to be cleared.
Before we get down to business, remember: follow our step-by-step instructions exactly. By disrupting its progress and deleting whatever comes to hand, you can significantly damage the OS until it completely fails!

We “clean” the system
So, let's look at the process of clearing the cache on a computer or laptop with any operating system from Microsoft.
Cleaning RAM
Since the reliability and performance of the entire system depends on the correct and stable operation of the RAM, let’s start with cleaning it. Moreover, this is done very simply.
- First, we will use the services of the universal utility “Run”. You can launch it using the hotkey combination Win + R. When the button click box appears in a small window, enter the command below into it and click OK.
For 32-bit systems:
%windir%\system32\rundll32.exeFor 64-bit systems:
%windir%\SysWOW64\rundll32.exe advapi32.dll,ProcessIdleTasks
Attention: to find out the bitness of your OS, use the hotkey combination Win+PauseBreak.
- After the RAM memory has been cleaned, we’ll continue what we started with the task manager. Launch it by right-clicking on the taskbar and selecting the desired item from the context menu.

- Go to the “Processes” tab (active by default), sort the list by the amount of RAM consumed, select the process you want to stop, thus clearing the memory, and click “End task”.

Be careful: before you force quit a program, be sure to save all of its data, otherwise it may be lost.
System tools
The instructions you are reading are given using Windows 10 as an example, but everything can be done in a similar way in other operating systems. "Ten" and earlier versions of Microsoft operating systems have their own tools that allow you to clear temporary files (cache). It works like this:
- We launch our explorer by clicking on the icon on the taskbar.
- You can also open “This PC” through a search.

- Right-click on the disk with the installed system and select “Properties” from the context menu.

- Select the “General” tab and click on the button labeled “Cleaning”.

- An assessment of your system partition will begin and depending on how large and cluttered it is, this may take a varying amount of time.

- Next, check the boxes next to all the items (marked with the number “2”) and click the “Clean up system files” button.
Attention: this algorithm requires administrative rights in the user account.

- Now again check the boxes next to the items that we want to clear and click “OK”.

- A confirmation will appear in which we need to click on the button surrounded by a red frame.

Cleaning will begin, the duration of which may vary. It all depends on the amount of “garbage” in the system cache, the performance of a particular PC, etc.

This method is good for its security for the operating system, but it does not completely clear the computer’s cache. If you want to dig deeper, read our article further.
Removing junk from browsers
The browser is one of the most “garbage” places on our computer or laptop. The cache available here is constantly clogged with temporary files. Many of you have probably noticed how your browser starts to work slower and slower.
The fix is quite simple. Below we have described the sequence of actions for each browser separately. But before you start, remember:
You can start cleaning in any browser using the key combination Ctrl+Shift+Del.
Opera
As we have already said, you can start clearing the cache in Opera by pressing Ctrl + Shift + Del at the same time. We do this and see a new window in which we should indicate the cleaning interval and what exactly we want to delete.
The following options exist:
- browsing history;
- download history;
- Cookies and other site data;
- image cache;
- passwords;
- autocomplete data;
- news data.
Important: Before deleting autofill data, please note that you will have to enter your browser passwords again.

Google Chrome
In the Google Browser, cleaning looks the same as in Opera. You specify the cleaning period and select the types of files to be deleted. Finally, click the “DELETE DATA” button.

Yandex browser
The situation is similar in the popular Yandex Browser. Press Ctrl + Shift + Del, select the period, decide what we will erase and confirm all this by clicking on the button marked “2”.

Mozilla Firefox
In Mozilla, the window for deleting cache from a PC looks a little different. However, the principle of its operation does not change much. The process is divided into 3 stages, each of which is marked with a number in the screenshot below.

Microsoft Edge
In the standard Windows 10 browser, they didn’t come up with anything - the same combination works here as in Opera, Chrome or Yandex Browser.

Internet Explorer
In conclusion, we show the cache clearing menu in Internet Explorer. The same combination of hot buttons applies here.

Cleaning the “Temp” folder manually
To make our Windows even more “clean,” you can visit the temporary files storage folder and check if there is anything unnecessary there.
Important: You will need administrator privileges to use the option below.
- Open our explorer by clicking on the icon on the taskbar.
- Let's go along the path:

- If you are asked for superuser privileges, grant them.

- Select all the files that are in “Temp” and delete them.
Before you start clearing temporary files, close all programs and save their data.

- Confirm your intention to delete system files.

As a result, we are left with only a few text documents that cannot be deleted.

Clearing the DNS cache via the command line
- Launch the command line as administrator. To do this, open the Windows search, enter the word “CMD” into it, click on the result indicated by the number “2” and select the option to run as administrator.

- When the black window opens, enter the command below into it and press Enter.

After this, the DNS cache will be cleared in a split second.
Using additional software
When talking about clearing the cache on a computer or laptop, one cannot fail to mention programs that exist specifically for this purpose. There are a lot of them created and there is no way to list them all. Let’s also not create TOPs with a bunch of software and a couple of lines of description for each; it’s better to take the leader of computer cleaning and talk about its downloading, installation and proper operation.
Our “highlight” is called CCleaner. This is truly the best tool, which the developers did not burden with unnecessary functions. So, let's start the installation:
- Initially, download CCleaner by visiting its official website and selecting the “Download Free Version” button there.

- On the next page, click on the marked button again.

- Select one of the “mirrors” to download CCleaner.

- When the installer we need is on the PC, launch it.

- At the first stage, simply press the button marked in the picture below.

- We are waiting for the installation to complete, which, by the way, only takes a couple of seconds.

- All that remains is to launch the program and proceed to clearing the cache on the computer.

The installation is complete, let's move on to working with CCleaner:
- Activate the “Cleaning” tab, check the boxes for the items that we want to scan, and click the “Analysis” button.

- The scanning itself lasts only a couple of minutes.

- If at the time of scanning one of the programs whose cache needs to be deleted is running, CCleaner will offer to terminate its operation and continue analysis.

- 20 GB of “garbage” were found, most of it is taken up by the recycle bin, but even without it there is a lot of unnecessary stuff. So, we start cleaning by pressing the corresponding button.

- The cleaning itself is even faster than analysis. We are waiting for the process to complete.


Ready. Your computer is completely free of unnecessary files.
Conclusion
Now you know how to clear the cache on your computer or laptop so that it no longer slows down. And not only the system disk, but also DNS, RAM and browser data. We showed several ways to bring order to your PC. We recommend using all the methods in a row, and if you have questions during the process, ask them in the comments.
Video instruction
During the long-term use of a computer or laptop, most users inevitably have a question: on the computer? At first there are no memory problems. There is a lot of free space, and you don’t have to think about its availability. But then, after some time, this question becomes very relevant. The main problem in this case is the accumulation of information, due to which the computer begins to work slower. To avoid such a problem, you need to periodically This operation can be done in two ways: using built-in tools and using specialized utilities. Each of them will be discussed within the framework of this material.
Browser
For each browser, you can clear the cache manually. Mozilla, Opera, Chrome and Yandex are built on the same engine. Therefore, they use the same algorithm for performing this procedure. First, hold down Ctrl + Shift and, without releasing them, press Del. The Clear History window will appear. In it we select the time interval for which this operation must be performed. This is done in the top one. Then check the necessary boxes and press the button labeled “Clear history.”
This operation is a little more complicated and is performed in Internet Explorer. Go to the “Service” menu. In it, select “Internet Options”. Then go to the “General” tab. On it we find the “Delete” button in the “Browsing history” section. Click on it with the right mouse button. Next, a window will open in which we set the checkboxes at our discretion and click “Delete”. When finished, close all open windows and continue working in Internet Explorer.
HDD
Now let's figure out how to clear the cache on your computer using Explorer. To begin with, we launch it by pressing the combination Win + R. In the window that opens, right-click on the shortcut of the first logical volume (usually the “C:” section). In the list that appears, select “Properties”. Then we find the button that says “Disk Cleanup” and click on it. We only check the “Temporary Internet files” checkbox. The rest should be inactive. After
click “Ok”. We wait until the cleaning is completed and close all previously open windows. Similarly, we clean all other physical and logical volumes on the computer.

Specialized software
The easiest way to clear the cache is using specialized utilities. The most popular product of this class is CCleaner, developed by Piriform. It can also optimize the operating system registry and remove programs. Another advantage of this utility is that it is absolutely free. The procedure for working with it is as follows. Download its installation version from the official website of the developer. Then we install it following the instructions of the wizard. Launch it by double-clicking on the shortcut located on the desktop. In the window that opens, go to the “Cleaning” tab (located in the upper right part of the screen). A window will open with two tabs: Windows and Applications. On each of them, select the necessary checkboxes, then click the “Analysis” button. We wait for it to finish and click “Cleaning”. Once completed, you can close the program. This is the easiest way to clear the cache on your computer. There is only one downside to this solution - the need to install additional software.
Summary

Within the framework of this material, various methods were described on how to clear the cache on a computer. System tools can be used for these purposes, but this is not entirely convenient in practice. Therefore, it is better to install a specialized utility and use it. It doesn’t take up much space, but it’s much easier to perform this operation with it.
In your browser. As an example, I will use the most popular programs at the moment, such as Google Chrome, Opera, Mozilla. This operation is usually performed according to one pattern. That is, you need to go to the settings, find the menu with the saved browsing history, where you need to select deleting the cache. But this article is intended for beginners, so I will describe in more detail how to clear the cache.
Preparation
First, it’s worth understanding why you need to periodically delete the cache. Cache is a temporary computer memory that allows you to store some information on the clipboard. With its help, you can access files (in this case from the Internet) without even connecting to the network. But sometimes the cache memory becomes full, which can cause some problems. For example, the browser will begin to interpret information incorrectly or even begin to refuse to receive new information. The latter rarely happens, but sometimes it happens. Clearing the browser cache should occur at certain intervals. It all depends on the characteristics of your computer and the amount of cache memory allocated. It will be difficult for the browser to navigate through a large number of files. Moreover, most of them will never be needed again. Next, you'll learn how to clear the cache in some specific programs. A universal method for performing this operation will also be outlined.
- Open your browser. Go to the settings menu. To do this, click on the button located to the right of the address bar. In the drop-down menu, find the “History” item. You can use the key combination Ctrl + H.
- At the top there will be a “Clear history” button, click on it. You will see a new window where you need to check the “Clear cache” checkbox. Next, click “Clear history.”
- Please note that at the top of this window there is an additional menu where you can select the time interval for which the cache was accumulated.

- Open your browser. Go to the settings menu. To do this, find the button labeled “Opera” in the upper left part of the screen, or on the main page of the program, press the Alt key on your keyboard. In the drop-down list, find the “History” item. You can use the keyboard shortcut Ctrl + H.
- You will see a window open where all previously visited sites will be listed. At the very top there will be a “Clear browsing history” button. Click on it.
- A new window should appear again. Check the box next to “Clear cache”. Click on the inscription “Clear history...”. Here you can also select the required time interval.

- Open your browser. Go to the settings menu. To do this, in the upper left side of the screen, find the button labeled “Firefox”. On the right side of the drop-down menu, find “History”, where you need to select “Erase recent history”. You can use the hotkeys Ctrl + Shift + Del.
- Check the box next to “Clear cache”. Click on “Clean Now”. In the same window there is a window for selecting a time interval.
Universal method
If you use several browsers at once, you can clear the cache of all these browsers in one program. Now there are many utilities for performing such an operation. I recommend you use CCleaner. The interface of this software is very simple and intuitive. Therefore, everyone can cope.
Conclusion
The question “how to clear the cache” is very often asked by inexperienced PC users. Various forums interpret their instructions and methods. I suggest using only standard software tools. Now, I hope you know how to clear the cache in your browser.