Features and rules of full cloning of hard disk data from HDD to SSD. Hard disk cloning software for Windows Hard disk copying in Acronis True Image
After buying a new HDD or SSD, the first question that arises is what to do with the operating system currently in use. Not many users have a need to install a clean OS, but on the contrary, they want to clone an existing system from an old disk to a new one.
So that the user who decides to upgrade the hard drive does not have to reinstall the operating system, there is the possibility of transferring it. In this case, the current user profile is saved, and in the future you can use Windows in the same way as before performing the procedure.
Usually, those who want to divide the OS itself and user files into two physical drives are interested in the transfer. After moving, the operating system will appear on the new hard drive, and remain on the old one. In the future, it can be removed from the old hard drive by formatting, or leave it as a second system.
First, the user needs to connect a new drive to the system unit and make sure that the PC has detected it (this is done through the BIOS or Explorer).
Method 1: AOMEI Partition Assistant Standard Edition
Unlike the previous two programs, Macrium Reflect cannot pre-allocate a free partition on the drive where the OS will be transferred. This means that user files from disk 2 will be deleted. Therefore, it is best to use a blank HDD.
- Click on the link "Clone this disk..." in the main window of the program.
- The Migration Wizard opens. At the top, select the HDD you want to clone from. By default, all drives can be selected, so uncheck those drives you don't want to use.
- Click the link at the bottom of the window "Select a disk to clone to..." and select the hard drive to which you want to clone.
- With Disk 2 selected, you can use the link with cloning options.
- Here you can configure the space that will be occupied by the system. By default, a partition with no free space will be created. We recommend adding at least 20-30 GB (or more) to the system partition for correct future updates and Windows needs. You can do this with knobs or by entering numbers.
- If desired, you can choose the drive letter yourself.
- The rest of the parameters do not need to be changed.
- In the next window, you can set up a cloning schedule, but we don't need it, so just click Next.
- A list of actions that will be performed with the drive will be displayed, click Finish.
- In the window with the offer to make restore points, agree or reject the offer.
- OS cloning will start and you will be notified when it is completed "Clone completed", indicating that the migration was successful.
- Now you can boot from the new drive, having previously made it the main one for booting in the BIOS. How to do this, see Method 1.


We talked about three ways to transfer the OS from one drive to another. As you can see, this is a very simple process and you won't usually run into any errors. After cloning Windows, you can check the drive for health by booting the computer from it. If there are no problems, you can remove the old HDD from the system unit or keep it as a spare.
Initial conditions: Your system has more than one hard drive. On one of them, the operating system is already installed, and on the second you installed Windows 7. There was a need to remove from the system HDD on which Windows 7 is not installed. But it turned out that without this disk your system does not want to boot.
This happened because one of the three conditions for a successful boot was no longer met:
- the partition from which the boot is performed must be active;
- The boot sector of the partition must be compatible with bootmgr;
- download files must be on the active partition operating system. For Windows 7 this is the file bootmgr and the boot configuration data store ( BCD), located in a hidden and system folder Boot.
Consider the solution to the problem using the configuration example shown in the figure
The screenshot of Disk Management shows that the C: drive, on which Windows 7 is installed, is not active. Drive D: is active. Files Windows boot 7 (they are hidden and system) on drive C: also will not be found. Task: move the bootloader from drive D: to drive C:, that is, ensure that the above conditions are met.
Using a Windows 7 Installation or Recovery Disc
With these discs, transferring boot files is easy. Physically disconnect the "unnecessary" hard drive, boot from the disk by setting in the BIOS CD-DVD drive first boot device, enter the recovery environment. After the scan and search for installed operating systems is completed, perform "Startup Repair". The recovery program will prepare the hard drive as needed and copy the necessary files to it. After the reboot, the ability to download will be restored.
If you don't have any installation disk, no recovery disc, you can use the method described below.
Transferring boot files using the bcdboot.exe utility
It is conditionally possible to divide the upcoming operation into three stages, corresponding to the three necessary conditions for a successful download.
First: go to the "Disk Management" snap-in (Win + R, in the "Run" line, type diskmgmt.msc and click OK) and see what letter is assigned to the first left partition of the disk that you plan to keep. It is this partition that we will make bootable and active: right-click on the selected partition and select the "Make partition active" context menu item. Note that this section must have a "main" attribute.
Second: run a command prompt with administrator privileges. All commands, which will be discussed below, will be executed sequentially without exiting the command line.
DISKPART list disk sel disk X list partition sel part 1 active exit
where X is the number of the disk to be left in the list of disks (command list disk).
To do this, you need a utility bootsect.exe, which, in the absence of an installation disk, can be obtained here. Download and unzip it in advance, for example, to the root directory of the C: partition.
C:\bootsect /nt60 All /force
note: experience shows that if there are 2 or more HDDs in the configuration, the key /force necessary.
Bcdboot %Windir% /l ru-Ru /s С:
Key /l- selection of language options for the download manager. If your system is not Russian, use other values of this key, for example, en-Us for English, de-DE for German, etc.
Key /s- Specifies the volume letter assigned to the target system partition to which the boot environment files are copied. This is the section that we have made active. Since the command firmware uses the current system partition by default (before removing the hard drive, it is the D: partition), applying this key with the letter of the intended boot partition is necessarily!
- We make the disk active. There are two ways to make the desired section active.
- Overwrite the boot sector (make it compatible with bootmgr):
- Move the BCD and bootmgr file to the new active partition:
Checking and editing BCD
Execute the command
bcdedit /store C:\boot\bcd

Enlarge picture
Based on the results of the command, check the parameters (underlined in the screenshot):
- in the "Windows Boot Manager" section device should be equal to the letter of the new active partition, in our case - and osdevice must be equal to the letter of the partition where the Windows directories are currently located. In our case, this is also FROM:.
- in case of inconsistency, make the necessary changes using the commands:
Usually, the execution of commands is not required, but it does not hurt to check. Instead of an identifier (current), it can be (default), or even alphanumeric. Then in the commands you need to use the one that is used for loading.
Thus, transferring boot files to another drive is not such a difficult task.
Instead of a conclusion, or "Russian-language multi-boot menu"
Due to the fact that the startup repair program running from the recovery environment uses the "default" parameters, the language of the boot manager becomes English. In the presence of a single bootable system, this is not noticeable, but in the presence of a multiboot menu, it is striking. If this does not suit you, run on the command line:
bcdboot %Windir% /l en-Ru
You need to execute it after transferring the download files to a new partition.
Greetings to all readers and visitors of the blog site. In today's article, we will look at how to copy a hard disk partition along with the operating system and installed programs, and how to restore Windows from a previously created backup. Everything said below is applicable not only to Windows OS. But also to other operating systems.
Almost any computer user has had to deal with a situation where, as they say, the operating system has crashed and needs to be reinstalled. If everything rested only on the installation of the OS, then there would be no problems, but the fact is that you still need to install your favorite and desired programs, drivers, configure screen settings and so on.
Things can get more complicated if you have a bootable flash drive with multiple operating systems, and you just don't remember which version of the operating system you installed. However, there is light at the end of the tunnel, and it is called CloneZilla. This program will allow you to create a copy of the operating system with all installed drivers and programs.
Important Preface
Backing up Windows and disk partitions
To test the program, I decided to take a slightly more complicated route. In order not to run around with the camera and shoot the process of copying the partition from the OS, I decided to use the services. First of all, installed, added a few hard drives, and installed the Windows XP operating system on one of them. The OS partition occupied about 20 GB, additional partitions were 30 and 50 GB each. All partitions contained the NTFS file system. How to copy Windows.
The next step was to download CloneZilla. It is important to understand that CloneZilla is not some kind of program, but a group of files that are in an ISO image (you can also download a ZIP). I downloaded the CloneZilla ISO image not from the official clonezilla.org/downloads.php site, but from other sources.
Having received the CloneZilla ISO image, you need to mount it on a USB flash drive or memory card from which the OS will boot. In the article about I described several programs we need. Although I am used to using the program WinSetupFromUSB, I decided to use xboot, since here you can immediately add all the necessary ISO images. In general, my multiboot flash drive offers the following contents:
- Windows 7
- Windows XP
- live CD
- CloneZilla
I booted the OS from a flash drive and checked the performance of CloneZilla. However, it is more convenient to use a virtual machine. I just started the virtual machine and mounted the CloneZilla ISO image into a virtual drive and started testing.
For the sake of clarity, I will describe a number of points:
CloneZilla allows you to copy the contents of an entire hard disk partition or an entire disk into one or more files. Copy Windows to another hard drive.
Example: There is a computer or laptop, on disk C there is an installed OS and the necessary programs, games and Accounts user. We want to use a new larger drive so that we don’t waste time again installing the OS and programs, and tedious setup, we copy the hard disk partition, the result is saved in one file, an image, which can then be used to restore the entire structure of the C drive.
CloneZilla allows you to restore the contents of a partition backup to any other drive.
Example: We connected a new hard drive to a computer or laptop, created the necessary partitions and formatted them. Now we connect an external drive to which we copied the previously created backup copy of the hard disk partition containing the installed Windows OS and programs. We launch the CloneZilla utility, specify the disk on which the backup copy of the Windows partition is located, indicate the partition to which the contents of the copy should be copied. As a result, we were able to copy Windows from one hard drive to another.
Windows backup and restore on another platform.
You need to understand that copying installed Windows and programs from one disk partition to another, which are connected to the same platform, should not cause problems - you used the ASUS K40 as you use it, you just changed the hard drive. It's a completely different matter if you have a backup of your Windows hard drive partition and want to transfer it to a neighbor's computer. Since you and your neighbor use different peripherals (type of video card, motherboard, and so on), there is no guarantee that the operating system copied from your PC will work safely and it does not.
If it's just a hard disk change, then why use CloneZIlla, can't you just copy all the files from the partition directly?
Theoretically, yes. However, system files cannot always be copied because they are used by the OS itself. Even if you copied Windows and the contents of the entire partition, you will not be able to save the correct location of the boot sectors - you have created a copy of the files, but not a copy of their desired location. Plus, copying disk partitions to a single file is much more convenient, since a single file is easier and faster to copy.
How to copy Windows and hard drive partitions with CloneZilla
CloneZilla is a program for creating an image of the operating system (Windows, Linux) and data (copies of hard disk partitions, copies of all users, cloning the contents of drives, and so on).
You need to understand that CloneZilla has a fairly large range of features:
- Various compression methods when copying hard disk partitions.
- Automatic and customizable disk copy mode with Windows and files.
- The ability to transfer the contents of a system image to a local or network drive.
Let's see how to copy Windows. The foregoing applies not only to the partition of the disk with the OS, but also to any other partition or the entire hard disk.
After we have created a bootable flash drive with the CloneZilla image and booted the system from it, the CloneZilla menu will appear on the screen. You have several items to choose from.
You can choose the first item CloneZilla Live (default settings), or use the backup to RAM option - Clonezilla live (To RAM, boot media can be removed later).

After some time and various inscriptions appear on the black screen, the Choose language window will appear. In the Choose language window, select the desired language, you can select the Russian language in order to understand what is required of us. Proceed to the next step by pressing the ENTER key.

Menu Configuring console-data - do only backup, so we leave the default values - don't touch keymap(do not touch the layout), press ENTER.

Choose Start_Clonezilla and move on...

At this stage, we specify the mode of operation of the program, we choose between creating an image and direct cloning. We want to make an image of the hard disk partition, so we select the first option device image and press ENTER.
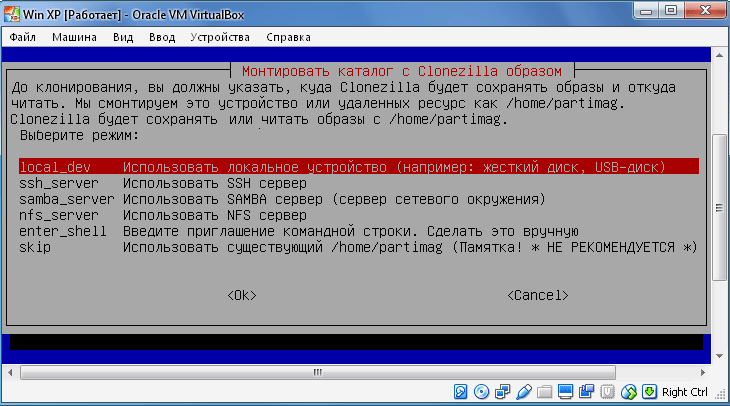
In step Mount Clonezilla image directory(Mount directory with Clonezilla image) you need to choose where the system backup will be saved. There are several options to choose from, the first item implies that the copy will be stored on a local drive, the rest are used when storing a snapshot on remote drives. In this example, I select the first item - local_dev and confirm the selection with the ENTER key.
Clonezilla will prepare the mount point and once again ask us to confirm ( Press Enter to continue), so we'll move on to the next step by pressing the ENTER key.

In this step, we specify a specific partition on which the system image will be saved. Select the hard drive partition to save the Windows backup and press ENTER. I chose a drive that takes up 55 GB, the first 21 GB drive has Windows and programs installed.

We specify a specific folder on the selected partition in which our image will be stored and press ENTER. I chose the root directory, it will then create a folder that will contain the system image and additional files.
It is planned to install partitions, go ahead (ENTER).

Next, select the starting level ( beginner) or expert level ( Expert). If you choose wizard mode, you will need to select additional options. The number and selection options affect the progress of the partition copy and the success of the operation. It is better to choose the initial level first, so that everything goes well. Move on (ENTER).

Specify the image creation mode:
- savedisk- save the local disk as an image.
- saveparts– save local partitions as an image.
We select saveparts, because we only want to copy the hard disk partition with Windows and installed programs.

In the next step, we define a name for the image file. The date is automatically inserted into the title, the title itself can be changed. The name of my Windows backup is BACKUP_WIN_XP-10-08-2016.

It's time to specify the disk partition that we want to save to an image file (back up the hard disk partition). In my case, this is a 21 GB disk.

Since I chose the manual level at the beginning, after agreeing to the copy operation, the process of creating the partition image will begin.
Important!!! If you chose the expert level at the very beginning, then you will need to make additional settings:


Priority - choose partclone/partimage/dd

Copy options.

compression method. I chose the first option - gzip compression. If you want a smaller image size, choose bzip2 or lzip compression.

It is necessary to determine the maximum size of a single image file containing a Windows backup and a disk partition as a whole. Specifying the size makes sense if we want to write the image to several smaller devices. If you need to get one solid image of the system, then simply specify a large number of zeros, which guarantees the health of the cast file.

Everything is set! At this point, CloneZilla will ask for more confirmation of completion. Reserve copy. Enter "y" and confirm with the ENTER key.
The Windows backup process will begin. It can last from several minutes to several hours, depending on the selected parameters and the performance of your computer / laptop.
Restoring Windows from a disk partition backup with CloneZilla

Additional files and a Windows disk partition backup file
Well, the process of creating a copy of the Windows partition was successful. In fact, we created a snapshot not only of the OS, but also of all installed programs and files that were on the copied partition.
Now let's try to take a blank hard disk and copy the contents of the image of the copied hard disk partition with Windows onto it. For these purposes, I created another virtual machine, connected to it one virtual disk, to which we will copy everything, and a disk that contains a copy of the partition created earlier.
We start the virtual machine and mount the CloneZilla ISO image into the drive.
For a real situation, we load the operating system from a bootable USB flash drive and enter the CloneZilla menu.
The algorithm of actions is almost the same as when creating a copy of the OS:
- The first menu item or Other Modes of CloneZilla live / CloneZilla live (To RAM. Boot media can be removed later).
- Choose a language.
- Don't touch the keyboard
- Start CloneZilla.
- device-image.
- Local_dev.
We select the partition on which the previously created Windows backup and the contents of the disk partition are located.
Select the initial level (Beginner).

Since we want to restore the contents of the image, we need to select or restoredisk or restoreparts. If we previously created an image of the partition (saveparts), and not the entire disk, then select restoreparts. If we created a copy of the entire disk (savediisk), then select the restoredisk item. I created an image of the partition, so now I select the restoreparts item.

If everything is correct, then we will have a window with a folder in which the image created earlier is stored, select this folder and press Enter.
The next step is to select the partition to which you want to restore the contents of the Windows backup. We select a section and remember that its contents will be completely overwritten.
Press Enter to continue and confirm your intentions.

That's it, the recovery process has begun.
Important note!!! The size of the partition to which you want to restore the contents of a backup copy of the Windows partition cannot be less than the partition from which you made the backup. If you made a snapshot of a 20 GB partition, and the snapshot takes up only, for example, 2 GB, this does not mean that you can restore to a 10 GB partition.
This is the transfer of all data from the old drive ("donor") to a new one ("recipient"). Everything is copied without exception: the operating system with drivers, installed programs, photo, music and so on. After cloning and replacing the disk, you do not need to remember passwords, all files will be in their usual places.
Why clone a hard drive?
This operation is carried out for the following purposes:
- To use a new and faster drive. A typical case is replacing a slow HDD with a modern SSD. This will significantly speed up the responsiveness of Windows, and due to cloning, the upgrade of the computer will be as comfortable as possible for the user. All shortcuts and settings will remain unchanged, but the system will become faster.
- Not to reinstall the operating system. For example, after buying a new computer, you want everything to be like on the old one and without reinstallations. This will happen when transferring information from the “donor” to the “recipient”, and the procedure itself will require relatively little action and attention from the user.
- To synchronize work on different computers. Remote work is becoming more and more common. Cloning a hard drive will allow you to deploy a full-fledged workplace where it is convenient and there can be as many such places as you like.
- To backup your data. You can lose information on the drive at any time - nothing lasts forever. Thanks to cloning in a few clicks, you can also be safe in case of force majeure to have a fully working "cast" of all data.
It is important that the "donor" does not have viruses - clone the drive only after a thorough check for malware.
Utilities and programs for cloning
There are many cloning applications. Some, specially designed to perform such an operation, are suitable for inexperienced users who value the simplicity of the process. Other programs have wider functionality. In them, creating a disk clone is just one of the many options available.
Connect your new drive to your computer before using any application. To do this, it is convenient to use an external hard drive pocket.
Renee Becca
A simple utility that everyone will understand. With its help, you can clone a storage medium in a few clicks. The algorithm of actions consists of the following steps:
- download, install and run the application;
- select in the left pane "Clone". With Renee Becca, you can also clone only certain local drives or transfer only the operating system to a new drive. The corresponding items are located below in the initial window of the program;
- indicate "donor" and "recipient". To get a complete copy of the "donor", check the box "Make target disk bootable ..." at the bottom of the window. On the left, expand the "More" list and check the box next to "Clone of all sectors ...". Then start the operation by clicking on "Clone";
A functional program that costs a lot, but a demo version is also suitable for cloning. To download it, follow the link and enter your e-mail. After launching the application, do the following:
- select "donor". It is important to specify not just a local drive, but the entire drive. To do this, right-click on the line with this drive and click on "Clone basic disk";
- specify "recipient". When choosing this disk, remember that the data on it will be overwritten, and its volume cannot be less than the size of the occupied information on the "donor";
- so that the "recipient" is exactly the same as the "donor", check the box next to the "One to One" line in the next window;
- in Acronis Disc Director, any manipulations with drives must always be confirmed separately. To do this, at the top of the window, click on "Apply pending operations" - only after that the cloning will begin;
If you do not use the program for commercial purposes, then you do not need to pay for it. You just need to go to the developer's website, click on "Home Use", enter your e-mail and confirm it - you will receive a corresponding letter. After downloading, installing and running Macrium Reflect, follow these steps:
- on the home screen, click on "Clone this disk";
- on the next window, tick all local drives on the "donor";
- at the bottom, click on "Select a disk to clone ..." - a selection window will appear, where specify the "donor";
- at the end of the operation, click on "Finish";
Paragon Drive Backup Personal
A free utility, the capabilities of which are enough for cloning. It is available for download on this page, and after downloading, installing and running, do the following:
- create your own account in the app. This is done in a few clicks - you only need to specify your e-mail and personal data. After that, on the left, click on "My new backup". On the right, specify "donor" in the "Backup source" field and "recipient" in the "Destination" field;
- start cloning by clicking on "Back up now";
Simple and free app. To download, go to the developer's website and select the version with Russian localization.
After installation and launch, follow these steps in sequence:
- indicate "donor". If you need to clone not the entire drive, but only one of the local drives, then check the box "Show partitions" and select the required local drives. Then click on "Next";
- Specify the "recipient" and click on "Next" again.
- the settings window will appear. You can not change anything and click on "Next";
- a window for setting the sizes of the "donor" and "receiver" will appear. It is enough to tick the option "Resize partitions proportionally" and click on "Next";
- in the last window, confirm the start of the operation by clicking on "Start copying".
A good utility that has a demo version, the capabilities of which are enough for a one-time disk cloning. After downloading, installing and running the application, follow these steps:
- in the top panel, click on "Clone" - unfortunately, the program does not have a translation into Russian;

The main problem when changing a hard drive is the need to install and configure the operating system and programs from scratch. It takes a lot of time and effort.
The solution to the problem is automatic disk cloning (HDD, SSD) using special software.
Cloning- This is the process of sector-by-sector transfer of the operating system, software and user's personal files from one disk to another. Unlike backup or disk imaging (ISO), cloning creates a 100% copy of the original media: the main partitions, structure and software.
The new cloned disk is almost identical to the old one. This means you won't have to reconfigure your work environment, activate your system, or renew your software licenses. The difference between it and the original media is that the binding to the computer hardware is removed from the operating system, but it also becomes inaccessible to roll back the system to the original settings while preserving user data and reinstalling in update mode.
Preparing for cloning
Before you start cloning, make sure that nothing interferes with the process:
- If you are using a laptop, charge the battery;
- Troubleshoot problems that cause the computer to restart and shutdown (if any).
It is also advisable to back up important data.
Connect the receiving disk via any available interface. The process will go faster if both media are connected to SATA 6 Gb or faster connectors, but if this is not possible, use, for example, USB (USB-SATA adapters are sold in computer stores).
Hard disk cloning time depends on the following factors:
- Program capabilities.
- Disk volume. The larger it is, the longer the utility transfers files, sections, and structure.
- Speed and Type of Source and Destination Drive: SSDs (solid state media) are faster than HDDs (magnetic hard drives).
Cloning utilities
We present to your attention the best, in our opinion, utilities for cloning hard drives.
Renee Becca

Macrium Reflect
The main advantage of Macrium Reflect is its simple and user-friendly interface. The program is also free for home use.
While the utility is running, disable heavy applications, as the program is demanding on computer resources.
To make a clone of a storage medium, you need:

Handy Backup
Handy Backup is an easy-to-use program for creating physical and logical copies of disks. The utility creates an exact copy of the HDD completely preserving its structure.
Cloning is performed automatically: you do not need to manually clean up the garbage, transfer files, fix registry failures.
To use this software permanently, you need to purchase a license. A 30 day trial is available for free. It is enough to perform basic functions. The interface is translated into Russian.
How to use Handy Backup:

HDClone
HDClone is another versatile hard drive cloning tool that allows you to work with drives of 137 GB or more.

Acronis True Image
A feature of Acronis True Image is that copies created in it can be stored not only on your computer, but also in cloud storage Acronis Cloud. When saving data in the cloud, access to a copy of the disk is possible from any device connected to the Internet. The program uses AES-256 encryption to protect data.
To use all the features of the utility, you need to buy a subscription. The cost of the standard version is 1700 rubles. There is a trial version for 30 days.


