Correct installation of Windows XP. Installing Windows XP
Reinstalling the operating system allows you to correct accumulated operating errors, reformat hard disks, completely clear the registry. It is recommended to reinstall Windows XP every six months.
Step 1. When you turn on your computer, enter the BIOS and set your drive to be the first priority boot device.

On a note! You can boot from the drive in another way: during the procedure “POST" enter the boot menu and select yourCD-ROM orDVD-ROM.
Step 2. During installation, you will be prompted to download specific drivers for SCSI or RAID devices. These drivers are used for server systems, so for home computer You can skip this point.
Step 3. Please review the End User License Agreement (EULA). To confirm your consent, press F8. In case of failure (ESC), the installation will be interrupted.

On a note! The agreement has several points that few people pay attention to. For example, according to the specified document, you have the right to copy the installation disk no more than twice for each paid license. This way you can avoid various lawsuits associated with the use of unlicensed copies of distributions!
Step 4. Check out the capacity of your hard drive. To install to the selected partition, use the Enter key and go to step 7. If you want to change the number of volumes, go to step 5.

Step 5. Create the required number of logical partitions (volumes) of the hard drive by pressing the “C” key. Specify the size of the new volume.

Step 6. Specify the logical drive where you want to install XP.

Step 7 Check the desired option to format your hard drive.

Important! It is preferable to choose a full format rather than a quick format, since it checks for bad sectors. Please note that when installingXP volume selected for installation is completely cleared!
Step 8 Wait until the partition formatting process finishes.

Step 9 Wait until the process of copying system files is completed.

Step 10 To continue, a reboot is required; as a rule, it occurs automatically.

Step 11 After downloading, the system installation process begins.

Step 12 At the request of the installer program, configure the regional settings you need.

It is advisable to select the default layout as the one you use most often. You can change it later, in an already installed system.

Step 13 Setting up the ownership of programs is necessary for subsequent display in Windows XP of the name of the copyright holder of this licensed copy.

Step 14 When prompted by the installer, enter the key. As a rule, stickers with license keys located on the computer case or on the original boxes for installation disks.

Step 15 Create and enter a computer name (required parameter), as well as a password for account“Administrator” (the parameter is optional, but it is better to specify it).
On a note! If your computer is not on a workgroup or domain network, you can specify any name. Otherwise, you should use the name in Latin, but make sure that it does not coincide with the previous one, otherwise problems may arise when connecting to a domain controller or another computer.

Step 16 Specify date and time settings.
On a note! When installing older versionsXP may have a problem with time zones. Currently, winter and summer time have been cancelled, but these transitions remain in the system. To avoid them without installing additional updates, specify your time zone for another country (for example, instead of Moscow, specify Istanbul).

Step 17 Network parameters are set as follows: if your computer should have a static IP, check the “Special parameters” option. If you select “Normal settings”, the network address of your computer, gateway and DNS server will be assigned automatically.

Step 18 Specify the domain or network group that your computer belongs to. The default is Workgroup.
Important! If you need to connect to a domain, it is better to specify it immediately during installation - this will allow you to quickly receive all operating system updates, security settings and standard workstation settings.

Step 19 Wait for the installation to complete.

Step 20. When prompted by your computer, give your system consent to automatic setup screen settings.

Step 21 Check the desired option in the Screen Resolution Wizard.

Step 22 Perform the final setup of the operating system according to the instructions.

Step 23 Check the desired system update option.
Important! Technical supportWindowsXP was discontinued in 2014, so there are currently no updates, with the exception of very important ones, for example, protection against ransomware viruses.

Step 24 Upon request, register your copy of Windows with Microsoft Corporation. Essentially, this feature provides access to all system updates.

Step 25 Specify computer users.
On a note! Users must be specified even if your machine is on a domain, since these records only apply to a specific workplace.

Step 26 Complete the installation wizard.

Step 27 After completing the Windows installation process, you need to update the drivers for all devices.

Conclusion
We have looked at the main points of OS installation, but do not forget about the difference between installing on a “stand-alone” machine and a station in the domain. Try to update your system drivers as often as possible to maintain stable operation.
Video - Installing Windows XP
As everyone knows, to work with a computer we need operating system, which over time becomes “unusable” due to viruses, “garbage” and other factors. Many people think that it is better to turn to a professional for reinstallation, but I offer you step-by-step instructions for installing Windows XP. After studying it, you will have no doubt that you can install Windows XP yourself.

Why do you have to reinstall Windows?
According to statistics, even if you have good computer protection from viruses and careful handling, you still have to reinstall Windows xp every three years. The “garbage” that accumulates in the system is sometimes leftovers from the removal of programs and games, which contain settings, configuration files and other system files of the old application. Many programs make entries in the registry, and after deleting the entry remains “live” in the system. It also happens that the computer hangs and there is no way to “revive” it, and the conclusion suggests itself: you need to install new Windows xp.
Setting up your computer to boot from disk.
Usually, when the computer boots, the motherboard splash screen appears for a moment, then the post is checked, and now we see the “Windows XP” greeting. To install, we do not need to launch Windows itself, but we need to launch a disk with our windows xp image. To do this you need to go to Bios. To enter Bios, you must press the DEL or F1 key when turning on the computer. (On laptops use F1, F2, F3, DEL, Ctrl+Alt+Esc. If more than one combination does not work, then you need to look on the official website for how to enter bios).
Most often there are only two types of bios:

1. Phoenix AwardBIOS.
If you have this particular version, then you need to do the following: enter the Advanced BIOS Features section, select First Boot Device and assign the value CD-ROM. Then press the F10 key (to save the settings and exit) and select Yes in the dialog box that appears.

2. American Megatrends BIOS.
In this version, the background will be gray and the sections will be written in a line at the top. First you need to enter the Boot section, then the Boot Device Priority subsection and in the 1st Boot Device item select your CD-ROM drive. And just like in Phoenix AwardBIOS, press the F10 key and confirm Yes.
This completes the computer setup.

Launch the windows installer.
The first step is to insert the Windows disk into the drive and restart the computer. On dark screen we will see the inscription “Press any key to boot from CD”, which means press any key to boot the disk, which is what we do. This message is displayed for no more than five seconds, so you need to immediately press any key. If you didn’t have time, you should restart the computer and press the key again.

On the monitor we will see that the Windows installation has started. There is no need to interfere unless you want to install a special RAID or SCSI driver. In this case, you need to press the F6 key.

Next we will be asked:
1. Start installing windows xp (Enter key)
2. Restore Windows (R key)
3. Exit the installer (F3 key)

We press Enter and the license agreement appears; to agree and continue the installation, press F8. Next, you need to select the hard drive partition on which the installation will be performed. If the disk is new and there is only an unallocated area on it, you need to create a partition (C key), specify the required size in it.

We will also be offered to format the hard drive quickly and normally. Formatting is best done as usual with the ntfs file system. After all, the long-awaited installation of windows xp will finally begin; upon completion, the computer will reboot itself and a window will appear with the inscription “Press any key to boot from CD”, this time we are not pressing anything!

A window like this will appear in which you don’t need to change anything, but in the next one, be sure to enter the Name and Organization.
Windows XP is a good option for installing on a netbook, a weak desktop computer, or a laptop that was released many years ago.
operating room Windows system XP, despite being released in 2001, is still well suited for running on low-power, outdated computers. More modern operating systems Windows 10, Windows 8.1, Windows 8, Windows 7 place more severe demands on computer hardware.
During times creating Windows XP, to install the operating system, CDs were used that were inserted into the CD/DVD drives of the computer. Era of portable USB flash drives has not yet arrived, so Microsoft has not provided a tool to install the system with bootable flash drive.
Windows installation XP via a flash drive takes place in three stages:
- Creating a bootable USB flash drive.
- Selecting to boot from a USB flash drive in the computer BIOS.
- Installing Windows XP on a computer from an installation flash drive.
Creating a bootable USB flash drive with Windows XP
To create a bootable USB flash drive, we use free program WinSetupFromUSB. We also need a clean one USB drive to write to the system's flash drive.
There is a detailed article on my website. Read the article, write the operating system onto a flash drive according to the instructions.
Selecting boot priority in BIOS
Insert the USB flash drive with Windows XP into the USB connector, and then turn on the computer. Immediately after starting the PC, you need to press a specific keyboard key to enter BIOS settings to select boot priority from a bootable USB flash drive or DVD drive A.
On different devices are used various keys or keyboard shortcuts.
After starting the computer, testing the equipment begins, at this time you need to quickly press the key to enter the BIOS. The most commonly used keys are "Del", "F2" and "F8" for fast loading.
Work in the BIOS is carried out using keyboard keys. The BIOS window provides explanations for English language, which keys need to be used to configure.
In the AMIBIOS settings, go to the Advanced BIOS Features menu, where you need to select as the first boot USB devices disk, moving it to first place.
AMI BIOS ver.3.31a
In other BIOS versions, open the Boot tab, select USB flash drive , install it as the first boot device if you are installing from a USB flash drive. Select DVD drive, if you are installing from disk.
Save the settings and then exit the BIOS. Immediately after this, the computer will boot from the installation flash drive or from a CD/DVD disk if an optical disk is used to install Windows XP.
If you didn't manage to enter the BIOS in time, it's okay: restart your computer again, and then try again.
How to install Windows XP from a USB flash drive
In the first window with the inscription “Press any key to boot from CD” you need to press any key on the keyboard.
To create a flash drive, we used the WinSetupFromUSB program, so the MultiBoot USB window will open on the screen, in which you need to select « Microsoft installation Windows XP SP3 x86 - Russian version".
If you install from disk, the window located above does not appear.
The installation of Windows XP begins. After downloading necessary files The Windows XP Professional Setup window opens. Necessarily
Press any key, otherwise the installation will not start. 
Press the " Enter» to start installation of the operating system.
All offered options:
1. Proceed with installing windows xp (Enter key)
2. Restore Windows (R key)
3. Exit the installer (F3 key)

We accept the license agreement by clicking on the " F8».

If the system is already installed on the computer, the hard drive partitions will be displayed in the window. You can delete all partitions and install the system in an unallocated area, (be careful, after deleting a partition or formatting it, you will lose all data) or select an existing system partition for installation.
We will install Windows XP in an unallocated area. In the unallocated area, if necessary, you can create an additional non-system disk partition (partition D for data storage).
On our computer, an unallocated area is selected. To start Windows installation, click on “ Enter». 
- Format partition to NTFS system(Quick).
- Format the partition in the NTFS system.
This window may prompt you to format it as a file. FAT system, do not consider this option.
You can choose any of these formatting options in NTFS. In the first case, formatting the partition will be faster.

The system partition is being formatted.

The system copies the files to the Windows installation folders.

Upon completion, the computer will restart.
Next, a window will appear with the inscription “Press any key to boot from CD”, in This time we don't press anything!  The installation program window displays information about the functions of the operating system. Windows XP will take some time to install, and the estimated time until installation is complete is displayed in the Windows Setup window.

On top of the System Installation Wizard window, windows open for configuring certain parameters.
In the window " language and regional standards» select the language, click on the « Further" In the Russified version of Windows XP, Russian is selected by default.

In the next window, be sure to enter “ Account name”, for example Alexander.
You can enter anything you want. This name will appear in the system as the computer username.
If you are a regular user, " Name of the organization» do not enter. 
In the Product Key window, enter the key for your copy of Windows. (this window may not appear - depending on the build of Windows XP ). You can skip this step; the system can be activated later, after installation on your computer is complete.

If you did not enter the key in the previous window, in the " Error» click on the button « No».
In the next window, enter " Computer name", such as Dell, and administrator password. If you do not use a password, leave the corresponding fields blank, and then click on the " Further" If necessary, you can set the administrator password later. 
In the window " Setting the time and date» — select time, date and time zone.

The Windows XP Setup window will open again.

In the next window " Network settings» select « Regular Options».

In the window " Workgroup or domain» click on the button « Further", without changing anything.  The Windows XP installation window will open again.

The installation of the operating system continues for some time. After installation is complete, the computer will restart.

A welcome window will open and then Windows XP will start. 
Windows XP installation complete.
Enter the BIOS, again select the computer's hard drive (HDD) as the first boot device. Next, install the necessary drivers on your PC. You may have the drivers on the disk that came with your computer, or you can go to the official website of the equipment manufacturer and download the necessary drivers from there. More details about this in the article: “. This article contains links to the official websites of manufacturers motherboards and video adapters.
In contact with
Probably every second computer-related website has an article about how to install Windows XP operating system. I thought that let my blog be no exception and remain on it Windows XP installation instructions.
You can install Windows on a blank hard drive; on top of an already installed system; or as a second (third, etc.) operating system. Each of these options has its own characteristics. Today I want to tell you how to completely reinstall your existing operating system while formatting the system disk.
In general, you can start installing Windows XP in two ways: 1) by booting from installation disk; 2) directly from the installed system. The first option is preferable, and we will consider it.
A small digression: I did not take the screenshots used in the article myself. I borrowed them from the site compbegin.ru. I hope the author won’t be offended by me for this :)
So, for installation we need boot disk with Windows XP operating system. Only such a disk contains a special hidden partition with important system files that will allow the computer to boot directly from this CD.
We turn on our computer and first of all go to the BIOS to configure booting from disk. To do this, immediately after turning on, press the key on the keyboard Delete or F2(other keys may also be used, so you need to carefully watch the prompts on the screen).
Once in Bios, you need to find the section with the word Boot, and then change the order of boot devices in it so that the CD-ROM is in first place. Depending on the BIOS version, the device from which the computer will boot is either selected from the list or moved to the top using the keys F5/F6, +/-
.
After the changes have been made, we exit the BIOS, saving the settings. Before leaving, you need to insert a disk with Windows XP into the drive so that the computer can boot from it.
If any Windows operating system was already installed on your computer, then after rebooting you will see “” on the screen (this means “Press any key to boot from CD”). Accordingly, you need to press any button on the keyboard. If you wait more than 10 seconds, the current operating system installed on the hard drive will begin loading (then you will have to restart the computer again).  The Windows XP installer shell will appear on the screen. The OS will check the hardware installed on the computer and begin downloading installation files.
  At the end of this process, a window will appear asking you to begin installing Windows. Click Enter on keyboard.
 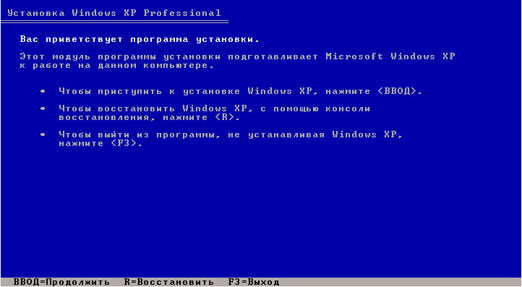 Next, accept the license agreement by clicking F8.
 It will then search for previous copies of Windows installed on your computer. If any are found, you will see a screen with a list of these systems.
  Here you will also be offered:
1) Restore the found copy of Windows by pressing the R key .
Recovery can help in case of damage, deletion or replacement of infected system files Windows files.
If you select this option, you will have to go through the full system installation procedure, during which all system files of the old copy will be replaced with new ones from the CD. All your data, settings and installed programs however, they will not disappear anywhere.
2) Install a new copy of Windows by pressing the Esc key .
Because we want to install a new Windows XP, then press now on the keyboard Esc.
You will not see a window with a list of installed systems if you are installing the system on a new hard drive, or if the previous copy of Windows has a different edition or service pack.
Because in my case, the operating system was already installed on the computer, and the hard drive was already distributed into logical drives. Therefore, a window appears listing all found partitions.  If the current partition of your hard drive does not suit you, you can delete existing partitions by pressing D(you can select the desired section using the arrows on the keyboard). After deleting a partition, the area it occupied becomes unallocated, and all data located on it logical drive are deleted.
The existing structure of the hard drive suits me, so I use the arrow on the keyboard to select the partition in which the system will be installed. Let it be C: Section2 (SYSTEM). Then I click Enter.
If the following window appears, just click Enter. Then select “Format partition using NTFS” and click Enter.
 The formatting process will begin:
 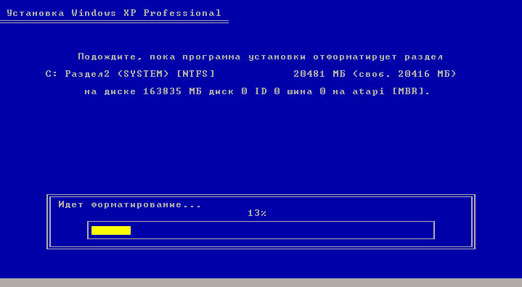 When it’s finished, Windows XP files will begin copying to your hard drive:
 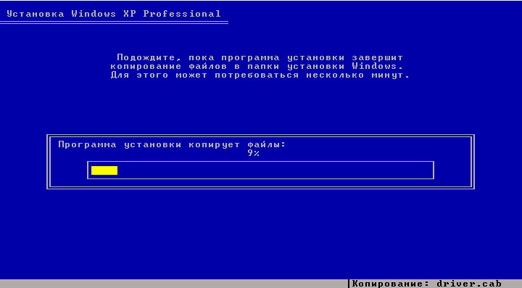 After the copying is completed, the computer will reboot. If after rebooting a screen appears that says “”, do not press anything (just wait 10 seconds). Otherwise, the installation will start again.
Next, Windows will offer to configure the language and region. Click “Next”.  In the “Setting program affiliation” window, enter some name (for example: Ivan) and the name of the organization (for example: Nome). Click “Next”.
  The “Product Key” window will appear, in which you must enter serial number Windows XP.
 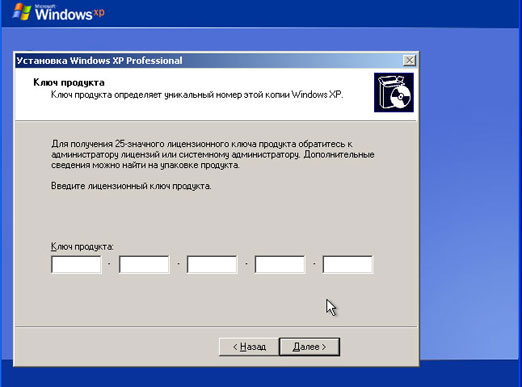 Next, come up with and enter the name of the computer under which it will be visible on the network (use Latin letters). The administrator password can be left blank.
  In the “Setting time and date” window, check all the settings and click “Next”.
  You will see the next two windows only if the Windows XP distribution contains a driver for your network card. In the first of them, we leave the marker in the “Normal settings” position, and in the second, we agree with the name of the working group WORKGROUP and simply click “Next”.
 Windows will then begin setting up the network and copying files. After the installation is complete, the computer will restart and offer to automatically adjust the screen resolution - click “OK”.
  A welcome screen will appear - click “Next”.
  The next window will ask you to enable automatic update. You can select “Delay this action” and click “Next”.
  If a network card driver was installed during installation, two more windows will appear in front of you. In the first “Test Internet connection” click “Skip”. And in the second, put the marker in the “No, some other time” position and click “Next”.
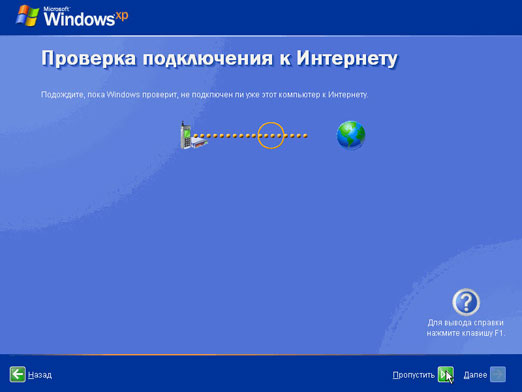
 The account creation window will appear. In the “Your account name” field, enter any name in Latin letters and without spaces. You can also create a second, third, etc. now. users, but for now one is enough. Click “Next”.
  This completes the installation of Windows XP. After clicking the “Finish” button, the Desktop will appear.
 Do not forget to return the computer to boot from the hard drive in BIOS.
Windows XP is the classic and most popular operating system, which is still installed on computers by antique lovers. Unfortunately, due to its obsolescence, serious problems may arise during the installation process. In particular, installation may not occur at all due to errors. But almost all of them can be solved.
What could be the reasons
There are two options in which it may suddenly become impossible to install Windows XP on a computer:
- The problems are directly in the software.
- Problems with computer components.
In both situations, significant conflicts may arise with the operating system installation process. However, any of them can be easily and simply solved if you understand a little what the problem is.
Damage to the installation disk
One of the most common reasons why Windows XP does not install is a malfunction of the installation disk itself. In most cases, no one pays attention to scratches and wear on the disk, although massive damage is quite capable of preventing the reading of some files. The same applies to recording - incorrectly “burning” the media will not allow the operating system to be installed correctly. So if the reason is scratched, it is recommended to look for another installation disk.
Incorrect input and output device
The most common and far from sad mistake is an incorrectly positioned I/O device. The operating system is trying to install from some media, but the BIOS does not see it, so the installation fails.
So to fix the problem you will have to look into the BIOS. To do this, immediately after pressing the computer's power button, begin to very actively press one of the keys on the keyboard. As a rule, this is F2, Esc or Del; more precisely, you need to look at the motherboard manufacturer.
After this, we directly set the download priority. Using AMI BIOS as an example:
- Let's go to Boot.
- We find Boot Device Priority there.
- Let's see which device is displayed first. It is necessary that the First Boot Device line contains the device that is needed for installation (floppy drive or flash drive).
After this, you can exit the Bios and save the settings.
If this does not help, be sure to replace the small battery that powers the CMOS on the motherboard.
Boot viruses
The next problem, which is also related to Bios, is the function of boot viruses. Or rather, its on state. In the original, this item should fight off viruses during boot, but for some reason it only interferes with the installation of the system. Therefore, you need to disable it by changing the position to Disabled.

Drive failure
In some cases, a damaged drive may prevent Windows XP from installing. The likelihood is especially high if there were problems with it before - it did not read or read information incorrectly. If this is not so noticeable in everyday life, then during the installation process every file is important, which is why it freezes.
There are two ways out of this situation - either install a new drive if you plan to install from a CD/DVD, or try installing the operating system from a flash drive.
Hardware problems
The next reason is any malfunction in the computer hardware. It could be a deformity hard drive. It occurs if the computer for some reason falls or hits something. In this case, the hard drive is damaged and recording can no longer be performed on it.
The next “internal” problem is disconnected contacts on the motherboard. Or, for example, there was a failure in the data input/output device, which is located on the motherboard itself.
And there is only one way out - try installing a copy of the operating system on another PC. If it starts, it means that the problem is in the computer’s hardware. If not, the problem lies in the copy itself.
Conflict with modernity
This problem is relevant for the latest motherboards. They work slightly differently, so the installer simply does not recognize HDD devices. The essence of the problem is this: in the BIOS the value for the IDI/SATA controller of the chipset, specifically AHCI, is set incorrectly for the installer. The outdated Windows XP operating system is simply not able to recognize such a value, since it appeared much later than the last patch for it.

The solution is the following - enter Bios, then SATA Mode. Find there the value called IDE and set it as used. XP is familiar with it and will not be capricious.
Other problems
In addition to the problems described above, other unpleasant malfunctions may occur:
- Overheating of any component. During operation, one of the components of the processor heats up excessively and cannot perform functions correctly. So you should first eliminate the cause of overheating.
- Conflict with more new system. If the disk already contains a version of Windows 7 or higher, installation may not occur. First you need to format the disk with the old system and only then start installing the new one.
- Service pack conflict. If this error occurs, you should format your local drives. A clean system is then installed on a free hard drive.
These were the most common and easily resolved problems, but many others may also occur. Most often, they can be determined either by a specialist or by a program designed for diagnostics.
(Visited 3,981 times, 2 visits today)


