The program restores raw to ntfs. What is the RAW file system and how to return to NTFS
One of the common problems encountered on Windows 7, 8 and 10 is changing the file system of a hard drive, flash drive or solid-state drive to RAW. The system automatically informs you about this problem with messages like “Format the disk to use it” and “The disk file system is not recognized.” Let's figure out how to return the file system from RAW back to NTFS or FAT32.
The RAW file system is, in fact, the complete “absence of a file system” on the media as such. This usually happens due to system failures, a sudden power outage, or a malfunction of the device itself. Any attempts to check the drive are often accompanied by the notification “CHKDSK is not valid for RAW drives.” There is no need to worry - in most cases, the data on the disk can be recovered.
How we will solve the problem:
- Using a standard drive check tool.
- Through partition formatting.
- Recuva utility.
- Using the DMDE program.
- Via TestDisk.
The first thing you need to do when you detect a RAW file system and have problems accessing storage media (HDD, SDD, external drive or microSD card) is to test the device. The method will not work in all cases, but it is absolutely safe and is perfect for situations when the system disk is formatted in RAW, as a result of which the OS refuses to boot.
The system starts
So, if you are lucky and the system was “lying” on another volume (continues to work), then you can perform the check directly from the OS. To do this, perform the following sequence of actions:
- We use administrator rights to open the command line. To do this, press the Win + X combination on the keyboard or right-click on “Start”, and then go to the “Command Prompt (Administrator)” section.
- Enter the command chkdsk n: /f into the line, where n is the symbol of the disk whose file system has changed to RAW. Click on Enter.
There are two possible options for the command line to respond to the entered command:
- the check will begin and the drive will be reformatted to the original NTFS format if the problem was due to a normal failure;
- the line will display the message “chkdsk is not valid for raw disks” or “The main file table is damaged, chkdsk was interrupted” if the problem is more serious than a standard failure (then chkdsk will not be able to restore the file system).
After checking the external hard drive, folders ntfsck 00000000 and ntfsck 00000001 may appear on the media, which will contain many recovered files with the name “file”.
You can also check the device with another command – “sfc /scannow”. Use it if the previous one did not help. A system scan will begin, which may take quite a long period of time (the current progress will be displayed).
If the operation does not give the desired result, then we move on to other methods of returning the file system on a hard drive, solid drive or microSD.
The system does not start
If Windows refuses to boot (this means that the system drive has become the RAW disk), you need to boot from another OS, . We will not analyze the process of its creation - this is a topic for a separate article. Next, to fix the problem with RAW, follow the instructions below:
- We boot the PC using the distribution package, which is recorded on a flash drive or on an external hard drive (the Boot Menu launch combination for your motherboard or laptop can be seen when you start the computer). Having selected the language, click on “System Restore” in the lower right corner, or press the combination Shift + F10.
- In the command line that opens, write the following commands one by one:
- diskpart;
- list volume (the program will show which letter was assigned to the faulty disk partition, since it may differ from the one that was installed on the system);
- exit;
- chkdsk n: /f (again, n is the letter of the failed drive).
As for the possible reaction, everything is exactly the same - these operations will either help change the file system to NTFS, and the system will boot, or a message will be displayed stating that this method is not applicable.
If RAW was caused by minor damage to the MFT file table, then most likely you will be able to perform a recovery using the CHKDSK utility, after which the system will start in standard mode.
If the steps described above fail, move on to the following methods to solve the problem.
Formatting a partition
We have already noted that with RAW format, the system automatically asks you to format the hard drive to start working. This is what you should do if important information is not stored on the device, or if the media is simply new (for new drives, the RAW file system is standard). When performing the formatting procedure, data loss cannot be avoided.
You can format a partition or an entire disk using the tools built into Windows. To do this, we either agree with the system’s request, which it displays when we try to open the disk, or we carry out the following actions:
- Press the key combination Win + R and in the “Run” window that opens, write the command. Click on “OK”.
- In the list of disks, select the drive that has RAW listed in the “File system” column. We right-click and format the device by clicking on the desired button.
- If the “Format” item is not active (it is not available for new drives), then you must first click on “Initialize disk”. Once the device is initialized, you can format it to NTFS and begin using it.
If the formatting procedure still fails, then first right-click on the disk and click on “Delete Volume”. Then click on the unallocated area (it will be marked with shading) and select “Create a simple volume”. The wizard, which comes off automatically, will help you carry out further actions.
The formatting procedure itself will not require additional actions from the user - you will only need to indicate the future file system (NTFS or FAT32) and the desired letter for the new volume.
Recuva utility help
Recuva is a simple application that can quickly return the NTFS format to a disk with the current RAW file system without losing data (a free analogue of the EaseUS Data Recovery Wizard utility).
To fix the problem using Recuva, you need to follow the instructions below:
- Download the program from the official website and install it. There is a free version of the utility, the functionality of which is quite sufficient for us. The developers have already completed the translation into Russian.
- Click on the icon with a list of disks and select the one with which the problem occurred, and then click on the “Analysis” button.
- Upon completion of the scan, the utility will display a list of files. We restore them in a few clicks: select the ones you need, right-click and click on “Restore selected...”.
The files will be restored, RAW will return to NTFS.
Using DMDE
It's possible that the RAW disc contained important information that needs to be returned. In this case, you cannot format the drive under any circumstances. We suggest using the free DMDE utility designed for data recovery.
The procedure for returning data from a RAW partition using DMDE can be represented as follows:
- Download the utility from the official website of the developer.
- The program does not need installation - just unpack the archive to any convenient location and run the dmde.exe file.
- Check the “Show partitions” checkbox, select the hard drive on which the problematic RAW partition is located, and click “OK”.
- After analysis, a partition without a file system and with a crossed out icon should appear in the list. Right-click on it and click on “Open Volume”. If RAW was not found, perform a “Full Scan”, and then open the section.
- We check whether the necessary information is on this disk partition. If it is there, then click on the second icon in the top toolbar.
- Select the disk and click on “Recover”.
When the procedure is completed, the faulty partition will become accessible again. The NTFS file system will be returned.
When performing this procedure on a system hard drive connected to another computer, you will have to restore the bootloader in order for the drive to work on your PC.
Recovery via TestDisk
TestDisk is a fairly advanced tool that can solve most problems with the RAW file system (and convert it to NTFS in particular). You have to “pay” for such functionality - there is a possibility that something will go wrong and the data on the disk with the current system will be lost. Use this program only if none of the previous methods worked.
- Download the utility from the official website and unpack the archive to a suitable location - the program does not need installation.
- Run the testdisk_win.exe file from the unzipped folder.
- In the “Select a media” item, select a disk, one of the partitions of which has received RAW status (we select the drive itself, and not a separate faulty partition). Move using arrows, select by pressing Enter.
We are waiting for the verification procedure to complete.
- As a result, the utility will find partitions, including RAW. We can determine which one we need by size. You can view the contents by pressing the English letter P, and go back by pressing Q. Partitions with a “P” mark next to them will be restored and written, while those with a “D” will be ignored. Using the left and right keys on the keyboard you can change the assignment for the section. To avoid accidentally deleting the system partition marked with the symbol “D”, change it to “P”. To continue, press Enter.
- We make sure that the program has compiled the correct table, and if we are sure that everything has been done correctly, then select “Write”, press Enter, and then Y to confirm the action.
When the program completes its work, close it and check the result. If this method did not help, and the file system for the flash drive or disk did not return, then the drive may have mechanical damage. In such situations, it is better to entrust hard drive recovery to a professional.
In conclusion, we suggest that you familiarize yourself with the list of problems that may result in changing the file system to RAW:
- Power interruptions. You may have suddenly lost power, causing your file system to become corrupted.
- There is a malfunction in the cable connecting the device to the motherboard.
- Operation of malicious software.
- Failure of the USB connector (if the problem occurs with the flash drive).
- Problems with the motherboard.
- Presence of bad sectors.
We hope that you were able to recover your personal information and return the disk to the NTFS file system. The presented guides apply to SSD, HDD and flash memory.
Video instruction
We have attached video instructions, thanks to which you can clearly study the process of returning from RAW to NTFS using advanced software.
Conclusion
Now you know exactly how to fix the RAW file system on a flash drive or other drive. We recommend using the methods described in the article one by one - in most cases, one of them helps solve the problem.
How to recover data from a disk or partition whose file system is defined as RAW?
First, you should answer what is the RAW file system?
In fact, the RAW file system does not exist, and defining the partition file system as RAW means that none of the file system drivers installed in the operating system recognized the file system name of the disk or partition.
If the disk file system is recognized as RAW, reading data, assigning a volume label, and other operations with this partition become impossible.
In this case, the operating system displays the size of the partition and, when accessing it, offers to format it.
RAW hard drive

Rice. 1 Hard drive is displayed as RAW
If the operating system cannot recognize the file system of the hard drive, it will display it as RAW. In this case, the user will not have access to data or disk partitions.
However, its capacity, free space and used space will be displayed as “0” (zero). This means that all data from the disk is lost.
They are not available to the user for viewing or copying.
RAW hard drive partition
There are times when, as a result of a virus attack or damage, only one of the disk partitions will be displayed as RAW.
When you try to open such a disk, Windows will report an error and the need to format it.
Formatting such a partition will make it available for further use, but will lead to the loss of all data stored on it.
Reasons why a hard drive or partition may become RAW
The reasons can be very diverse, but if we summarize them, the following can be called the main ones.
For the entire disk:
- Connection or drive cable problems. Sometimes a hard drive can be detected as RAW if its connection cable is damaged or there is poor contact in the connector.
- Broken sectors. Having a large number of bad sectors on a disk can damage its file system.
- Damage to the file system structure. In addition to a large number of bad sectors, the file system can also be damaged for other reasons.
- Partition table damage. Regardless of the reasons for the damage to the partition table, if it is damaged, the entire disk will be detected as RAW.
- Reinstalling or restoring the operating system.
- As a result of exposure to viruses. Malicious software can change or delete important settings or information on your hard drive.
For a disk partition:
- Viruses. Virus programs can, for example, damage the part of the hard disk partition table that indicates the beginning and end of the partition.
- Reinstalling Windows.
- Number of hard drives and partitions. Too many disks and partitions on the computer can lead to RAW partitions.
Methods for restoring a RAW disk
If Windows boots, and the data from the RAW disk has no value for the user.
This is the easiest and fastest way to restore the functionality of a RAW disk or partition.
In this case, it is enough to simply format it in order to be able to use it in the future.
It, of course, does not imply saving or restoring data, but the user must understand that such a possibility exists.
If Windows reports an error and the need to format it, just click the “Format disk” button.

Fig.2 Formatting the disk
If the operating system does not inform the user about the error, but after checking the properties of the disk, the absence of a file system is visible or the disk is not displayed in the “This PC” folder, then you can format it using the Disk Management menu (Fig. 3).

To do this, go to Disk Management by right-clicking on the Start menu.
In the window that opens, find a disk with the RAW file system (it will be signed as such), right-click on it and select Format.
When Windows boots, it is important not to lose data from the RAW disk.
If the data of a disk or partition that is defined as RAW is important to you, then do not rush to format it.
First, try checking such a disk for errors and fixing them. This may restore its functionality.
For this:
- Go to Disk Management (see above).
- Remember the drive letter of the RAW file system.
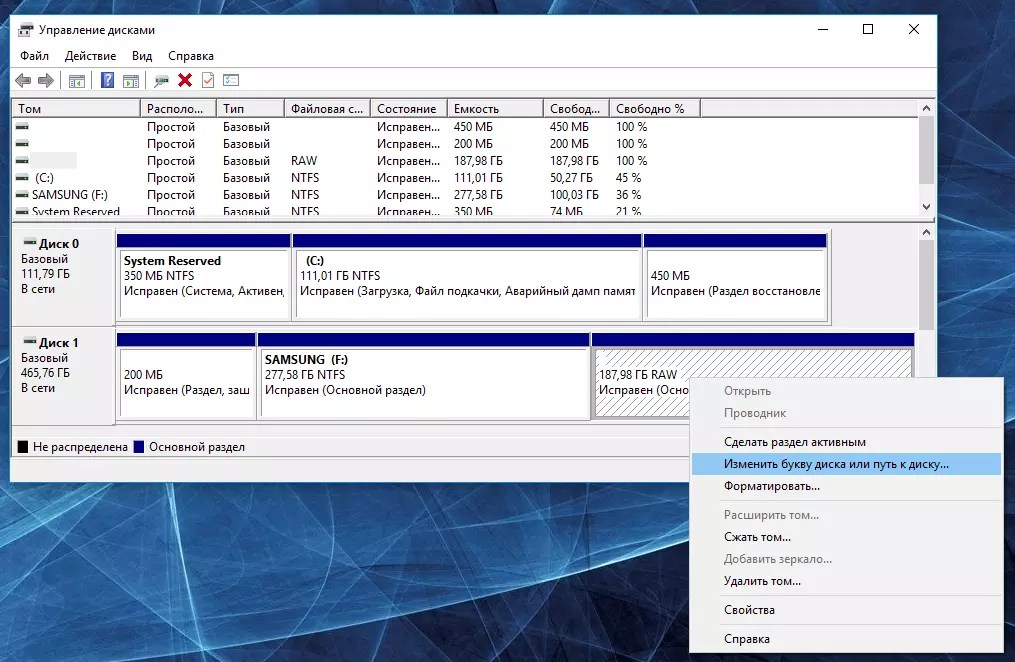
Note: if the drive does not have a letter, assign one to it. To do this, right-click on the desired drive and select “Change drive letter or drive path” (Fig. 4).
- Run Command Prompt as an administrator. To do this, right-click on the Start menu and select “Command Prompt (Admin).”
- Enter the command chkdsk D: /f (instead of D: - specify your drive letter) and press Enter (Fig. 5).

- After running the command, the process of checking and correcting errors will begin. Often, after checking, Windows reports that all errors have been corrected. After that, try going to your disk again, the RAW file system should change to the one that was originally (FAT or NTFS).
If Windows does NOT boot and the disk on which the operating system is installed is defined as RAW.
If the user does not have the installation disk:
- you need to disconnect the hard drive from the computer and connect it to another. Using another computer, this hard drive can be checked for errors using the method described above or scanned using a data recovery program.
If you have an installation disk available:
- Boot your computer using the installation disc and select Repair your computer instead of installing.

- In the recovery menu, find and select Command Prompt. Use it to check for errors on the disk on which Windows is installed.
For this:
- Enter the Notepad command in the Command Prompt. As a result of executing this command, a Notepad window will open in a new window.
- Select File/Open and look for availability and drive letters.

- Run the Command Line to check and fix errors on the disk on which the operating system is located.

Rice. 8 Running check and execution and disk errors from the command line
Recovering data from a RAW disk using data recovery software
If none of the described methods restored the functionality of the hard drive or partition, then another way to recover disk data is data recovery programs.
There are many and varied programs for data and file recovery today.
But in this case, only the one that is capable of recovering information from a RAW disk or partition is suitable for the user.
That is, from a disk or partition from a missing or damaged file system.
Here you should pay attention to the so-called Raw Recovery or Partition Recovery programs.
The principle of their operation is similar, there may be differences in some functions and interface.
For clarity, let's look at the process of restoring data from a RAW partition using Hetman Partition Recovery(the program can be downloaded from the developer’s website).
After the user launches the program, he will be provided with a list of all disks and partitions on the computer. You need to select the RAW section and double-click on it.
In our case, this is Disk (E:).
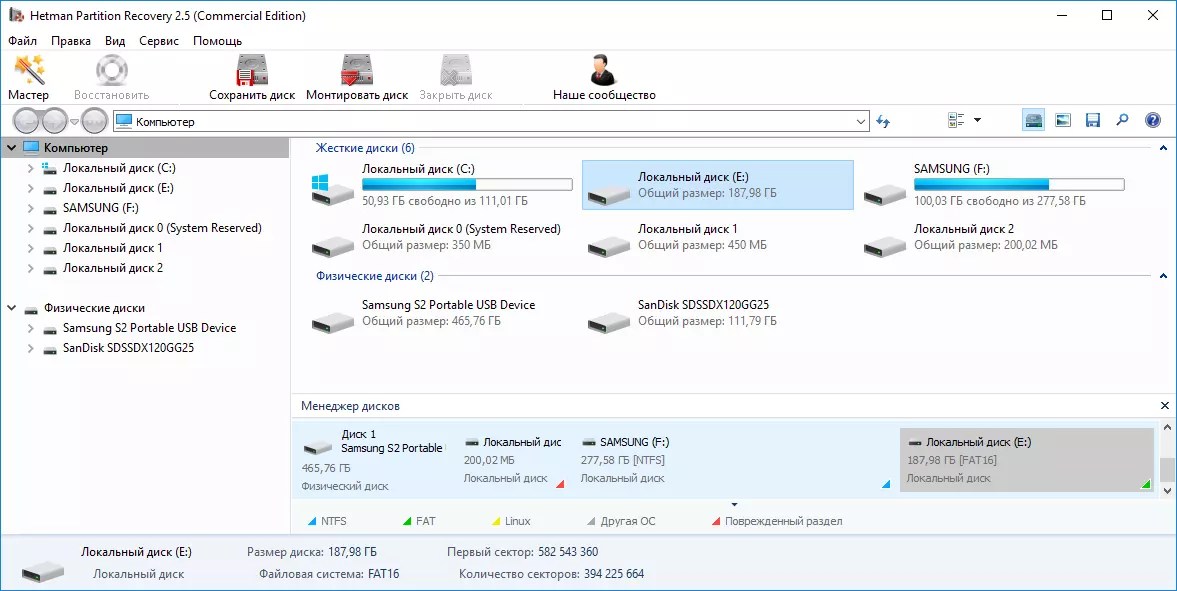
A special feature of the program is that it recovers data from disks or partitions with any file system, which it detects automatically, without the need for the user to make additional settings.
That is, the user just needs to select the required type of analysis in the next window and wait for it to finish (in this case, it is recommended to carry out “Full analysis”).

Depending on the size of the disk being scanned, the analysis process can take from 15 minutes to several hours.
As a result, the program will display all detected files and arrange them into folders in accordance with the extensions of the found files.
Transfer the necessary files to the recovery list and click "Recover", optionally viewing or listening to them in the preview window.

Also about how to recover data from other storage media.
Hard disk drives (HDDs), which for various reasons are not detected by the operating system, receive RAW status and access to them is no longer possible. When you try to open such a disk, Windows advises you to format it, but if you follow this recommendation, all recorded information will disappear. It is advisable to restore an acceptable format: NTFS or FAT32.
The sources of problems with HDD can be different, and before you do anything to restore the format, it is worth identifying them. Here are the most common:
- Connection failures. For example, the user incorrectly disconnected the disk or the power supply stopped and the file system became corrupted.
- The cable that connects the drive to the board is broken.
- Malicious software that violates the data structure.
- Errors that occurred when reinstalling or updating the OS.
- In the case of a flash drive, the reason for changing the format to RAW may also be a malfunction of the USB connectors.
- Malfunctions of the PC motherboard.
- Errors when working with Acronis Disk Director. This program, by the way, can cause strange problems with the file system, even if the media is simply formatted in it. It is better to use standard Windows formatting, and to work with partitions it is better to use other programs, for example, Paragon Partition Manager or similar.
Format recovery
To restore NTFS format from RAW, try the following:

Some people do not take the chkdsk utility seriously, believing that since the file system has changed, the partition has disappeared irrevocably - it has “flown off” and there is nothing in it. This is a misconception. This may simply mean that there are errors in the file system.
This often happens on the system partition when the computer suddenly turns off, when the system was writing files and did not have time to make changes to the file structure in the boot sector. Then the file system collapses at the very root, although physically it is not damaged at all. This also happens when so-called “bad sectors” – bad blocks – appear on the surface of the hard drive.
The utility can easily find errors and fix them, returning the RAW partition to its original state - NTFS or FAT32. In this case, usually even all files remain intact.
This is more difficult to do with FAT32, due to the weak resistance of the format itself to such failures. NTFS can almost always be restored in this way, of course, if the reason was a violation of the file structure or the boot sector.
Restoring format using special programs
If, when you try to check the HDD using the method described above, a message appears: “CHKDSK is not valid for RAW disks,” you can use programs that allow you to restore the NTFS format from RAW. Let's look at the most popular of them.
DMDE
DMDE is a utility that looks for damaged partitions in the file system and helps restore the disk to NTFS status. After downloading and installing the program, you need to do the following:
- Launch the application.
- On the left, check the box next to the phrases “Physical devices” and “Show partitions”.
- Select the damaged drive and click OK. After this, the utility will find the RAW section and indicate it with a crossed out icon. If this does not happen, perform a full scan (the corresponding button is located at the bottom of the window).
- Now try to open the RAW volume and click “Recover” and then “Apply settings”.
- After this, as a rule, the HDD format changes to NTFS.

DMDE program window
IMPORTANT. If you are trying to return the NTFS status to the system disk and do it from another PC, then after the operation is completed and the HDD is returned to its place, the old computer will still display it in RAW format, so it is advisable to first restore the Windows bootloader.
Recuva
A simple and easy-to-use program that can extract files from damaged or formatted media. By itself, it will not restore the file system, but it will allow you to save important files from a flash drive or hard drive. After this, the media can simply be reformatted without fear of losing information.
Remember that you can often find and save important files even on a damaged partition using similar utilities. But this can be done if you did not do anything else with this partition - did not delete it manually, did not create new partitions in its place, did not format it again, did not change the size, and did not write new data there. These utilities themselves save information only on a disk or flash drive that you have authorized, that is, they work with a damaged one, as if “without touching it with your hands.”
- Launch the application, select “Recover all files”, mark the damaged disk and click “Start”.
- The utility will detect files with a broken structure and correct the format to NTFS.
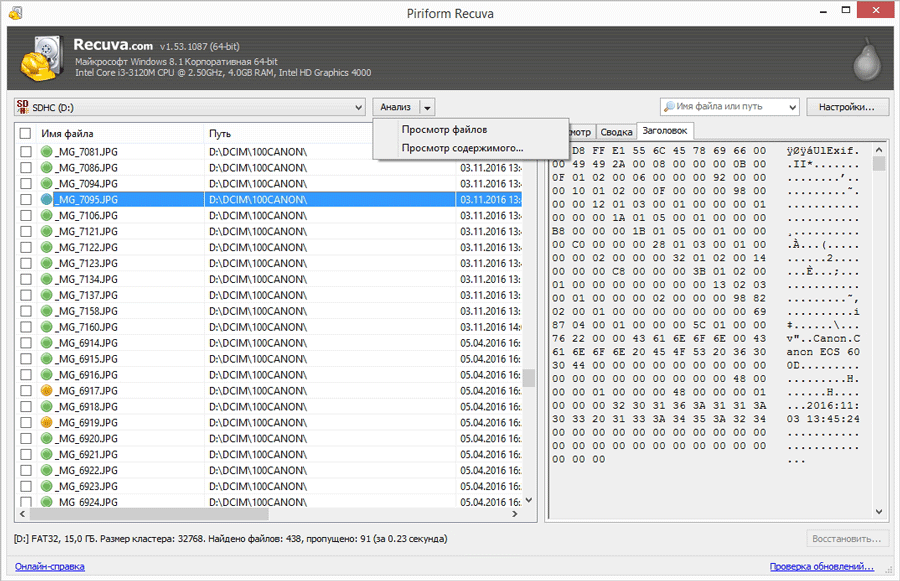
Piriform Recuva program window
TestDisk
The third utility that restores the disk format. Just download and run it, and then:
- Select New, press Enter.
- Then click on the problematic HDD, then Enter again and select Analyze and Quick Search.
- After executing the command, select Write to restore the information structure.

TestDisk window
If all these manipulations lead to nothing, most likely the disk has mechanical damage or its components do not interact correctly and it would be more advisable to show it to a specialist. If the electronics and mechanics are intact, then there is a chance to return it to functionality.
Have you ever encountered a situation where the disc format turned into RAW? How did you deal with a problem like this? Write about it in the comments.
I go to my work disk...
Stop. More precisely, I'm trying to go to
your work disk... and drive E:
no :(. Instead it is empty
unallocated space
From the memories of Horrific
Xakep v.11.01(35) p.27
Happens even to great gurus
troubles of this kind. Not from them
no one is insured. I'll try to tell you
how can I recover data in such
situations. After all, most likely the data is nowhere
not shared, they remain on the disk as they were.
The service area is simply damaged
section. So let's try to figure it out
how it works, and having understood, we will work out
algorithm of actions.
Information about the NTFS structure is quite scarce,
and, due to the closure of the main
specifications for it, obtained like this
called method. Like other file systems, NTFS
divides the disk surface into clusters. Size
clusters have a fixed size,
selectable from the interval from 512 bytes (1 sector)
up to 64 KB (128 sectors). Commonly used
cluster size is 4 KB (8 sectors). Every
file system element, including
official (which are usually called
metafiles) is a file.
Metafiles are located in the NTFS root directory
section and begin with the name symbol "$",
Main service file - $MFT (Master File Table) -
a list of absolutely all files stored in
section, including MFT. Again
a formatted NTFS partition looks like
in the following way:
Space for the MFT file is allocated immediately and with
large margin, usually 12.5% (but maybe
25%, 37.5% and 50%) of the section volume. Remaining
space intended for storage
file contents. However, the OS, when
necessary, can reduce space,
allocated for the MFT file when the space for
the contents of the files are full. For this, in
current versions of NTFS, remaining free
The space allocated for the MFT file is reduced
doubling, thereby increasing the space,
allocated for content placement
files. And when the OS informs you that it is free
place, then this is the sum of free space in both
parts of the partition (reserved for MFT
file and space allocated for content storage
files). But files are not only added to
section, but are also removed from it. And in this
In this case, it is possible to increase the space again,
allocated for the MFT file. At the same time, in the office
area may contain the contents of files,
which will remain there. MFT file will start
fragment, although this is not good.
Once again, what has been said applies to
the newly formatted partition. When I
added using Partition Magic program
unallocated space before NTFS
partition to the NTFS partition (F:), then I have MFT
starts from cluster 1731201, although the usual
value - 4.
The MFT itself is divided into fixed
1 KB in size (2 sectors) each. First 24
records are service files, and the first
MFT itself is on the list. Due to the special importance
MFT file, copy of first four records
stored in the $MFTMirr file somewhere in the area
middle of the section. Also in the last sector
partition (for Win"2k/XP) a backup copy is stored
boot sectors. Thus, for
partition recovery must be found and
copy the first 4 to the beginning of section
MFT entries from backup and possibly itself
boot sector.
To work we need any disk
editor. The main thing is that he can see everything
your disk space. Can
use DiskEdit from Uncle Norton from
Norton Utilities package
2002 or standard disk editor Win"2k -
Disk Probe, for which you need it from a Windows distribution from
folders Support\Tools install additional
tools, including Disk Probe. Also
you will need the PartitionInfo program from the Partition package
Magic. First, let's find out the physical
boundaries of the required NTFS partition. It's possible
done using the PartitionInfo program from
Partition Magic package.
In my case the NTFS partition starts at 5060538
disk sectors. (also available in the lower window
information in the format C:H:S) Now we get
information about the last sector number and
location of the MFT and its copy, why
press the Boot Record button...
So, the last sector of the partition is 5060538 +
3341456 = 8401994 (first sector of the partition + Total NTFS Sectors),
MFT starts with 8x4=32 sectors (MFT start cluster * Sectors
per cluster), MFT Mirr - c 417682 x 4=1670728 sectors (MFT Mirror start
cluster * Sectors per cluster). Let's clarify the size of a separate
records in the MFT file, for which by running
Partition Magic program by selecting the required partition,
by clicking the right mouse button, select the item
Properties In the window that appears, select
NTFS Info tab. As it should be, the size
records in an MFT file (File Record Size) is 1 KB (2
sector).
Launch a disk editor, for example Disk
Probe, and select menu items
mouse on the required section (in my case
this is G), press the Set buttons successively
Active and OK. Now let's move on to the sector,
containing a copy of the MFT. For this we choose
menu item
window, enter the sector number 1670728 and the number
required sectors (16) and press the Read button.
Now let's rewrite these sectors in place
MFT location, with 32 sectors. For this
select a menu item
We answer yes to the question of change
operating mode from Read Only to Read/Write, in
in the window that appears, indicate the sector with
which needs to be recorded (in our
In this case it is 32) and press the Write it button.
We confirm our desire once again and MFT
restored.
Now you need to copy it to your
place boot sector. For this
select a menu item
required physical disk. It's similar
what we have accomplished for logical
disk. Now we need to go to the last one
sector of the partition being restored. Through
menu
then we write this value into the sector
5060538. Be especially careful
since you are working with a whole disk and not
limited by the boundaries of the damaged
section!
All that remains is to run the chkdsk e: /f utility, which
will find and fix just great
number of errors, then congratulate
yourself with the saved section.
PS: Since all operations are potential
dangerous, don't be lazy to make a backup copy
partitions located on the same physical
disk as the partition being restored.
Situations when an unreadable RAW format appears on a computer or laptop instead of a regular partition are very unpleasant for the user. And many simply do not know what to do to bring the disk to normal condition, since the system initially does not recognize the RAW format of HDD disks. How to fix this problem? To do this, you can use several recommended tools, including Windows tools and specialized programs.
RAW format - what is it?
Some users mistakenly believe that the appearance of this format is solely due to the fact that the RAW file system appears instead of the usual one. We restore the disk by rolling back the system state to the previous state, and... the result is zero! Why?
Yes, only because the RAW format is not a file system, but rather the absence of one. This is why the operating system does not see the hard drive or logical partition (damage may also affect partition tables).
Sometimes the system can perceive a damaged HDD, but there is no information that should supposedly be present on it. That is, it is there, but it is impossible to read it. However, often when you try to access such a partition, Windows immediately displays a message about the need to format it before further use. Unfortunately, formatting does not always produce the desired effect, and information is destroyed. It will be very difficult to restore it later, although special programs can be used. But this is not the best method that allows you to convert the RAW format of HDDs. How to fix the situation with saving information? For such purposes, you should first turn to the system’s tools, which will be discussed separately.
Why is the format changing?
Among the reasons that cause the replacement of the desired format with an unreadable one, the main place is occupied by purposefully acting viruses, power surges, sudden power outages in the process of performing some system or user operations, etc.
It also happens that the system defines the hard drive as RAW, files and folders seem to be displayed, but it is impossible to do anything with them (copy, open, move, delete). In this case, you cannot even format the partition, change the volume label, or change its conditional or actual size.
RAW format of HDD disks: how to fix it using the simplest method?
The very first thing to do is to use the command console and run as administrator. You can call it from the “Run” menu (Win + R) using the cmd line.
The chkdsk command is used as a universal tool for restoring the format without data loss. Please note that if the system partition is damaged, you can only call the command line if you boot from removable media such as a LiveCD, a Windows installation disk, or from a bootable flash drive. As a rule, the combination Shift + F10 is used to open the console.

To run the command itself, you need to know the drive or partition letter (the so-called volume label). Let's say the damaged partition in the system is designated by the letter “D”. In this case, the command to be written will look like this: chkdsk d: /f. After entering it, you need to press the Enter key and wait for the file system recovery process to complete, after which you must restart the computer.
RAW format of HDD disks: instructions for using partition management tools
Windows has another powerful tool in the form of the Disk and Partition Management utility. It, along with the above command, is capable of restoring the RAW format of HDDs. How to fix the partition format using it? It's also easy. It’s just worth considering that this technique is designed exclusively for those cases when there is no data in the section.

First, through computer administration or using the diskmgmt.msc command in the Run console (Win + R), you need to call the built-in Disk Management system utility. Next, on the selected partition that has a damaged format, you should right-click and select the formatting line from the context menu.


If the system displays an error or formatting error message, in order to restore a RAW disk, initialization will first be required, followed by the creation of a simple volume. After completing these steps, formatting will be performed, and the disk or partition can be used again for your needs.
Using the TestDisk application
Interesting opportunities for recovering the HDD format are provided by the free TestDisk utility, which is designed as a portable version and does not require installation on the hard drive.

After starting the program in simulating DOS mode, you need to select the Create line, and then specify the disk that was converted to RAW format (you need to select the disk, not the partition). Next, the section style is set (this is usually done automatically).

At the next stage, select the analysis line (Analyze), press Enter, then Enter again with the Quick Search item selected.

In the analysis results, partitions for recovery will be marked in green and the letter P, while those to be deleted will remain gray with the letter D. If you need to change the attribute from P to D, arrows are used.

To continue, press the Enter key again, select the Write button from below, then use Enter again, and press Y (Yes) to confirm the action. When the conversion is complete, all that remains is to restart your computer.
MiniTool Data Recovery utility
This program is also capable of restoring the RAW format of HDD disks. You can fix it as follows.

After launching the utility, a tool called Lost Partition Recovery is selected, the RAW partition is specified, and Full Scan is activated.

At the end of the scan, all files and folders that are in the partition with the changed format will be shown. They can be copied to another location, and then formatted in the application itself, or use the methods described above for this.
According to most experts, the program is good in everything (it works quickly, reliably and stably), but it has one huge drawback - it belongs to the category of shareware applications. The limitations in the trial version include the fact that using this utility it will not be possible to recover partitions larger than 1 GB (but you can also find distributions with activators on the Internet, although their use is illegal from the point of view of international law).
Recovering partitions in DMDE
DMDE is another program for converting disks and partitions of any type from the RAW system to the normal format.

In the application, you select a physical disk with a RAW format (do not uncheck the partition display line!), which can be visually identified by underlining, color mark, size or file system, after which you need to select it and click the open volume button just below. Next, you should check the contents by clicking the show sections button. If this is exactly what is required, the restore button is then used, then the operation is confirmed, and at the end of the process the “Apply” button is pressed. To avoid errors, although this is not required, it is advisable to reboot the system.
A few final words
These are the main methods for restoring a damaged HDD format. Only the most popular tools and programs were listed here. You can find many other interesting utilities on the Internet, but all of them, as evidenced by reviews from experts and users, work on similar principles.
When changing the format on the system partition, the same methods are used, but in this case the boot is done from removable media, and the main tool is exclusively the command console or portable versions of the above-described applications (for example, TestDisk).


