How to set the BIOS to read from disk. How to boot from an “installation” DVD or flash drive - BIOS setup in pictures
Today I decided to write a detailed tutorial with photographs that I just took about how to set CD/DVD drives or flash drives in BIOS.
I'll probably start with the fact that in the system BIOS information is stored about which device to start the computer from when it is turned on. By default, the computer starts from the hard drive, on which the operating system is stored. But in cases where, for example, you need, or some other OS, to boot from some other disk to scan the system for viruses or externally copy data in the event of a system failure, you need the computer to boot from a CD/DVD disk, or a flash drive (modern motherboards can do this).
And this is where the fun begins. You insert a disk or flash drive, restart the computer, and nothing happens, but it boots from the hard drive, or it just tries to boot. All this is because in the BIOS the hard drive comes first, and accordingly the boot comes from it. What do we need to do to make the computer boot from the seed media first? We just need to change the device priority in the BIOS settings and set the order we need, this is what we will do next.
1. First we need to get into the BIOS; you can read more about this in the article. But most often the keys are used to enter the BIOS Del or F2. For example, I have Del. So, we reboot the computer and as soon as it starts to turn on, press the BIOS entry key. For example, I actively clicked on Del. Like this:
2. After this we find ourselves in the holy of holies - BIOS. For me it looks like this:

But this does not mean that yours looks exactly the same. Depending on the motherboard and the BIOS chip itself, it looks different, both visually and with different menu items. Therefore, what I write may not coincide with your settings. But at least you will at least have something to focus on. So let's move on.
3. In order to install the initial boot of the computer from a disk or flash drive, go to the “Advanced BIOS Features” tab.

4. Select the “Advanced BIOS Features” menu item and see the following picture:

5. We need to change the settings in item. Click on it and see this:

As you can see, I have a CD/DVD drive installed in the first place, and a hard drive in the second. And when there is no disk in the drive, loading from the hard disk begins immediately. To change the boot device, for example, select the “1st Boot Device” item and select the device we need.
5. After making changes, click on F10 to save all the settings you have made and Esc to exit BIOS.
Update
I also wrote a detailed article about that. I think it will be useful.
Update
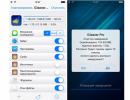
I got my hands on a computer with a new ASUS motherboard and a new BIOS utility. UEFI BIOS Utility – EZ mode. There is already a beautiful and clear graphical interface, mouse support, choice of interface language, etc.
It turned out to be easier to set boot priority in this modern utility. Right on the home screen (by the way, in order to enter the BIOS you need to press the key combination Del+F2) there is a point Download priority.
And there are icons of hard drive, drive, flash drive (if it is connected). You just need to drag the icon we need to the first place. We put the drive icon in first place and it will boot from the boot disk.

That's it, now you can put the disk in the drive or connect a flash drive and restart the computer. The computer should boot first from the device that you first set in the settings. Well, if it is not detected, then downloading will begin from another device, etc. If something didn’t work out for you, then write in the comments and we’ll figure it out. Good luck.
Also on the site:
How to set the BIOS to boot from a drive or flash drive updated: July 30, 2013 by: admin
Installing, reinstalling and restoring the operating system, as well as carrying out certain types of diagnostic work, usually require the use of special boot disks or flash drives. But in order for the computer to be able to boot from external media, the appropriate priority must be set in the settings of the basic I/O system or otherwise BIOSa, that is, literally indicate from which source the system should boot.
The procedure for setting up booting from external media is quite simple, however, it raises many questions for many novice users. And this is quite understandable. Firstly, you rarely encounter the need for such a boot, and secondly, in different computer models, the procedure for entering the BIOS and changing boot priorities may differ in detail. Let's look at everything in more detail.
At the moment, there are two types of basic input/output system: the classic BIOS and its improved version UEFI. Both of them are special programs recorded on the motherboard chip and designed to configure and check the readiness of hardware components, and transfer control of the PC to the operating system. Unlike BIOS, UEFI is more autonomous, it has a convenient graphical interface with mouse support, allows you to integrate drivers, run executable files in the EFI format, and work with GPT disks without restrictions. In addition, computers with UEFI start up an order of magnitude faster than PCs with a regular BIOS.
How to get into BIOS or UEFI
To get into the BIOS or UEFI, immediately after turning on the computer, press and hold the Del, F2, or Esc button. Which button should be used to enter the BIOS/UEFI on your desktop or laptop model should be indicated in the user manual that came with it. However, new computers running Windows 8.1 may have problems with this. If fast boot technology is activated on the system, you simply will not have time to press Del or F2 in time. In this case, you must perform the following steps:
Open Settings -> Change PC settings -> Update and recovery -> Recovery -> Special boot options, and then click Restart Now. After the reboot, you will be taken to the “Select Action” window. Click Diagnostics -> Advanced Options -> UEFI Firmware Options. The computer will reboot and you will be taken straight to the UEFI interface.

Note
Determining which interface your computer uses is very simple. To do this, press Win + R and in the window that opens, run the msinfo32 command, and then in the system information window, find the “BIOS Mode” item. The old version of the I/O system will be marked “Obsolete”, the new one will be marked “UEFI”.

Setting up boot from CD/DVD/flash drive in BIOS
In most BIOS versions, the Boot section is responsible for configuring boot parameters.
It contains a list of all devices connected to the computer. Since the hard drive and CD-ROM are built-in components, they will be present in the list anyway, but if you want a flash drive to be there, you need to insert it into the USB port in advance, even before entering the BIOS. The first in the list is the device from which the system is currently booting. Using the arrow keys, you can change the boot priority, and pressing the F10 key will apply the new settings.
In some BIOS versions, the Boot section may have additional options, in particular Boot Device Priority, Hard Disk Drives, and so on.
If you boot from a CD/DVD or a regular flash drive, it will be enough to move this device to the top of the list in Boot Device Priority and save the settings. If the flash drive is formatted as an HDD, you will first need to go to Hard Disk Drives, select the first device in the list (1st Drive), press Enter and select the flash drive in the menu that appears. Then the same will need to be done in the Boot Device Priority subsection. Save the settings using the F10 key. This concerns AMI BIOSes.


The procedure for setting up booting from a DVD/flash drive in BIOS AWARD or Phoenix is slightly different. Here in the main BIOS menu you need to find the Advanced BIOS Features section, and in it find the First Boot Device item, which is responsible for prioritizing boot devices. While on First Boot Device, press Enter and in the menu that opens (list of devices) select CD-ROM or, if available, a flash drive. If there is no flash drive in the list, switch to the first item Hard Disk Boot Priority, press Enter, select our flash drive in the list, move it to the top of the list. To save the settings, press Esc twice, and then Save and Exit Setup and confirm saving the parameters with the Y key.


Setting up booting from CD/DVD/flash drive in UEFI
Setting boot priority in UEFI is easier, and not just because you can use a mouse. Most UEFI interfaces have a Boot Priority panel at the bottom of the window, which displays all devices connected to the computer, including flash drives and removable HDDs. To install boot from a particular device, simply drag it with the mouse to the beginning of the panel, and then save the new settings when exiting UEFI.

You can also click the “Exit/Advanced mode” button, go to the Boot tab in the window that opens, select “Boot Option #1” in the Boot Option Priorities list and set a flash drive, hard drive, CD-ROM or other device connected to the boot device as the boot device. computer device.

New settings are saved when exiting UEFI or pressing F10.
Have a great day!
Today I will tell you how to enable booting from a flash drive in the BIOS of various manufacturers. No matter what version you have, the order of body movements will be as follows:
1. We insert our bootable USB flash drive into the USB connector of your computer. I recommend inserting it into a port located directly on the motherboard, i.e. from the back of the system unit.
2. Turn on the computer and press the key Delete(or F2) to get into the BIOS. Depending on the manufacturer and BIOS version, other keys (Esc, F1, Tab) may be used, so you need to carefully read the prompts on the screen.
In Bios, we can only navigate between tabs using the keyboard.
Below I will describe this process in detail using the most commonly used BIOS versions as an example.
Attention! Keep in mind that if you are installing the operating system from a flash drive or CD and have selected the boot device in the BIOS rather than in the boot menu, then after the first automatic reboot of Windows you will need to enter the BIOS again and return booting from the hard drive. If this is not done, autoboot from a flash drive or CD will work again, and Windows will begin the first stage of the procedure again installations.
Setting up Award Bios to boot from a flash drive
Award Bios:
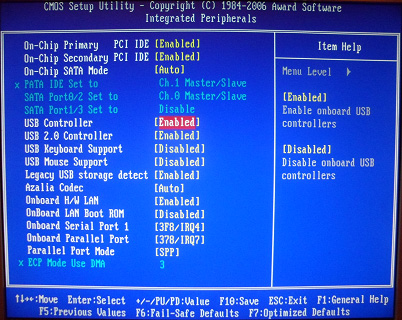
First, let's check if the USB controller is enabled. Let's go to “Integrated Peripherals”. Use the arrow on the keyboard to move down to the “USB Controller” item. Press the “Enter” key and select “Enable” in the window that appears (also using “Enter”). Opposite “USB Controller 2.0” there should also be “Enable”.
 Exit this tab by pressing “Esc”.
Then we go to “Advanced BIOS Features” – “Hard Disk Boot Priority”.Now in my example the hard drive is in first place, but the flash drive should be.
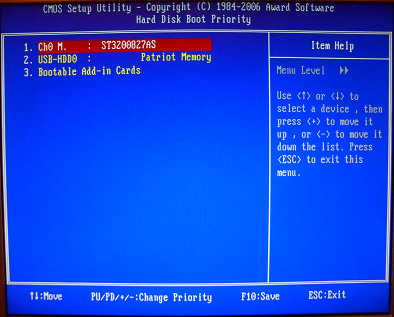 We stand on the line with the name of our flash drive (Patriot Memory) and raise it to the very top using the “+” key on the keyboard.
 We exit here by pressing “Esc”.
Setting up AMI Bios to boot from a flash drive
If, after entering Bios, you see such a screen, it means you have AMI Bios:
 First, let's check if the USB controller is enabled. Go to the “Advanced” – “USB Configuration” tab.
 Opposite the items “USB Function” and “USB 2.0 Controller” should be “Enabled”.
 If this is not the case, go to this line and press the “Enter” key. From the list that appears, select “Enabled” (also using “Enter”).
Then exit this tab by pressing “Esc”.
Let's go to the tab “Boot” – “Hard Disk Drives”.
 Now my hard drive is in first place, but I need to put a flash drive here. We go to the first line, press “Enter” and in the window that appears, select our Patriot Memory flash drive.
 It should be like this:
 We leave here via “Esc”.
Select “Boot Device Priority”. Here, the first boot device must be a flash drive.
 Press Esc.
Then we exit the Bios, saving all the settings made. To do this, go to “Exit” – “Exit & Save Changes” – “OK”.

Setting up Phoenix-Award Bios to boot from a flash drive
If, after entering Bios, you see such a screen, it means you have Phoenix-Award BIOS :
 First, let's check if the USB controller is enabled. Go to the “Peripherals” tab – opposite the “USB Controller” and “USB 2.0 Controller” items there should be “Enabled”.
 Then go to the “Advanced” tab and opposite “First Boot Device” set “USB-HDD”.
 After that, exit the Bios, saving the changes. To do this, go to “Exit” – “Save & Exit Setup” – press the “Y” – “Enter” key
 That's practically everything you need to know in order to boot from a flash drive. In my article, I described the process of setting up the BIOS of the most popular versions: Award And AMI. The third example presents Phoenix-Award Bios, which is much less common.
The described procedure may differ slightly in different BIOS versions. But the main thing is that you understand the principle of setting itself.
By the way, I would also like to add: in order to choose which device to boot your computer from, it is not necessary to change the settings in the BIOS. You can immediately call up a special menu after turning on the computer to select boot devices (this can be done by pressing the F8, F10, F11, F12 or Esc key). In order not to guess with the keys, look carefully at the monitor immediately after turning it on. We need to have time to see an inscription like this: “Press Esc to selest boot device.” In my case, it was necessary to press “Esc”.
Tweet
Let's say you have a boot disk with Windows in your hands. Or the Dr.Web LiveCD anti-virus disk. Or maybe you want to install Linux. You insert the disk into the computer, but suddenly the question arises: “What to do next?” If you are an inexperienced (yet) computer user, this question will be one of the first to arise. Experienced users also sometimes need to know the boot order in different BIOS versions. So my instructions are suitable for everyone.
So, we are faced with a task: we need to tell the computer which disk it should boot from first. To do this you need to go into the BIOS settings. How to do this - read on.
Which button should I press?
The very first question that arises for an unprepared user. How to boot from a boot disk or flash drive?
Two solutions:
- Open the boot menu with a list of connected boot devices and select the one you need from the list.
- Configure the motherboard BIOS so that the operating system loads primarily from the desired device, and not from the hard drive.
Option 1 simple, but not all BIOS support such a menu. In any case, it's worth a try. Typically, the boot menu appears when you press F11 or F12 immediately after turning on the computer. Less often - Esc, F8 or other buttons. Sometimes it is supported but disabled. In this case, read the instructions for your computer's motherboard.
Option 2 It always works - there are boot settings in almost every BIOS. I will tell you about the setup.
We need to get into the BIOS settings. BIOS (or its improved analogue UEFI) is a special system that boots immediately after turning on the computer. The BIOS does not depend on Windows or anything else because it is located on a memory chip soldered into the motherboard. You can read more about terminology.
Typically, to enter the BIOS settings, you need to press the Delete, F2 or Esc button 1-3 seconds after turning on the computer. How to find out which button to press: after turning on the PC, look for the line Press Del to enter Setup on the screen (where instead of Del there may be F2 or another key). This will be the inscription about which button to press. Example:
Instead of a black screen with diagnostic text, the logo of the laptop or motherboard manufacturer may be displayed, then the prompt will look like this:
By the way, in the last two screenshots there are hints for the boot menu button (which is called easier) - on the first it is Esc, on the second F12. Let me remind you that this option is preferable, but is not always available.
There is no inscription on the boot screens of some laptops, then look at the keymap
Press the desired button and get into the BIOS. If you press the wrong button, nothing bad will happen, because... the computer will simply ignore your actions or show some other BIOS add-on that will not contain what you need. Then you need to press Reset (reboot button on the system unit) or Ctrl Alt Del to restart the computer.
After pressing the required button and the BIOS screen appears, an ambush awaits us - there are many versions of BIOS, their settings look different. There is good news - they all most often have the same points, so you can figure out what's what. There are two BIOS versions that are very different from each other, we will look at them below.
Please note that similar tips can be found in the instructions for your laptop or desktop computer motherboard. If you do not have instructions in paper form, you can always download it from the model page on the manufacturer’s official website.
After reading this article and looking at the explanatory illustrations, you will be able to configure booting from the Windows installation disk on any computer.
Popular BIOS version. It is, in particular, on many Acer laptops:
We need to get to the Boot section. Press the right arrow three times:
Here is a list of devices from which you can boot. The line names are different on each computer, but the first two words always tell you what kind of device it is:
- IDE CD – CD/DVD drive
- IDE HDD - hard drive
- USB HDD – portable hard drive
- USB KEY – flash drive.
To set the disk drive first (line starting with IDE CD), i.e. change the boot priority, use the up/down arrows to highlight this item, then press F5/F6(on some versions of this BIOS you need to press – or), put it first in the list. It will be something like this:
To save settings made, click right arrow to get to the menu Exit(Exit), select menu item Exit Saving Changes(Exit and save changes) and press Enter twice in a row.
Note: The Exit Discarding Changes menu option allows you to exit the BIOS without saving the settings you have made.
The computer will restart and instead of loading Windows, it should start booting from the selected drive. That is, for example, the installation of Windows will begin. Mission Complete!
The main menu of this BIOS looks like this:
Press Enter, return to the previous settings page, go to Second Boot Device(Second boot device) and set it there Hard Disk– this will allow your computer to boot normally when the DVD or flash drive is removed.
Press Y on the keyboard, then Enter - the settings will be saved and the computer will restart.
Ready! Now, when a boot disk is inserted, the computer will boot from it first, and not from the hard drive. If the disc is not inserted, it will boot from the next device in the list.
Old version of AWARD BIOS
I've only seen this on old computers before 2003. The main menu looks like this:
To configure the boot order, you need to go to the BIOS FEATURES SETUP menu:  Paragraph Boot Sequence is responsible for the loading order. Buttons PageUp And PageDown(or Enter and arrows - unfortunately, I have no way to check) you need to set CDROM first, C second (this is the hard drive), third is not important - set any.
Similar to the aforementioned AWARD BIOS. It most often contains the inscription BIOS Setup Utility without any explanatory names.
Use the “right arrow” button on the keyboard to move to the tab Boot:
On the Boot page you need to go to Boot Device Priority:
There are points here 1st Drive, 2nd Drive– “First boot device”, “Second boot device”. You need to open 1st Drive and specify CDROM (for a disk drive) or USB (for booting from a flash drive) there; in 2nd Drive specify SATA or IDE, depending on what kind of hard drive you have and which item will be available in the menu.
Another AMI BIOS
Everything is clear here, look at the picture:
Buttons and – You can cycle through menu items by pressing a button F10 will call up the option to save settings.
Questions and answers
IN: I can't get into the BIOS settings. What to do?
ABOUT: Make sure you're doing everything right. 99% of problems are due to inattentive reading of the instructions. Everything can be solved if you ask the almighty Google the right question: “motherboard/laptop model, boot settings.”
IN: I configured it as it should, but the error “NTLDR is missing” appears or the cursor blinks at the top left of the screen.
ABOUT: You wrote the boot disk or flash drive incorrectly.
IN: How to boot from a flash drive (or portable hard drive) rather than from a DVD?
O1: You must specify USB-HDD, USB-ZIP or Removable in the boot settings. The item name may vary. In case of problems, read the instructions for the motherboard.
O2: If the BIOS does not support booting from USB devices, you can make a bootable DVD with Plop Boot Manager and, when booting from it, select the “USB” item in the menu that appears. The advantage of this method is that even on old computers, where USB operates in the slow USB 1.1 mode when booting, the speed will be fast - USB 2.0 mode will turn on. Minus - again, it is not always supported by some motherboards. Read more about Plop
IN:How to make a bootable USB flash drive?
ABOUT: If you need a flash drive with installation of Windows 7 or 8, then go to the section
IN:The article does not contain instructions for setting up my BIOS. Please write!!111
ABOUT: With the advent of motherboards that use UEFI instead of BIOS, a large number of externally different, but essentially identical screens with settings have appeared. Since the settings need to be the same everywhere, either read the article above carefully and find similar items in your BIOS, or read the instructions for your motherboard/laptop.
IN: I configured the BIOS, now nothing loads at all. Help!
ABOUT: In 10 cases out of 10, the problem is inattention or an incorrectly made bootable flash drive/disk. Reset the BIOS settings either by removing the battery for half an hour from turned off computer, or the Load Default Settings menu item. Then do everything again, carefully reading all instructions.
IN: When booting from a flash drive, a blue screen appears.
ABOUT: You made a mistake somewhere when creating a bootable USB flash drive. Read the instructions more carefully or look for another one - there are many ways to create bootable flash drives.
IN: I made a boot disk/flash drive, configured the BIOS, but it still boots from the hard drive.
ABOUT: Either you prepared the boot disk/flash drive incorrectly, or you configured the boot incorrectly. If you are unable to read the instructions carefully, consider whether you will do everything else correctly? Maybe it’s better to contact experienced people (service center)?
Conclusion
Using the information from this article, you can launch bootable disks on any computer or laptop - any LiveCD, installation disk with Windows or Linux, any bootable USB flash drive (if the BIOS supports booting from USB devices).
On modern computers, there are versions of BIOS (or UEFI) with support for a mouse, beautiful menus, and so on. Despite the different appearance, everything is configured according to the same principle as I gave above.
Don't forget after installation (or why else are you setting up the BIOS) to return the boot settings back so that the computer boots normally from the hard drive!
Booting from disk in BIOS is required for various reasons. Most often this is needed to install Windows. But sometimes you need to boot from disk to restore the operating system. You may have caught a virus. Or the computer stopped turning on. In such cases, you can configure booting from disk and try to restore the PC.
This is not difficult to do. Moreover, it is much simpler than. Indeed, in the latter case, you need to additionally check whether USB devices are turned on.
I would like to note right away that the OS version does not play a role here. You may have Windows 10, 8, 7 or XP - it doesn’t matter. The brand of the laptop doesn't really matter either. The only thing that matters is the BIOS version. There are 4 of them: Award, AMI, Phoenix and the new BIOS UEFI. Each version is different in appearance and some items are named differently. Although the procedure is the same everywhere.
To enter the BIOS, you need to click one button when turning on your computer or laptop. Most often this is Delete or F2. Sometimes - F1 or Esc.
Let's start with desktop PCs. Older computers most often have Award BIOS installed. It looks like this:

To enable boot from disk in BIOS, do the following:


By the way, if you accidentally changed unfamiliar settings, then when exiting the BIOS, when you are asked whether to save the changes, write N (i.e. No - “No”). Then you can enter it again.
If you did everything correctly, the computer will boot from the disk. As a result, you will see a black screen with one single line.

Press any button and Windows will start loading from the disk (if you recorded the OS). We've sorted out the Award - let's move on.
The AMI BIOS version is usually found on laptops
The AMI BIOS version is usually found on laptops. It looks like this:


The laptop will reboot and you will see the same black screen with one line. To start booting the laptop from the disk, press any button.
These instructions are suitable for laptops of any brand - Lenovo, Asus, Acer, HP Pavilion, MSI, Samsung, etc. If you have a different BIOS version, then 2 more options are discussed below. Perhaps one of them is your case.
How to set boot from disk?
The third BIOS version is Phoenix. It is less common compared to other options (mostly on old laptops). Looks like that:

How to set boot from disk in this case? To do this, do the following:


The laptop or computer will automatically reboot. To start loading the installation disc (or recovery disc), click any button.
And the latest version is the new BIOS UEFI
And the latest version is the new UEFI BIOS. It looks different depending on the manufacturer of the motherboard installed on the PC or the brand of the laptop.

It has a stylish graphical interface, so it is not difficult to identify.
How to enable boot from disk in UEFI? This is even easier to do than in the previous 3 options. True, setting up booting from disk can be done a little differently - depending on the specific brand of laptop or PC.
For example, ASUS has the Boot Priority section at the bottom. And here all connected devices are displayed - hard drive, CR-ROM, flash drive. You just need to drag the drive icon to the first position with the mouse, as shown in the screenshot.

Then click "Exit" (top right corner) and save your settings.
The PC or laptop will reboot automatically and you will see a black screen. To start loading the operating system from the disk, click any button.
When you do what you wanted (install Windows or restore your PC), do not forget to switch the device boot back. That is, change the settings in the BIOS: put the hard drive first and the disk drive second. Otherwise, when you turn on the PC, the system will always boot from the DVD first, and if there is none, then from the hard drive. This applies not only to BIOS UEFI, but also to other versions.
How to install disk boot in UEFI from other manufacturers - MSI or Gigabyte? All you need is to find the “Boot Priority” item and change the priority of turning on devices. Gigabyte has it in the “BIOS Features” section.

And for MSI - in the settings (“Settings”).