Is it possible to remove standard applications on Android? Uninstalling stock apps on Android
Manufacturers Android smartphones very often they build into their firmware many applications that the user does not need. These take up space on the system disk and, working in the background, create a load on the device’s processor.
Manually removing built-in applications
You can also avoid using Root Uninstaller and instead uninstall built-in apps manually. It will be a little more difficult and time consuming, but it is possible.
To manually remove built-in applications on Android, you will need a file manager that can use ROOT rights. In this article we will use the ES File Explorer file manager. You can download it absolutely free.
So, after you have downloaded and installed ES File Explorer, you must configure it. To do this, swipe to the right and open the ES Explorer side menu. Here you need to find and enable the “ROOT Explorer” function.

After this, a window will open asking you to confirm the granting of Root rights. In this window you need to click on the “Ok” button. If this is not done, then ES Explorer will not be able to work normally with root rights.
After that, tap again on the “ROOT Explorer” function in the ES Explorer application and hold your finger on the screen until the settings menu appears. In this menu you need to select the “Connect as R/W” item.

In the window that opens, select the “RW” option for all folders. Then click on the “Ok” button to save the settings.

This completes the setup of ES Explorer, and you can start removing built-in applications on your Android device. To do this, go to the /system/app folder, which is located on the internal memory of the device. In this folder you need to delete the APK and ODEX files of the built-in applications that you want to remove. This can be done very simply by selecting the required APK and ODEX files and clicking on the “Delete” button.

If you have Android 5.0 or a newer version, then in the /system/app folder the files will not be all in a pile, but sorted into folders. In this case, we simply find the folder of the desired application and delete it in exactly the same way.
The next step is to remove the updates. To do this, go to the /data/app folder, find the necessary ones there APK files(or folders if you have Android 5.0) and delete them.

The final stage on Android is deleting cache files and databases. To do this, open the /data/data folder, find folders with updates there and delete these folders.

After that, we reboot the device and enjoy pure Android without unnecessary built-in programs.
Most owners of Android devices know that on a smartphone or tablet you can initially find a bunch of unnecessary junk in the form of pre-installed applications. Judging by the reviews, most of them are not only not needed by the average owner, but also cause quite serious indignation due to the fact that such programs are constantly updated without his knowledge and take up space in the internal storage or use RAM. How to delete system applications“Android” will now be shown. And it is absolutely not necessary to have or be a superuser. But first things first.
How important are system applications?
Many people think that all built-in applications of Android systems are “built into” the operating system and are mandatory components for its functioning. This is wrong.
In addition, any device based on this OS has at its disposal unnecessary services that use Google registration with confirmation via Gmail. The question arises: why register the same Google account+, if the device was initially confirmed according to the standard procedure?
And if you look at services like Google Maps, it’s not hard to imagine how much space they take up in internal storage. There are no questions regarding applications that use geolocation, but most uninitiated users do not need this. Removing system applications w3bsit3-dns.com (a specialized site dedicated to mobile gadgets) recommends using several accessible ways, even in the absence of root rights or superuser rights, which is often a prerequisite. Let's look at the most common options.
Removing system applications from Android devices: general rules
Let’s immediately differentiate the understanding of deleting or disabling standard programs from similar actions based on firmware. With system firmware, the situation is much simpler, because in most cases, even when installing them, intervention is required at the superuser level, similar to Windows systems where there is a super administrator account. The essence is the same.

Some programs installed on Android devices allow you to bypass these restrictions, especially when flashing firmware, but a “clean” system can easily resist changes. Hacking an OS to grant developer rights, so to speak, is quite simple. But it will be problematic to remove Android system applications correctly.
Using programs like Explorer
An inexperienced user needs to know that logging into the service Google Play trying to remove an application will have no effect (it simply won’t appear there). Deleting program files manually is also a thankless task, since most users do not know where all these objects are located. In addition, many of them may be hidden or contain data in locations other than the installed program directory.
In the very simple version you should use Root Explorer or its analogues (Framaroot, Titanium Backup, Root App Remover).
In Explorer, you need to find the tools item and, by entering the root explorer menu, agree to the provision of superuser rights. Then in a new window you should confirm the R/W connection, and then search in the app directory located in the System directory.

When the necessary APK files are found, you need to delete only applications, but not services (think a hundred times before doing this). But this won't be enough. At the same time, you should delete all objects of the same name with the .odex extension. Only after this the system will be cleared. Some people believe that this cleaning method removes registry entries. We beg to differ with this, because in Android, built on the basis of Linux systems, there is no registry at all.
System App Remover
In the previous case, deleting pre-installed applications can be very easy to make a mistake. For example, a fairly large number of cases of “demolition” of a Wi-Fi module are known, as a result of which users were left without communication. Reverting the initial build after this is very difficult (but possible).
Another thing is the official System App Remover utility, which can even be downloaded from Google Play. Only root rights are required. But the application filters system components, giving the user the right to choose, highlighting categories like “Can be deleted”, “It’s better to leave”, “It’s not safe to delete”. In the simplest case, deletion concerns widgets social networks(Facebook, Twitter) or similar services like YouTube. This will not harm the system.

In the second option on Android, the program does not recommend deleting system applications, since this may affect the list of contacts, calls, messages, etc. Again, without knowing the name of the service, you should not do such things, otherwise the phone mode can be deleted, after which making calls will become unavailable.
Uninstalling system applications without root rights
Now a few words about the lack of appropriate access rights to change the configuration. Uninstalling system applications from Lenovo, as well as from other manufacturers mobile devices, you can do it yourself without using privileges of this level.
To do this, you need to use the SuperOneClick and Deploater applications in parallel when connecting the device to the computer. Without talking about the principles of operation, we can only note that their actions force the system to believe that the user has developer rights. During the installation process, the drivers are first installed, and then the main application is launched. It operates on the basis of vulnerabilities found in Android 4.0, so the antivirus may perceive the program as a symptom of external unauthorized influence.

Conclusion: The real-time scanner needs to be disabled. But the program deletes all unnecessary selected objects with .apk and .odex extensions automatically.
Is it worth doing?
Removing Android system applications looks acceptable. But do not forget that some services may be disguised, and their names will not tell the user anything at all. In particular, this applies to elements whose names begin with the prefix com.android or com.google. This is where you need to be especially careful and remove such elements of services only with a full understanding of all the consequences.
It is not possible to completely remove Google Play Services without root rights, but if you really want to, you can configure your phone so that Google services are minimally present in it. Let's see how to disable Google services in the settings, and what to do to completely remove them.
Shutdown
Typically, the need to remove or disable Google Play Services arises due to the significant energy consumption of this application. Calendar, Maps, Hangouts, Drive, Location Services and other plugins may not be used, but they still take up a lot of space and eat up battery power. To reduce the impact of Google Play Services on your phone, just disable them in the Android settings.
Go to settings, find the section with accounts. Do you need an account Google entry, on which everything on Android is tied. You can remove it, and then the calendar data and other built-in programs and services will no longer be synchronized. But let's go the other way and try to simply stop Google Services and the Google Services Framework.
Open sync settings account. Here you need to uncheck all the boxes so that each plugin stops functioning. If you are concerned about Android's high power consumption, do the following:
- Go to the "Language and input" section in the settings.
- Open the Voice Search submenu.
- Go to the "OK Google Recognition" section.
- Move the toggle switches to the inactive position.

This will allow you to disable the function on Android voice search, which constantly accesses the microphone and drains the battery. The phone will work even longer if you erase the cache of built-in applications - Play Market, Google Services.
- Open the Applications section in Settings.
- Go to the All tab.
- Open the Services page, click “Clear cache”.
- Stop the program by clicking the appropriate button.

In the same way, you can delete the cache and leave the rest of the plugins running. You can easily return them to working condition if necessary, but for now they will not interfere and consume charge.
Removal
To produce complete removal Services require root rights. You can get them different ways, some custom firmwares have them by default. With root access, you can even uninstall built-in programs from the system, removing them directly from the directories in which they are installed. Let's see how to remove built-in Google Play Services on Android, and what applications can be removed in general:
- Launch Root Explorer or another manager that is suitable for working with the Android file system.
- Open the /system/app directory. Inside you will see built-in programs.
- A similar list of applications with some additions will be in the /system/priv-app directory.

If you delete these files, as well as frameworks in the /system/framework directory and libraries in /system/lib, then there will be no built-in software left on Android, and the question “Google services, can they be deleted?” will finally receive a positive response. How to recover remote programs? There is only 1 way - you need to download Google Services.

Hi all! Alexander Glebov is in touch, in this article I will talk about which built-in Android system applications can be removed and how to remove system applications on Android and clean it of garbage. It often happens that the internal memory of the phone is running out, and you need to clean it somehow, but you have all the applications you need, but there is a lot of junk like: Google Books, Google Music, Google Play Press, etc. The question is, why do we need these applications?
Which built-in android system applications can be removed - warnings
First of all, I want to warn you, deletion system applications can break your phone and it will not turn on, remove at your own peril and risk.
Prerequisites
It just so happened that without root You won’t be able to uninstall system apps, there’s nothing you can do about it. How to get root rights on android for Sony smartphones xperia can be read on my blog, . But perhaps the article will help you even if you have a phone from another company.
The procedure is as follows:
I will show you how to remove system apps on Android on your phone. I have Sony Xperia ZR, so if you have the same one, you will have an easier time. So, let's begin.

YouTube karaoke module
- Google Lyrics Module
- Wikipedia module
- YouTube module
-POBox Touch
- SkinSelector
- Standard
- Xperia Calendar Sync
- Xperia Social Engine photos
- Xperia from Facebook
- com.sonymobile.faceregistration
- Other applications can be found in the screenshots:
 |
 |
|---|---|
 |
 |
 |
 |
 |
 |
 |
 |
The result will be about 35 applications, maybe more. After all, you can delete something else that you think is not necessary. Once selected, click the “Delete” button. After clicking, you may need to grant super user rights again, and an information message will appear that there are selected applications that you do not want to remove. Click "Yes".
After removing the programs, reboot the phone. And we move on to the second stage. Cleaning Android from garbage that remains after removing system applications:

As a result of these simple steps, I freed up about 600 MB. internal memory. A very good result, especially when every megabyte matters free space. As always, ask your questions in the comments. I hope the article was useful.
Best regards, Alexander Glebov.
- Next, select the application you want to disable.
- If this program supports the shutdown function, you will see the corresponding button. Just press it.
- Next, select the item marked in the screenshot from the pop-up menu.
- Programs disabled in this way are not deleted: they simply stop until you run them yourself.
Attention! When you disable the standard software using the described method, the updates that were installed on it will be automatically deleted.
Program "Remove system applications"
Next we move on to using a third-party software. The first application on our list will be “Uninstall system applications”. You can download it at Play Store, which is exactly what we will do now.
- Let's go to the store Android applications and write the name of the program in the search bar. As soon as the desired result appears in the results, click on it.
- Install the program by tapping the button marked in the screenshot.
- We allow access to location, multimedia, Wi-Fi and other functions.
- The download of the program we need will begin. Since its size is small, it will not take much time.
- So, the download is complete, so let’s proceed directly to working with the application.
- At the first launch, we will need to provide the same Root rights that were mentioned in the introductory part of the article. Click the button marked in the screenshot.
- A list of all applications, including system ones, will open. We check the boxes that we want to delete and press the button marked “2”.
- We will be warned that we have identified applications that are important for the operation of the system. Think twice if you see such a message. In our case, everything is correct, so click “Yes”.
- The removal process will be completed in a matter of moments.
Ready. The program will disappear from your smartphone at the same moment.
Let's consider another option, which, if it differs in some way from the first, is only appearance. We will also download the program from the Play Market.
- We begin to write the name of the utility in the search bar of the Google store and, as soon as our program appears in search results, tap on it.
- Next, press the familiar green button.
- Allow Easy Uninstaller all required permissions.
- We are waiting for 5 MB to be downloaded from the network and installed on our Android.
- We go to the home screen and see a new shortcut in the form of a trash can. This is exactly what we need.
- In the list of programs available for removal, mark one or more items and press the button marked “2”.
- Once again we confirm our intentions by clicking on “OK”.
That's all. The application or applications will silently disappear so that they no longer burden our phone.
CCleaner
Here's another interesting option. Surely, few of you knew that the well-known program for cleaning the disk and phone storage is capable of removing pre-installed applications. Nevertheless, it is true. Below we will show how it works.
- In the same way as in previous cases, we are looking for the application in the Play Market.
- We install it by pressing the familiar button.
- We are waiting for the download of all the files necessary for CCleaner to complete.
- Let's launch our cleaner. Today it will act as an uninstaller.
- So, when the program opens, go to its main menu. To do this, click the button with the image of three horizontal stripes (marked in the screenshot below).
- In the menu that slides out from the left side, click on the “Application Manager” item.
- A list of installed and system software will open. To begin the removal procedure, click on the icon with the image of a trash can.
- And again we are warned that if we thoughtlessly “demolish” the standard software, we can easily “kill” our operating system, which, unlike a computer, is not so easy to repair. If you understand this, you can continue. Click the button circled in the picture.
- Mark the programs or games that need to be uninstalled and tap on the “Delete” button (marked with the number “2”).
After this, the program, game or their combination will be removed from Android.
Via file manager
This option for removing unnecessary applications from Android differs from the above. Here we will do everything ourselves, while the previously described uninstaller programs worked in automatic mode. So let's get started.
- We will use one of the best file managers. This is ES Explorer. Let's download it using Google Play.
- Click the button labeled “Install”.
- We allow the application all types of access that it needs to function properly.
- The program is downloading. Since it “weighs” a little more than 10 MB, it will not take up much of your time.
The application is installed and ready to use. Next we will look at how to remove standard programs. Launch the tool.
- Open the main menu of ES Explorer. We have marked it in the picture below.
- Now we need to allow our file manager work with components operating system. To do this, enable the “Root Explorer” function using the trigger marked in the screenshot.
- Naturally, we will need to provide the program with Root rights.
- When access to the firmware files is allowed, return to the main ES Explorer screen and go to the menu.
- Next, we need to go to the “Device” directory. This is ours file system, and not the file system of the drive, but system disk or firmware.
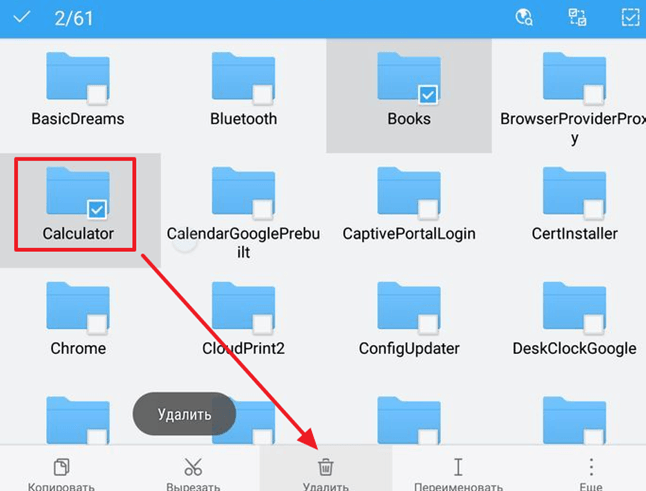
- So, to uninstall the same application, you need to erase files from several places. Let's visit the first one first. Go to the “system” directory.
- Then open the “app” folder.
- In Android 5 and above, you will see application folders. They contain APK files. In earlier versions of the operating system they will be located here without directories. One way or another, we need to delete the selected application with or without a folder. To do this, click on the object and hold it until the button marked “2” appears.
We confirm our action by tapping “OK”.
So, we have cleared the first path, let's move on to the second.
- We return to the root directory of the firmware and go to “data”.
- Then open the “app” directory and “demolish” all traces here unnecessary program.
- Go to “data” again.
- We go to the directory marked in the picture below and delete the data of the unnecessary program from here.
That's all. The method is one of the most complex and dangerous for the OS. We recommend using it only for people who are well versed in the topic.
We are gradually moving on to another option for removing pre-installed Android applications. This time it will be another utility called Root Uninstaller. Let's look at how to work with it.
- In the old fashioned way, go to the Play Store and enter the name of the tool in the search bar. When the desired object appears in the search results, tap on its icon.
- Click the button marked in the screenshot.
- We wait for the installation of all the necessary files to complete.
- Go to the home screen or menu and select the application you just downloaded.
- As in other cases, we will need to provide access to the operating system files. Otherwise, nothing will work.
- When the program opens, we will see a list of all third-party and standard applications, and also, if any, games. Tap on the one that needs to be removed.
- An additional menu will open with several options.
Identification of the various buttons:
- Freezing. The application or game is blocked: it does not occupy RAM and does not load the processor. However, the occupied disk space is not freed and the program is not removed;
- Delete. The application is completely removed from Android;
- Backup. Created backup copy, which, in case of failures, will help correct the situation and restore what you deleted;
- Reset. The software is cleared of all updates and data received during operation.
There are also a number of additional functions that are not particularly important to us.
- As soon as we click the delete button, a warning will follow in which we will need to confirm the action taken. In order to do this, click “OK”.
Attention! To ensure data safety and guarantee stable operation of the system, be sure to use the tools before deleting each program Reserve copy!
From the name of this program it is clear that it requires superuser privileges to operate, although they are required for our entire list. So, let's look at how to work with Root App Deleter in more detail.
- The first thing we will need to do is download the application to our phone. To do this, we will use the Google Play store. Enter the name of the program in the search field and select the desired result from the results.
- On the Root App Deleter home page, click the familiar button labeled “Install”.
- The program “weighs” only 700 kilobytes. This is very little, especially compared to competitors.
- So, the list of uninstallers has been replenished with a red icon, click on it.
- There are several tiles in the main menu of our application. We will work with the uninstaller. Click on the item marked in the screenshot.
- Next, we will be asked to select one of the program removal modes. This could be a newbie that automatically creates a backup copy of the existing software before uninstalling it. There is also an expert mode in which programs are deleted immediately and irrevocably. Choose the algorithm that suits you.
- As a result, a list of programs available for removal will appear. We will uninstall the most unnecessary of them. At least in our opinion. Click on the application name.
- Since this is beginner mode, there is no delete button, but there is a disable button. This way we can test the operation of the system and, if everything is fine, we will remove the software completely in expert mode.
- As in other cases, you cannot do without Root rights. Tap on “Provide”.
Ready. The program is disabled and no longer consumes phone resources.
Titanium Backup
Next up is the famous backup app. Among other things, the tool can remove any software, and if SuperUser is present, even system software. So let's figure out how to work with it.
- So, go to Google Play and look for Titanium Backup there. The main thing is to find the Root version. Otherwise, nothing will work. See screenshot attached below.