How to disable Windows hotkeys. How to disable the windows activation offer Why does an inscription appear asking for activation
The Windows button is on every keyboard and we use it on a daily basis to perform various actions. If you click on the Win button, the Start menu will open. Other than that, you can also use the Win button with other keys on your keyboard.
For example, pressing Windows+E will open Windows Explorer. If you press Windows + R, then you can open the "Run ..." utility. In general, there are a lot of combinations with this key, and all of them are incredibly useful for any user.
However, if the Win key does not work, then these combinations can be easily forgotten. Why does this button stop working? There are several reasons why the Win button has stopped working. These include problems with the keyboard, system settings, blocking key functionality, etc.
Method # 1 Pressing the combination Fn + F6
This method is likely to work for some laptop users and users with special keyboards. Find the FN key on your PC or laptop keyboard (usually located in the lower left corner, next to CTRL).
Then find the F6 key and take a closer look at it, as its surface can display the functionality activated by the FN + F6 combination. If you see something like a Win icon on this key, then try pressing the Fn + F6 key combination to activate or deactivate the Win key.
However, be careful, as on some laptops, the Fn + F6 key combination can turn off the display of the device or its touchpad. However, the F6 key should display functionality.
Method #2 Pressing the Win Lock Key
The next method will require you to press the Win Lock key. This key was most commonly seen on older keyboards that some users may still have.
In addition to older keyboards, the Win Lock key may also be present on a number of gaming devices. In the heat of battle, players can often accidentally press the Win key. It is precisely for this gaming devices and introduced the Win Lock key.
Perhaps you are the owner of either an old or a gaming keyboard (although there are exceptions and the Win Lock key may be present on a regular keyboard). Find it and click to return the functionality to the Win key.
Method #3 Cleaning the Keyboard
I don't think you'll like the next question, but since we're here trying to fix a problem with the Win button not working, we have to ask: Have you been cleaning your keyboard for a long time?
Yes, the fact is that the keys, with the accumulation of a sufficient amount of dirt, can simply start to stick or not be pressed at all (or be pressed, but not transmit a signal). Membrane keyboards are particularly susceptible to contamination.
Open up the insides of your keyboard (it's not difficult at all) and then do a little cleaning there. Especially near the Win key. Once you're done, put the keyboard back together and test the Win key.
Method #4 Changing the connection port
In very rare cases, some keyboard buttons may not function properly due to the port that the keyboard itself is connected to. Most keyboards nowadays connect via USB. Try plugging your keyboard into a different USB port and test the Win key. It is desirable, also test the functionality of other keys.
If you have an old keyboard that has a PS / 2 connection, then you can connect it to another such port if you have motherboard there is a second PS / 2 port for the keyboard (which is quite a rarity).
If none of the above helped in solving the problem with the Windows key, then perhaps the matter lies in the keyboard itself and it has failed. In this case, there is nothing left but to buy a new keyboard.
Found a typo? Select the text and press Ctrl + Enter
How to turn off windows activation suggestion
Hello everyone, in this article from Computer76 I will show you how to quickly get rid of the system prompt to activate the installed copy and disable the windows activation prompt.
Windows activation is the process of checking the installed copy for authenticity. Activation has only one meaning - to make sure that the copy is used on the number of computers, the number of which is subject to the license rules.
A little about licensing. Windows has several types at once:
Licensed: this is the status you will see after activating a system purchased in good faith. You will most likely never need to disable the windows activation setting.
Grace period (graceful): the time when the license is not paid for, but the rights of the copyright holder (that is, Microsoft) are not violated. This is usually the familiar 30-day trial or evaluation period we all know. After it, the copy will be limited in performance or automatically activated. Last option individuals do not know. Such a function may not be included in the assembly, but in enterprise versions it has a place to be.
Additional grace period: in case of replacement or installation of additional equipment that does not go unnoticed by windows, the grace period can be extended. Both of the previous cases and can be used as an example of how to disable the activation setting.
Reminder period. Follows the two just described. Accompanied by continuous offers to activate the copy.
Extended period for unregistered copies. Windows is confirmed to be unregistered, but the user is given time to register a copy or transfer data to other media. Little whether, they say. Human rights and all that...
Unregistered copy. Well... no comment.
So, all the last (with the exception of the first paragraph) options are our case when we try to disable the windows activation offer.
Is it possible to disable the windows activation offer and not go through the procedure itself?
No, my dears. This article only contains information on how to get rid of the activation offer. The countdown started after the launch will continue, and hour X is imminent. But how it is quite comfortable to extend the term of using windows, you can read in the article
How to disable windows activation suggestion in Windows Vista\7\8 operating systems?
For Windows 7 \ 8, you can disable the activation offer like this:
- Press combination Win+R and enter the regedit command
- In the Registry Editor window that opens, find the hive:
On the right side of the editor window, find dword parameter with value Manual. You have a value of 0 - automatic activation is enabled. Let's change it (parameter) and give it a value of 1. As in the figure below:
Now you need to close the editor and restart your computer.
If you have Windows Vista, in the registry, to disable the activation setting, you will have to find this branch:
HKLM\SOFTWARE\Microsoft\Windows NT\CurrentVersion\SL\Activation
We also change the Manual parameter, assigning it a value of 1.
P.S. There were cases when such manipulations were not “rolled”. You may need to work with the parameter Notification Disabled, giving it the value 1.
Those who have updated their system on the computer to Windows 10 are faced with the problem of having a watermark on the screen. This is a reminder to the user that the update version is not complete. Today the story will be about how to remove the inscription Activate Windows 10.
Why does an activation message appear?
Before trying to remove the inscription, consider the reason for its appearance. If, then after the initial boot, the OS will require a full activation. This is necessary in order to confirm the licensed version, while excluding the piracy of Microsoft system products. Previously, the inscription activation was also found in Windows 8.
After thirty days of trial work with new system, the time limit expires and an automatic notification about . This sign does not affect the work in any way, but a huge number of users are very annoying and there is a desire to remove it.
You can hide the inscription in three ways:
- Purchase of the full licensed version.
- Standard settings in the OS support center.
- With the help of utilities, which are specialized programs for carrying out certain work with the OS.
How to remove using standard Windows tools
To fix the problem, you can use the standard OS tools. The problem is that Microsoft has banned this action on some systems. If this option works for you, then we will explain how to remove the inscription Activate Windows 10 forever.

A more complicated way to remove the watermark is by purge system32:

Hiding watermark with Re-Loader Activator
This application has been around since XP. After the release of 10-ki, it was updated. Re-Loader Activator is an easy-to-use program that quickly removes watermarks. Follow the instructions below:
- Download Re-Loader Activator from the Internet. Download the program only through the official website.

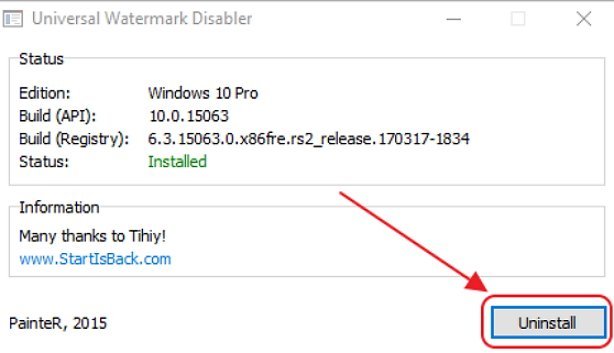
Hiding the watermark with UWD
UWD is another great anti-letter program.
- We go to the UWD program website and download the file by clicking "Download Universal Watermark Disabler". Or download directly from our website:

After the initial installation of the Windows 10 operating system from removable media, you must activate it to confirm the license rights to own this version. This is required to prevent the use of pirated content and to verify the product license key against valid Microsoft keys. Before the key is entered, the system will work in trial mode for thirty days, after which it will stop starting. Within the specified period, the user is obliged to activate or uninstall the system. Windows 10 will automatically remind you to activate it every time you start it by displaying a watermark with reminder text in the lower right corner of the display. This sometimes annoys many users, which is why they start looking for ways to remove the auto-pop-up label. The removal process itself is not difficult and does not require special training.
Why does the Windows 10 activation watermark appear?
An activation reminder watermark may appear in test versions, in pirated copies of a licensed OS, or if the user for some reason forgot to activate Windows 10 after the installation was completed on a computer.
Windows 10 activation message appears on desktopThis feature is fixed in the registry and has no effect on the speed and performance of the computer. You can also use an unactivated version of Windows 10 (with some restrictions), but this is not very convenient. Most users try to remove the annoying reminder using third-party programs or editing branches in the registry.
There are a certain number of rules that must be followed when removing the watermark that reminds you of activation, since in most cases it is used software third party developer. Often, not everyone wants to take risks and change registry entries, rightly fearing to disrupt the normal operation of the computer.
Basic rules to follow when removing a watermark:
- always create a system restore point before you start deleting a watermark using the registry;
- use software only from official websites of manufacturers;
- watermark removal and activation reminder methods should have good recommendations on the net and be tested many times.
If you do not follow at least one of these rules, then no one guarantees you that the result of removing a small problem will not become a big problem, which entails a complete reinstallation of Windows 10.
How to remove the inscription about the activation of Windows 10
There are several ways to remove the automatic system reminder to activate the software product. Sometimes the result is achieved immediately, sometimes you need to sort out several ways to achieve success. The main ways to remove the Windows 10 activation watermark include using third-party programs and editing the registry. You can also use the system's built-in software, but in home versions, not all notification removal features are included in the Windows 10 installation package.
How to remove the activation inscription through the registry
There are two most simple ways remove the activation label.
First way:

The second way (for those who are afraid to manually enter the registry update):

Remove notification about activation by third-party programs
You can remove the watermark that says you need to activate Windows 10 using third-party programs. There are several such programs, and they have been repeatedly tested in practice by various user groups.
The Universal Watermark Disabler utility has the following advantages:
- can quickly remove watermarks on any version of Windows;
- provides support for any languages at work;
- does not harm system files;
- instantly removes all watermarks on the display.
How to work with the utility:
Video: Removing Watermarks with Universal Watermark Disabler
In addition to the most common Universal Watermark Disabler utility, two small utilities are used for the same purposes:

How to remove the activation window and disable pop-up notifications
You can remove the activation window and turn off notifications in Windows 10 using the built-in Notifications and Actions service.
This service includes the following features:
- allows and prohibits the appearance of pop-up alerts for Windows 10 and third-party programs;
- allows you to show the system alerts about various events and updates received from the network;
- using pop-up menus, it speeds up the process of ejecting removable media, activating and deactivating various adapters.
Using this service, you can turn off annoying notifications, block them and turn off the notification center.
Disabling Notification Center
In Windows 10, you can turn off the notification center using three different methods:
- using a change in Windows 10 settings;
- through editing Windows Registry 10;
- changing the group policies of the system.
Turn off notifications by changing the settings settings
This is the most fast way prevent unnecessary notifications from appearing on the display. It is carried out in several stages:

Video: Turn off notifications by changing Windows 10 settings
Disable Popup Notifications Using Registry Editor
This method is suitable for users who already feel confident enough working in the registry editor. Changes to be made to the registry and disabling alerts require the following algorithm:

Pop-up alerts are now disabled.
It should be borne in mind that in the latest versions developed Windows versions 10, regardless of the desire of the user, the settings for turning off notifications in the registry may already be created. This can only be tracked during a clean installation from a licensed distribution.
Turn off notifications when changing the general group policy

Video: Disable Notification Center and Toast Notifications
Removing watermarks and notifications in Windows 10 is a fairly easy process. At the same time, it is necessary to clearly understand that they were not developed by chance. It is quite possible that the activation failed for some reason or there was a failure in the system files. A watermark that was previously deleted as annoying will not appear. This can lead to the fact that at the most inopportune moment you will not be able to start the system and you will see a warning on the display about the end of the period allotted for activating Windows 10. You will need to spend time looking for a key, which, as always, will not be at hand. Therefore, you need to think carefully about whether it is worth removing watermarks and inscriptions about the need for activation.
The latest version of the operating system from Microsoft is literally crammed with various components and services. And if some of them can be considered conditionally useful, then some of them would be desirable to turn off and not remember about them anymore. And many who want to download and try it in action note this very desire. Since each action is inside the operating system, each word entered subsequently turns into an advertisement. In this way, Microsoft is trying to get the maximum benefit from the owners of shareware free Windows 10.
Removing everything unnecessary that can track your actions and analyze them is easy enough. And this can be done absolutely at any time. Do not worry if you did not immediately turn off unnecessary components.
During system installation
To use this method, during the installation of Windows 10, you must abandon the default settings and click on the barely noticeable "Settings" inscription. It is located at the very bottom of the existing text.
In this section, you will see all the components that may interfere with your future Windows 10. To prevent this, you must turn them all off by moving the slider to the appropriate position on the left. In total, you will have to disable two pages of functions.

It is also undesirable to enter your username and password registered on the Microsoft website during the installation process. This step can be simply skipped, it does not affect anything. To do this, at the bottom there is a small inscription "Skip this step."

If you meet these minimum requirements, then the new operating system will practically not indicate any information about the user. It simply will not have special functions for this. Since all the necessary components for this are simply disabled. Therefore, you can use it easily and fearlessly.
If the operating system is already installed
On the existing operating system turning off all unnecessary components that can interfere with a calm and anonymous life is not very difficult. Only you will have to disable only some of the functions of Windows 10, which are especially annoying. Namely:
- Windows Defender.
- Context search.
- advertising ID.
- cloud services.
Each of them has its own way to turn it off.
Windows Defender
To get rid of this tool, you need to go to Settings, and then proceed to the "Update and Security" section. There is a tab such as "Windows Defender" in which we need to work. You should disable the functions responsible for sending data and protecting the cloud, as in the screenshot.

By the way, if you don't want to go through the settings, just install any other antivirus. This will turn off Defender automatically.
Contextual search and Cortana
These two tools are turned off together. Of course, in Russian Windows 10, the latter does not work by default, because Russification was not invented for it. However, it's better to be safe.
You should click on the search in the bottom line of the desktop, and then click on the lowest icon in the left column that displays Settings. And there you need to disable both Cortana and Internet Search.

AdvertisingID
To disable this functionality, you need to go to the Settings we already know, from there go to the Privacy section. In the general settings, located at the very top of the left column, you will have to remove the “on” state. for the first three components.

The next tab we need is Speech, Handwriting and Typing. Here you need to prevent Windows 10 from forwarding your speech in order to learn the functionality of Cortana. Anyway, we already turned it off.


After completing these steps, do not close Privacy - it will still come in handy.
telemetry
To get rid of passing these parameters, you will have to program a little. For this, a built-in tool called PowerShell is used. To use it, you need to put the PC into console mode using the Windows + X key combination.
will appear command line, in which you need to fill the combinations prescribed in the screenshot.

In short, these commands delete already collected telemetry data, disable the operation of this service and completely cut off the ability to record any new data.
After that, we open Privacy again, and from there we go to “Reviews and diagnostics”. It is necessary to completely prohibit the formation of reviews (select the appropriate item in the drop-down menu), and then set the item “Basic information” in the “Diagnostic and Usage Data”.
Clouds
To cloud storage didn’t work, it’s enough not to use your account when working with Windows 10. To do this, you need to find the section in Settings that allows you to manage accounts, and then go to the “Your account” section from there.

You can opt out of using a record on the Microsoft website if you sign in as a local account. To do this, just click on the appropriate inscription and enter the data. Thus, only those components of the 10th generation system that are required can be left.
(Visited 32 367 times, 1 visits today)


