How to clear memory on a MacBook Air. Speed up your Mac in effective ways
Remember how fast your Mac was when you first bought it? How did it load instantly and open websites and apps smoothly? Over time, your Mac becomes filled with various applications, system updates, documents, photos and a variety of other files that cause a slowdown effect. If you want to make your Mac as fast as it was when you first took it out of the box, we've got some helpful tips for you.
1. Clear the startup list
Most of the applications you install are automatically added to the startup list, and every time you turn on or restart your Mac, the system is forced to waste resources to launch all these applications and services. As long as there are few of them, they do not have a significant impact on performance, but sooner or later this moment comes.
Fortunately, in OS X it is very convenient to control and regulate all this “economy”:
- Opening system settings and go to the section Users and groups.
- Choose yours account in the list on the left and open the tab Login objects.
- We carefully review the list and leave only those applications that you really need immediately after starting the system. We mercilessly remove everything else from there by highlighting and pressing the button – .
2. Update to the latest version of OS X

Your Mac should update itself, but it's a good idea to make sure your computer is running the latest OS. This can be easily checked using a Mac App Store. Just open the application and go to the tab Updates. The icon will show the number of available updates, which you can download both together and individually. For the future, it would be a good idea to check and enable the automatic download and installation of updates in the section App Store system settings.
3. Putting the disk in order

One of the best ways prevention of system performance is cleaning your hard drive from various files that you no longer need. The category of such files includes all kinds of logs, caches, temporary files, extensions, duplicate files and much, much more. To find and remove this file garbage, you can resort to special applications or use Disk Utility.
- Launch Disk Utility and select your HDD in the menu on the left
- Go to the tab First aid and press the button Check, and then To correct.
- The system will start scanning and correct errors if any are found.
After that, check your home folder and other folders on the drive to see if there are caches or temporary files that you no longer need. If you don't want to dig into the depths file system- it is better to use a profile utility.
4. Checking for gluttonous processes
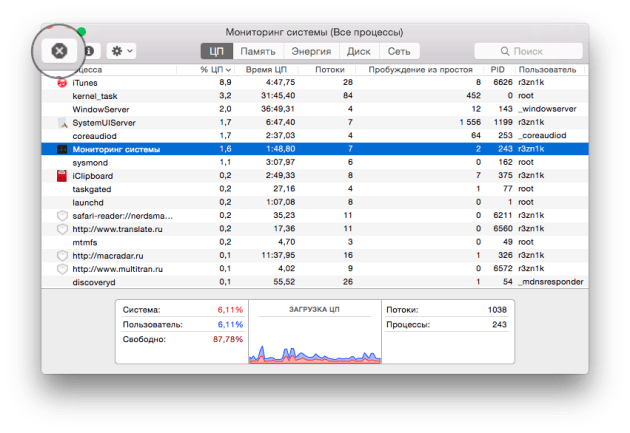
If you notice a drop in performance while working on your Mac, using System Monitor you can easily determine which application is eating up all your resources.
- Opening System monitoring from folder Programs - Utilities.
- Switching between tabs CPU And Memory and looking through running processes, we find applications that consume excessive amounts of resources.
- If you find a process consuming more than 90% (not a root process), feel free to terminate it using the button Complete.
5. Delete unused localization files
Every Mac has a ton of unused language files. Usually we use Russian and English, but the rest of the localizations that developers supply their applications with remain “dead weight” on the hard drive. You can remove them manually (a very tedious process) or use some special application. For example, the same CleanMyMac can do this and when cleaning, it always, among other “garbage”, scans the file system, including for the presence of unused language files.
6. Clean the desktop
Some users prefer to store files and application shortcuts on the desktop, considering it very convenient. Not really. Because the system has to handle all of these connections over time, this approach to storing and organizing your workspace can negatively impact system performance and responsiveness. Therefore, remove all unused icons and move documents and files to appropriate folders. Better yet, check out our guide to achieving desk zen.
7. Disable widgets
Widgets are miniature applications located on a specially designated desktop. You can add as many different widgets as you like, such as a virtual aquarium, an interactive calendar or a convenient weather informer. While some of them perform useful tasks and help you, many simply consume resources, thereby slowing down system performance. Therefore, audit your Dashboard and disable or delete all unnecessary widgets that you do not use - this will free up memory and increase system responsiveness.
All of the above tips are more relevant for owners of old Macs or machines with insufficient capacity random access memory. The slowdown effect on newer computers will be almost unnoticeable or noticeable even at the most advanced stages (monitoring tools). However, in any case, prevention and putting things in order have never bothered anyone. ;)
Even the fastest and powerful computers Over time, they become clogged with unnecessary files, and Apple computers are no exception. A large amount of junk on your hard drive can take up a lot of space free space, and also affect the speed and stability of the computer. Is there a way to quickly find and delete all those junk files that are slowing down your Mac OS?
Luckily, there's Movavi Mac Cleaner, a simple and convenient tool that will scan every corner of your system, show you what's taking up disk space, and safely remove all unnecessary files. Free up gigabytes of space and speed up your computer right now - download Movavi Mac Cleaner and follow our step by step instructions for cleaning up your Mac disk.
1. Install a Mac OS X cleaning program
Open the installation file and follow the on-screen instructions on your Mac to help you install the program correctly. Once installation is complete, launch Mac Cleaner.
2. Scan the system
As soon as you launch Mac Cleaner, the program will immediately begin checking your computer for junk. When the scanning process is completed, the screen will show the total amount of space occupied by unnecessary files.
3. Clean up your Mac drive
To quickly clean your Mac of debris, click Start cleaning. Thus, the program will erase all unnecessary cache and log files, and also delete files located in the Recycle Bin.

You can also delete unnecessary files manually. Notice the tabbed panel on the left side of the interface. In the tab System cleaning you can choose to delete cache and log files by clicking on the corresponding switches. If you want to delete individual files, click Details opposite the desired category. Next, mark the files you want to get rid of and click Start cleaning.

Open a tab Removing languages. In it you can remove all unnecessary application localizations and other language files that you will most likely never need. Just check the boxes for unnecessary localizations and click the button you already know Start cleaning.

Tab Large and old files will help you quickly find and delete “heavy” files that have been on your computer for a long time and, probably, you no longer need. To erase these files from your hard drive, check them and click Start cleaning.

To free extra bed on the disk, remove unused applications, as well as files remaining on the disk from programs that were previously deleted. To do this, open the tab Uninstaller and select a section User Applications, OS X Applications or Leftovers. Check the box next to the programs or files you want to erase and click Delete.
Latest generations MacBook Air- fast and autonomous laptops, which have absolutely no complaints in terms of performance. But how can you comfortably work with a laptop when it only has 128-256 GB of memory? It turns out it is possible! Over the four years of using the MBA line, I have developed several simple rules, which I’ll tell you about now.
1. Start with a clean slate
Installing and configuring macOS c from scratch will help you get rid of all the garbage in one fell swoop and make the system a little faster. If you are ready for such a radical option, then.
2. Buy an external drive for large
Large and rarely used files, such as video archives, can be downloaded to an external drive. For about $60 you can buy a 1 terabyte mechanical drive. An SSD of the same capacity will cost $150. If you have a laptop with USB-C, you will need a small adapter.
3. Disable Local Time Machine
One of the innovations in the last two versions of OS X is that if there is no connected disk for Time Machine backups, the system creates a local backup on the SSD. If you open About this Mac, then in the section Storage you can see how much space the local Backup takes up.

In our case it is 5.58 gigabytes. But this figure could be significantly higher. It all depends on how long ago you backed up Time Machine to an external drive. In order to disable the creation of local OS X backups, you need to run the following command in the terminal (you will need to enter the administrator password):
sudo tmutil disablelocal
To enable the function back, you will need the command:
sudo tmutil enablelocal
For reference: local files backup copy are stored in the directory / .MobileBackups. If you scan the disk using administrator mode, you will immediately discover an impressive folder size.
4. Avoid unnecessary software and extensions
Due to the lack of free space, you involuntarily face the need to minimize the amount of installed software. Keep iPhoto and Aperture, Pixelmator, Photoshop, etc. just “for fun” is already a great luxury.

It is worth giving up as much as possible on rarely used programs and all applications that duplicate each other’s functions. I talked about all this in detail in the article. Well, here are the ones installed personally on my Mac.
5. Transfer iTunes, Aperture, iPhoto libraries to external media
After analyzing the disk space of my previous laptop, I received the following data: iTunes - 84 GB, Aperture - 16 GB, iPhoto - 34 GB. In practice, I listen to most music from the clouds, I don’t use Aperture at all (I simply forgot to delete the database (a duplicate from iPhoto), and iPhoto archives are accessed extremely rarely.

All of these Mac programs allow you to work with multiple media libraries. This way, you can keep the music and photos you need on your Mac, and transfer the archives to the same Time Capsule. You can find transfer instructions on the Apple Support site. Well, to switch between them, just hold the key option during startup.
6. Remove unnecessary localizations
Most programs contain multiple localizations, which waste disk space. It is advisable to leave only those that correspond to your knowledge. If you do not speak Chinese, Indonesian and Korean, then you can safely delete them.
The utility is perfect for these purposes. Using it, I was able to reduce the space occupied by a fresh system and installed software from 20 to 16 GB.
7. Use Mac cleanup programs
I consider the above-mentioned CleanMyMac program to be the best tool. In addition to the ability to remove unnecessary localizations, it is able to find and remove various garbage that remains after applications run (temporary files, logs, caches, etc.), and also integrate with the macOS Trash to completely delete applications (the function is triggered when they get into cart). This utility also perfectly cleans startup, removes plugins, widgets and other little things that remain after other programs.
I consider the above-mentioned program to be the best tool. In addition to the ability to remove unnecessary localizations, it is able to find and remove various garbage that remains after applications run (temporary files, logs, caches, etc.), and also integrate with the OS X recycle bin to completely remove applications (the function is triggered when they enter Add to cart). This utility also perfectly cleans startup, removes plugins, widgets and other little things that remain after other programs.

8. Keep an eye on your Downloads folder
This is usually the next problem area after the iTunes and iPhoto libraries. Over time, tons of files accumulate here, many, if not most of which are unnecessary. It can be:
- documents sent
- music (which, when added to iTunes, is recorded in the library, which means we have unnecessary duplicates)
- TV series watched
- application installation files
- and everything, everything, everything you download from the network
 There were a lot of video files in my Downloads folder
 It would be advisable to periodically transfer some of these files to external drive for further sorting. But in order not to do this manually, you can use a trick and, using , automatically transfer/delete/sort them. Personally, I have two such self-cleaning folders: Downloads And Images/Screenshots.
9. Use cloud storage
There are a lot of options here. If you have your own hosting (I use DigitalOcian), then using programs you can use the free space on it, like a regular external drive. In the same DigitalOcian, for $5 per month you get a 20 GB disk. I note that this is an SSD and it works very quickly and upon registration you are immediately given $10 to your account. It's a good thing, but it's only suitable for tech-savvy people. Alternative option- upgrade your account for free (up to a maximum of 20 GB) and also mount it as in an external drive using the utility (in this case, a local copy of the files is not created). Or buy an extended Dropbox account for 1 TB and do the same.
In conclusion
This is probably all the turpentine that can be poured down the drain of any Mac with an SSD. Following even part of these recommendations will make your union more responsive.
Hello, Makovody! There was such a joke in my computer youth - when choosing a disk, I suggested taking a larger disk (at that time a 500 GB disk was already available) to replace the native one, which was often in the range of 100 - 200 GB. They looked at me like that and didn’t understand why there was such a “large” volume. And just then everyone began to have the Internet, a lot of content, saving movies and music to the computer... And it was clear - the larger the disk, the better - in six months or a year the disk would be jam-packed :) Now everything has changed: fast Internet and various services for content distribution - online movies, music streaming services like Apple Music... But even now, taking all this into account, the question has not lost its relevance - “how to free up space on a Mac?” And now I’ll tell you where to look and what to delete!
Who needs a lot of space on Mac?
Today, more and more often you can find Macs with an installed SSD - MacBook Air, Retina and just MacBook. I also like to install a fast SSD (solid-state drive) in everything that moves in a Mac, and often, the volume of such a drive varies from 120 to 250 GB, which may not be enough... The issue of free space in a Mac is very relevant for owners of a 120 GB drive GB - the system with programs takes up 20 - 30 GB + 10 - 20 GB is better left for stable operation of the SSD and as a result, 70 - 90 GB remains for movies, music and documents. Agree, this is not that much, and you will definitely find something to fill them with :) And the free space will run out at the most inopportune moment, when you urgently need to record some movie on the road or create a backup copy of your iPhone... Now I will try to talk a little about the intricacies SSD work, and if you are not interested, feel free to skip the next chapter :)
Subtleties of SSD operation and how much free space to leave on the SSD
An SSD is very similar to a flash drive that we all use every day, only the filling is a little cooler. Inside, in addition to the memory chips themselves, there are many more interesting things, but the most important thing is the controller, and the maximum speed of the disk, service life, and so on depend on what it is and how it works... Data on the disk is written to memory cells, and the controller knows where to write down what and where there is free space. When you perform the read-change-write procedure, the controller begins to frantically move data blocks to check the “wear and tear” of memory cells and other procedures. The more free space on the disk, the easier and faster this procedure is, but as soon as the free space on the disk approaches zero, the speed gets lower and lower... This can be compared to the defragmentation procedure on regular disks, those with spinning platters. As a result, when there is only 1 - 5 GB left on a 120 GB SSD, the speed drops so much that the speed of launching programs is similar to torture!
Now let's talk about optimal free space on SSD. By personal experience and according to articles on the network, the volume was revealed - 10 - 20% (percent!) of the total storage volume! Exactly percent, and not just 10-20 GB, since the controller’s operation will depend on the percentage of free space, how much room it will have for maneuvers - redistributing data for optimal “wear” of memory chips. Alas, memory cells cannot be written and cleared an infinite number of times, but the statistics on average are such that if you write several gigabytes per day, your disk will last at least 5 years! But this does not mean that it will really work that long if you leave 1 - 2% free on it and constantly work with it... In any case, after 5 years, you will want to change your drive, if only because the prices for SSD are creeping down all the time (if not for the depreciation of the ruble) and from year to year discs are becoming more and more accessible!
By the way, since we’re talking about the intricacies of SSDs, I can’t help but notice one VERY IMPORTANT THING - recovering data from an SSD is very difficult and expensive! Do you know why? And all because the controller is very smart and at every opportunity it restructures the data. On regular disks, when you delete a file, the data itself does not disappear, the disk simply marks the empty space as free and continues writing subsequent files to other cells. This is precisely because when you have deleted some important file, it can still be restored through special programs or service. The main thing is to turn off the computer as quickly as possible or disconnect the disk on which the data has disappeared and call the service. By the way, 🙂
But on an SSD, when you delete something, the controller can reassign the freed blocks within a few minutes (from 3 to 30 minutes), thereby permanently deleting the data. And to recover data from an SSD, you need to disconnect the disk and take it to a storage facility, where they will disassemble the disk, take out the board with the chips, unsolder the chips (if possible), and read all the information directly from them. After such a procedure, the disk will most likely go in the trash... So it is extremely necessary!!!
So, we have briefly discussed the intricacies of SSDs and now we can start clearing disk space!
How to free up space on Mac
To clean up a disk on a Mac, you can use 2 methods - go to Finder, select the desired folder- Images, Music, Documents and so on and look at the properties of the folder: how much space does this or that folder take up and begin to clean out the junk. The method is good, but only for a master who knows exactly which folders to look in first, so as not to break the system and remove truly unnecessary folders and files! Personally, I immediately go into iPhone/iPad backups, system library and cache. But that’s me - I understand that you can delete things from a Mac to free up space and not kill the system! In difficult cases, I run an excellent program. And don’t pay attention that the program is paid, since its free functionality is more than enough for us!
We download the program, run it, and see this window (for the second or more launches, you need to wait until the reference line disappears, and then click on Test Drive):
In the first window you can see all drives, both the system drive and all flash drives and images connected to the Mac. We need exactly the disk next to which it says “ boot disk", although you can also scan an external drive. Click on the scan button and wait for the process to complete: depending on the type of disk (hard drive or solid-state) and volume, the program will scan the disk from several seconds to several minutes. And after the scan, a window will appear with a diagram, which will be different for everyone, but similar to this:

Here beautiful diagram, which displays all large objects - folders and files on the selected disk. Keep in mind right away that not everything can be touched with your playful hands, and some things will not even be accessible, but first things first. If, like me, you have “(hidden space)” at the very bottom of the list, then this is a local disk backup: you can only get rid of it by connecting an external disk and . In most cases, this solves the problem, and if not, then there is no point in bothering (when the disk runs out of space, the operating system cleans up this space)!

Above there may be, like mine, folders System And Libraries — SUPER SCARY FOLDERS YOU SHOULD NOT ENTER WITHOUT A BACKUP COPY!!! They contain the most important files for adequate work operating system OS X! Only professionals who clearly understand what is there and what it is responsible for can get into these beautiful folders.
Next comes the folder private— it’s also worth going into it if you don’t know what lies there and what to do with all this stuff. I deleted something from there and a surprise awaited me :) Even system administration teachers in Moscow did not immediately say what was there and how it worked. Kroch, let’s not go there!
Cleaning the Applications folder
But then there is where we can go and delete something - Programs and Users. For 90% of my readers, the Users folder will be at the very top. Inside the folder Programs We will see something like this:

By the way, to immediately see in the Finder the object that you want to delete or view, just hold down the Command (CMD) key and left-click on the object in the diagram or in the left column.
Here you can delete whatever you want, except for system programs such as iChat, Quick Time, etc. You won't be able to delete them - OS X will tell you that it can't be done because they are system files. But find some rarely used or unnecessary programs it will be easy! Here I always remove junk from the iLife package - GarageBand, iWeb And iDVD, of course, if you don’t use them at all. Sometimes it goes into the trash bin iMovie, but this is rare. iPhoto almost always remains on the Mac :) The installation package of the new OS X can also take up a lot of space ( OS X Yosemite Installer, for example), and if you have no plans to install it, then you can safely throw it in the trash, since downloading it again on Mac will not be difficult!
Clearing the Users folder

At this stage, you will have the opportunity to evaluate your files from a bird's eye view - how much data you have in your downloads, how much music and movies you have, as well as look into your libraries. Naturally, I cannot give you advice on what you need in photographs, music or documents - these are your personal files and only you understand their value. I want to show those few folders that are most often not very necessary, but at the same time there is something to delete in them!
Music -> iTunes -> iTunes Media -> Mobile Applications - here may be programs from the iPhone and iPad that you downloaded from the App Store. In fact, there is no point in storing them on your Mac, since you can always download them from the store at any time! Sometimes this folder can take up a lot of space and in my case its volume was about 15 GB!
You can also inspect your library for large albums and re-evaluate their importance to you. There are some things you no longer want to listen to, and some things you’re tired of – don’t clutter up your disk with these compositions. By the way, you also need to pay attention to 2 folders: Music -> iTunes -> iTunes Media -> Home Video and Movies there - they may contain your movies purchased in iTMS and movies that you added to iTunes. It’s possible that you no longer need them, and there’s no point in just keeping movies from the store in your media library!
It is important to understand where exactly your music is stored - in the iTunes library or simply organized in folders. For example, all my music ends up in my library and after that, I delete all the original files. Although there are times when there are no tracks in the library itself, and music files are scattered throughout the Mac. Go to iTunes -> Settings -> Add-ons and see what checkboxes you have:

If, like me, all the boxes are checked, then the songs that you download from the Internet and then upload to iTunes are stored both in the media library and in the original downloaded folder! In this case, you can safely delete the original files and leave them only in iTunes.
If we have sorted out the media library, then we can safely stomp to the side iPhone backups on iTunes. To do this, you can either go to Libraries, which I don’t particularly recommend without understanding what to do, or go to iTunes and delete it through it. Let's clear the place using the second method. To do this, go to iTunes -> Settings and in the window that appears at the top, click on Devices:

If your Mac is already many years old and your family has a lot of phones and tablets, then you may be in for a surprise :) Personally, I have almost no copies there (and if there are, they are fresh), but for some I have seen more than 10 various devices with very ancient copies (up to 2010...)! Some copies may belong to your gadget, while others may belong to your wife, girlfriend or colleague - why do you need them?! Feel free to select irrelevant copies and click on Delete backup copy from below, and then on the OK button. If you click on Cancel, the copies will remain on your computer! Or you can do it a little differently - right-click on the device, select Show in Finder and from there delete the folder with the copy.
The difference is that when deleting via iTunes, you do not see the process itself, and if the copy is very large (more than 10-20 GB), then during uninstall Mac will slow down, and you will not see the process itself and its completion time. And if you delete a copy directly from Finder, you will see the progress of deleting the copy :)
For Mac owners with a solid-state drive, it will also be a good help. This trick will help you kill 2 birds with one stone - have backup copies from your iPhone/iPad, and also not fill up your laptop’s built-in disk with them!
In addition to the iTunes library, you can look into the library Photo or iPhoto. Look at your photos and you may find a lot of unnecessary ones. Personally, I had all the photos from my iPhone in Photos/iPhoto (via photo stream), and I often take something as a reminder, and the value of the frame disappears almost immediately after shooting, but these photos still ended up in the library. Photos on iPhone are very high quality, but back side quality - the weight of the frame! By deleting a hundred unnecessary pictures, you will save about 200 - 500 MB. But you should not only delete the photos themselves from the library, but also empty trash V iPhoto program and delete “recently deleted frames” in Photos.
And if a photo takes up a couple of megabytes, then a short 10-second video on an iPhone 5 (for example) already takes up 20 MB, not to mention the fact that videos on newer models take up much more space! And if you, without thinking, save all this in a media library or in a separate folder, then it’s worth visiting them and checking their volume. It may well turn out that some videos were shot by accident, or have already lost their relevance :)
By the way, in addition to cleaning media libraries, you can also use them :)
In addition to all of the above, I also recommend inspecting the folder Downloads! The most necessary and most harmful folder at the same time - everything that you download from the Internet most often ends up there, but not always, the downloaded files crawl to other places - music to music, films to films, etc... I very often see , as the Downloads folder takes up almost the most space, and only because the files from there are never audited and cleaned. Take a look there and take a close look at the contents! By the way, this folder is the largest for me, but only because I store a lot of useful things there ( iOS firmware, Mac updates, etc.) and inside the Downloads folder I have a clear structure.
Well, that seems to be all. So, off the top of my head, I delete 20 GB of data from some Macs that is not really needed on the computer. I hope you too can clear your Mac of unnecessary files 🙂
When you download several movies or TV series and then delete them after watching, you may wonder where the free space on your Mac’s disk went?
That is, even after deleting files, disk space may not be freed up. The same thing can happen not when deleting files, but when moving them to an external drive.
A very pressing problem for people working with graphics. When working with video, for example, the cache can store both 10 and 25 GB - this is not the limit, it all depends on the volume of source materials. When working with 3D software, the numbers are slightly smaller.
Now you can think about it: if every program on the computer makes records for itself, how much volume they can take from the hard drive. And if you add to this the files in the recycle bin, outdated Time Machine backups, files that are copied by iTunes into my documents, Browser caches (Safari, Chrome, Yandex, etc.) - the number adds up quite a bit.
Do you still have questions: Where does the disk space go? I think now you have another question, how to clean it all up!
Clearing the disk of temporary files and program caches
Emptying the Trash
In some cases, a message may appear stating that it is impossible to delete files, this is due to the fact that the files, even when moved to the trash, continue to be used by programs such as Bittorent, Skype, etc.
Solved by turning off running third party programs or reboot if these programs are not installed in your startup!
Quit all running applications using a keyboard shortcut cmd+Q.
By the way, there is also a convenient keyboard shortcut for emptying the trash can.
When you're in the Finder, just tap Shift + Option + Command + Delete and the basket will be cleared immediately without confirmation.
To empty the trash with a pop-up confirmation window, click: Shift + Command + Delete
Although I think you have already done this, so let's move on to more interesting actions.
Clearing Browser Cache
If you spend a lot of time on the Internet and have never cleared your browser cache and cookies, then they can take up quite a lot of space on your hard drive. Cleaning in different types browsers is the same type, but has slight differences!
Safari. In the left corner (next to the apple) click on safari and select clear history, the important point is to select “All history” in the next window.

Chrome and Yandex. Similar situation. In the right corner, click on the button with dots - history - history - clear history. We select everything except the saved passwords for all time and clean it.

It's the same in other browsers...
To clear the cache from other programs, such a simple method is not always available.
- We use the utility to clear the cache and temporary files. For example CCleaner, it will clear all temporary information for you.
- Open the window Finder and using a combination Shift+cmd+G go to ~/Library/Caches directory, select all files and folders with cmd+A and move everything to Cart. If prompted, enter your password.
- Once again using the keyboard shortcut Shift+cmd+G, now go to the /Library/Caches folder. Do the same thing - delete all files and folders.
Afterwards we empty the trash and reboot!
Continue to free up free space on your Mac drive
On Mac laptops starting with OS X Lion (10.7), if you have Time Machine enabled, the function of creating file system snapshots, also called local backups, should have been enabled along with it. The purpose of this feature is to supplement Time Machine backups when the external drive or Time Capsule you configured to store backups on is not connected.
In general, this is a rather useful function, it should be noted, because if you delete something really important, but it’s not on the disk with Time Machine, you can get very upset.
On the other hand, when you are not aware of such care for your files, and after deleting files, the disk space remains occupied, then you can also begin to get nervous and have trouble sleeping.
According to the Apple support site, when there is free space left on the disk:
- less than 20%, then Time Machine starts deleting snapshots, starting with the oldest;
- less than 10% or less than 5 GB, then Time Machine deletes all local backups except the most recent (new) one and stops creating snapshots.
The easiest way to find out if your free space is taken up by these local backups is to use the About This Mac utility.
- Select About This Mac from the Apple menu (top left corner).
- In the window that appears, click on the “More Info” button.
- Open the “Storage” tab.
Archives (Backups) are those same local backups.

Deleting local backups
If you need free space here and now, then this can be easily done by running and executing the following command there:
sudo tmutil disablelocal
After which you will be required to enter the administrator password. This command will disable the creation of local snapshots and delete those already created.
I myself like to make backups, and this has helped me out several times, so I would advise then turning on the function of creating local copies back:
sudo tmutil enablelocal

To create an instant backup of the current system state, run the following command:
Utilities for finding large files
If you haven’t turned on Time Machine, and even after disabling the creation of instant snapshots, you still don’t have enough free space, and you don’t know who took it all, then search utilities can come in very handy large files and directories that take up the most space...
You can use DaisyDisk to search. It has a simple and intuitive interface, and you can immediately see which folder has consumed the most gigabytes.

Conclusion
If you've lost free space on your Mac's drive and you can't find the reason, then you should consider doing the following:
- Empty trash.
- Clear program, browser and system caches.
- To restart a computer.
- Check if the space is occupied by local backups.
- Use a utility to search for large files and delete unnecessary files.
How do you solve the problem of lack of free disk space?