Take a screenshot on a Logitech keyboard. Taking a screenshot of the page (screen)
Many users are thinking about how to take a screenshot on a Toshiba laptop. This question sometimes causes a lot of problems and troubles. Next, we’ll try to figure out how to take screenshots on laptops. What tips will help you cope with the task? What to do if the screenshot is not taken?
Screenshot: definition
How to take a screenshot of the screen on a Toshiba laptop? First of all, each user must understand what elements he has to work with.
Screenshot is a screenshot. When creating a screenshot, an image is captured from the desktop. After this, the information is converted into a graphic document.
Screenshots on all laptops are made approximately the same. The methods for creating them are usually limited only by user preferences and computer device models. Namely keyboards. Therefore, the tips presented below can be considered universal.
Image Capture Methods
How to take a screenshot on a Toshiba laptop? We have already said that it is impossible to give a definite answer to this question. It all depends on what kind of laptop model a person uses.
In general, today you can find the following methods for capturing images from your desktop:
- using the keyboard;
- through system means;
- by working with additional programs.
Keyboard and its buttons
The first scenario is to capture an image using a keyboard shortcut on the keyboard panel. The technique is the simplest; it is used by the majority of novice PC users.
How to take a screenshot on a Toshiba laptop? To do this you will need:
- Install drivers for the laptop keyboard. When purchasing a device in a store, the corresponding software will be fully prepared and initialized.
- Place the elements that need to be captured on the OS desktop.
- Click on the PrintScreen keyboard.
- Open any graphics editor. For example, Paint.
- Press the keyboard shortcut Ctrl + V.
- Click on "File" - "Save As".
- Select a location to save the screenshot, giving the document a unique name.
- Confirm actions.
The case is completely completed. This way the user can capture an image at any time. For example, when the game process is running.

Combined buttons
Thinking about how to take a screenshot on a Toshiba laptop, some note that the previously presented algorithm of actions does not help them. This is due to the fact that the PrintScreen button is combined with End. When you press the corresponding key, “End” is triggered. What should I do?
You'll have to take a good look at the laptop's keyboard panel. It should have Fn keys. If the previously presented algorithm of actions did not help to capture the image, it is worth repeating it again, but using the Fn + PrintScreen combination. Everything should work!
System capabilities
How to take a screenshot on a Toshiba Satellite laptop? The answer to this kind of question has already been presented to your attention. The above instructions will help you achieve your desired goal. But you shouldn’t limit yourself to them.
You can use system applications built into the OS. Want to capture an image from your desktop? Then you can use these instructions:
- Open "Start" and enter "Scissors" in the search bar.
- Select the appropriate service.
- Click on the "Create" button and select a form. For example, "Rectangle".
- Select with the mouse cursor the part of the desktop that you want to photograph. To do this you will have to hold down the LMB.
- Release the mouse button.
PC programs
How to take a screenshot on a Toshiba laptop? The last suggestion is to work with additional programs. There are a lot of them. Most of them allow you to display images not only in the form of graphic documents, but also as videos.

Typically, to use this technique you need:
- Install a special program and run it.
- Open on the desktop the data that you want to capture in the image.
- Click on the button responsible for creating a photo.
Fast, simple and very convenient. What applications can you use to achieve your desired goal? Eg:
- Fraps.
- Bandicam.
- Lightshot.
- FastStone Capture.
- Screenshot Capture.
Thanks to them, you can solve the problem without any problems.
Screenshot is a useful option and is a regular screenshot. It can be done at any time and saved on your hard drive.
Taking a quick snapshot of Windows 8
In order to capture the entire desktop you need to use the keyboard shortcut Windows + Print Screen.
In this case, an image of the entire screen will be created. It will be automatically saved in a package "Screenshots" located on the tab "Images" .
The saved file will have a JPEG extension. Each subsequent photo will have its own numbering.
You can change the name assigned to the screenshot at any time.
If you need to create a screenshot of a certain area of the screen or make it of any shape, use the standard program "Scissors".
Working with it was described in the previous section.
To find this program, go to the START menu and select show all applications.
Right click on the program "Scissors" and pin it to your Start screen.

If necessary, you can pin its shortcut to the taskbar.
You can also place the program icon on your desktop.
To do this, right-click on the icon "Scissors" and select "Open file location" .
After this, a window with standard programs will open.
Click on the scissors icon and specify in the list that appears "Send to desktop (create shortcut)" .
This software is at your disposal at any time.
Options for creating screenshots of Windows 10
Ten has great functionality both in the usual sense and in creating screenshots.
They can be done using the already familiar keyboard shortcut Windows + Print Screen.
In this case, the system will automatically save the file with the PNG extension in the folder "Screenshots" .
To open it, go to the tab "My computer" , and then - "Images" .
Another way is to use the Windows + H keys. In this case, the picture will be saved in " ".
A sidebar will open on the right side of the screen, where you can choose how to use the screenshot you took.
This list contains the following options:

You can take and edit a screenshot by pressing the key Print Screen.
In this case, the image will be on the clipboard.
Open a standard editor and use the Ctrl + V keyboard shortcut to paste it into the program’s working window.
If necessary, edit and save it.
You can also take a screenshot of the active window using the combination Alt + Print Screen.
Pressing these keys simultaneously will create a screenshot of the active window at the moment of pressing. A very convenient way without taking a screenshot of the entire screen.

In Windows 10, you can use the keyboard shortcut Win + G. In this case, a special game panel will open.
It allows you to record video and take screenshots during gameplay.
To do this, you will need to simultaneously press Win + Alt + Print Screen.

To create a screenshot, you can also use a standard program "Scissors". Working with it was previously described.
There are a lot of options for taking screenshots. However, the list does not end with standard tools.
Additional programs for taking screenshots
Microsoft Snip
This screenshot manager is free. It can be downloaded from the official Microsoft website.
It allows you to take pictures of individual windows and the entire screen, as well as selective fragments.
With it, you can even record videos showing various marks.
This is very useful when creating training videos and various types of presentations.
You can also add sound to them.

Lightshot

People who have their own computers do not know how to take a screenshot, but this is a very useful thing, and sometimes helps to sort out unexpected problems and show this or that part of their own desktop. I will tell you and show you in the photo how to take a screenshot of the screen on a computer and laptop, as well as on Android, mac os and iphone. Taking a screenshot is very easy on any device and any operating system, the main thing is to initially know the buttons that are responsible for these actions.
How to take a screenshot of the screen on a computer and laptop.
Let's divide our article on how to take a screenshot into four parts:
Screenshot on Windows
First, let's look at how to take a screenshot on the Windows operating system. I will use step-by-step photo instructions for windiws 7, other versions are similar and it will not be difficult for you to guess what minor differences exist there.
In order to take a screenshot, at the very beginning on the keyboard of a computer or laptop, you need to find the button on which it says PrtScr (Print Screen), (the button PrtScr SysRq, PrtScn, PrtSc can be called similarly). This is how it is located on the laptop.
Important! If you want to take a screenshot not of the entire screen, but only of a separate window, initially hold down the Alt button, and then perform the remaining actions.

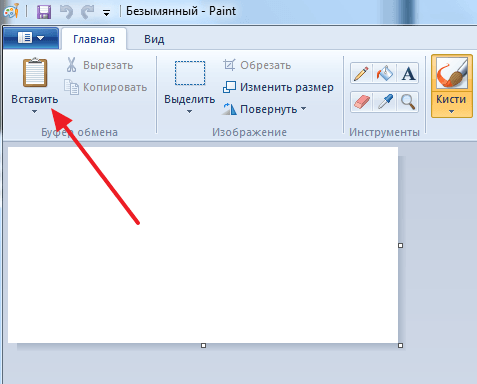
This button is on an old Logitech keyboard. This button takes a photo of your entire screen and puts the screen on the clipboard, which means that “Paste” or by pressing the Ctrl+v button combination, you can paste a photo of your screen into any editor or document.

After you have saved the screenshot to the clipboard, you need to make a picture from it. For this we will use a standard image editor called Paint. Next, I will show you how to find it and what actions need to be taken.
Click the Start button, it is located in the lower left corner. I think everyone knows this.

Then click on All Programs.

A sub-item will open, find and click - Standard.

And in the sub-item that opens, click the Paint program.

After the program has opened, you need to paste a screenshot from the clipboard. You can click the insert button, I demonstrated this in the photo, or press two keys simultaneously Ctrl+v and the photo will appear in the program. there you can edit it, but we don’t need it and we’ll just save it.

In the upper left corner, find the down arrow, click on it and a menu will drop down, there will be Save or Save As. Click any item, they are no different if you save this particular screenshot for the first time.

Then a window will open. In it you need to select the path to save the image and its format. Decide for yourself which path to choose, but I will recommend the JPEG format, it is considered the most common.

You now know everything about how to take a screenshot. Look for it in the place you chose to save and use it.
Screenshot of android screen
I will consider versions of Android 4.0 and higher. I will also mention 2.3 and below.
The method of taking a screenshot on android is very simple. You need to press two buttons on the device.
Power button (this button is also called the lock button) + home button (many call it the home button), (there are models on which you need to press the volume down button, it is located on the side of the device).


For Android versions below 2.3, making a screenshot by pressing two keys will not work; at that time there was no such function. Therefore, use the programs:
Screenshot
No Root Screenshot It
Screenshot Ultimate
Screenshot
Screenshot on mac os
Option 1.
Now let's look at how to take a screenshot on mac os. As with other systems, you need to perform simple steps. Namely, press the key combinations, which ones and what they do I will describe below:
Option 2.
You can use a standard program to create a screenshot on a Mac. The program is called “Screenshot”, in English its name will be “Grab.app”. The required program is located in the “Programs/System programs” folder, in English it is “Applications/Utilities“.

Screenshot of iPhone screen
And finally, I’ll tell you how to take a screenshot of the screen on an iPhone. As in Android, you need to press two buttons, after which there will be a slight delay and you will get a screenshot.
Press and hold the lock button + the center button of the phone at the same time.
By default, the screenshot will be saved to the standard gallery, where you will find it, most likely at the very end.


Conclusion.
We looked at four types of taking a screenshot on various devices. I hope everything works out for you, if you have any questions, ask them in the comments.
This is a screenshot, a picture that shows everything that is on your screen. The need to take a screenshot arises quite often. Therefore, this function was built directly into the operating system. In this material you will learn about which key to take a screenshot on a computer with the Windows operating system.
In the Windows operating system, the PRINT SCREEN key is used to take screenshots (on some keyboards PRT SCN). This key is located in the upper left part of the keyboard, next to the NUM LOCK, CAPS LOCK and SCROLL LOCK indicators. In order to take a screenshot you just need to press this key.
After pressing the PRINT SCREEN key, the screenshot will be placed on the clipboard. In order to save this screenshot as a picture, you need to open any graphics editor, paste the screenshot into it and save it as a file. For example, you can open the built-in graphics editor Paint. To do this, open the Start menu and search for “Paint.” After this, the system will find this program and you can open it.

After opening the Paint program, click on the “Paste” button or use the keyboard shortcut CTRL-V. After this, your screenshot will appear in Paint.

After saving the picture, you will receive the screenshot you need as a file.
A little trick: When taking a screenshot, you can use the PRINT SCREEN key along with the ALT key.
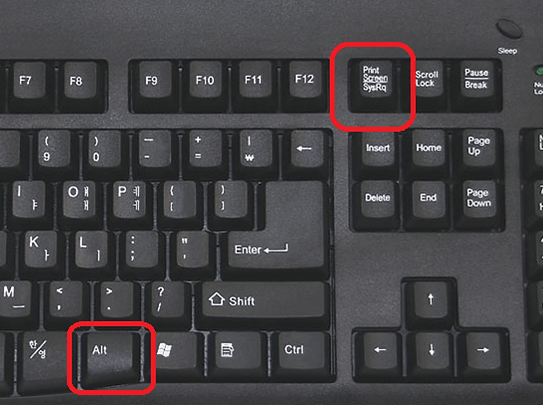
In this case, the system will create a screenshot of only the active window. This way, you can create screenshots only of the program you are currently working with.
A button on the keyboard called Print Screen is responsible for taking a screenshot in Windows 7, 10 and earlier versions of the system. Most often its abbreviated name is indicated - Prt Scr. The key is usually located in the upper center or right side of the keyboard, just behind the F1-F12 row. Before you click on it, make sure the screen is displayed exactly the way you want to capture it. The most difficult thing for a beginner begins precisely after clicking on Print Screen, since at first it is not clear where the screenshot is saved. But it is the user himself who determines the path for the location of the screenshot, which requires a few more steps.
Open any image editor, for which the standard Windows program MS Paint is quite suitable. The application is located in the standard programs section, which can be accessed through the Start menu. Once MS Paint starts, click on the “Edit” menu section and select “Paste.” The screenshot of your computer screen will immediately appear in the main field of the program. The same action of inserting an image can be performed using the Ctrl + V button combination. Make sure you are happy with the screenshot. Otherwise, you can use the program's tools to fix it, for example, select and trim off excess edges or flip the image. After that, go to “File” - “Save as..”, where you need to specify the folder to save the screenshot and click “Save”. The image will immediately appear in the selected folder and will be available for further use.
Here are the advantages and disadvantages of the described method to take a screenshot of the screen on a computer using the keyboard. Its advantages are as follows:
- comparative simplicity and accessibility;
- compatible with all versions of Windows;
- data security.
Despite the number of actions required to obtain and save a screen, the “Print Screen + Paint” method remains the most accessible and understandable for both beginners and advanced users. To obtain an image, it is not necessary to resort to the help of third-party programs and people, which helps prevent leakage of personal data and infection of your computer with viruses. However, this method also has disadvantages:
- a large number of actions;
- tangible time costs;
- keyboard addiction.
The method of capturing the screen via the Prt Scr key takes some time to get used to, so there is often confusion in the sequence of actions, which is why you have to turn to the help of specialists again and again. In addition, not everyone may have a working keyboard with the desired key at hand, so every self-respecting user of a personal computer is obliged to understand additional ways to take the coveted photo.
How to take a screenshot on a computer if there is no Print Screen button
Many users are interested in how to take a photo of a laptop if the necessary Print Screen button is missing? To begin with, it’s still worth looking for it, because, as mentioned earlier, it can be called differently: Prt Scr, PrScr, or even just have a screen icon. The location of the key may also vary depending on the equipment. However, the oldest computers, which are still installed in many Russian offices, do not really have a Print Screen button. In this case, special programs will come to the rescue, with the help of which you can easily take a screenshot of the screen on a computer or. Also, applications will be an excellent solution for those who simply want to reduce the time it takes to create and save a screenshot.
There are a great many different programs for creating a screenshot, but it is best to immediately pay attention to the simplest and free applications, which have long proven themselves among ordinary users. If you try to install the first program you come across on the Internet, there is a big risk of simply not understanding all its functions or, even worse, of catching a virus from a site where attackers operate. So, Lightshot is considered one of the best applications of its kind. The program is quickly installed and integrated into the system, starting to run when it starts. In the settings, you can assign any key to take a screenshot, and after pressing it, the image is immediately saved to a folder convenient for the user. Thus, it is created in just one step.
You can use the closest analogue of Lightshot - the Screenshoter program, which has similar functionality and which also allows you to take a screenshot of the screen in one action. Snagit and Clip2net are quite good in terms of convenience, which also have their own image editor that allows you to quickly and easily process the resulting screen. However, there are also certain disadvantages to the method of photographing the screen using applications:
- not compatible with all versions of Windows;
- deterioration of system performance;
- time required for development.
Alas, most programs do not actually work on the oldest computers, and if they are installed, they significantly slow down the system if the hardware configuration is weak. In addition, it will take some time to learn all the functions of the program and remember how to use it. However, in the future, the process of creating screenshots can be simplified tenfold. Thus, each user decides in his own way which method suits him best. If you rarely have to take a screenshot of the screen on your computer, it will be enough to remember the “Prt Scr + Paint” procedure, but if such a need arises every day, you should think about choosing a program that is suitable for convenience.
Video on the topic
There are situations when you need to show someone everything that is currently displayed on your monitor screen. Such a need may arise, for example, when corresponding with technical support, when you cannot accurately describe the problem with your computer in words, and it will be much more effective to show it clearly in the form of a picture. Whatever the reason, taking a photo of your monitor screen won't be too difficult, especially if you use the tips below.
Instructions
Find the PrintScreen key on your keyboard. It is usually to the right of the F12 key and above the Insert key. Press the key once, now completely copied.
If you want to photograph not the entire screen, but only a specific browser window, focus on it by clicking the mouse, then press the key combination Alt+PrtScr (PrintScreen). The window you need has been copied to the clipboard.
Open any graphics editor that is installed on your computer. The best option is Paint or Adobe Photoshop. Create a new file when the editor starts. In the "Edit" menu, select "Insert", after which the photographed screen image will appear in the editor.
If desired, trim off any excess elements using the Crop Tool if you are using Photoshop for editing.
Save the file in the format you need. It is best to choose the JPEG format, or, as a last resort, GIF.
Open a new Word document and press Ctrl+V (or in the “Edit – Paste” menu). The resulting screenshot will be inserted into the document. Save the document, and then you can send it as an attached file.
Video on the topic
note
To process images in cases where quality is important, you need a professional Photoshop tool.
Sources:
- how to take a picture of a monitor screen
Few people are satisfied with a standard desktop screensaver. On a personal computer, you want to put, for example, your image (picture or photograph) on the main screen. The choice of desktop wallpapers is very wide, and you can easily replace the standard image with your own.

Instructions
In the list that appears, select the “Properties” line.
The Properties: Display window will open. In it you need to select the “Desktop” tab.
To select your image on the Desktop, click the “Browse” button. A picture selection window will appear, in which you need to find the directory where the desired file is located, select it (with one click of the left mouse button) and click the “Open” button. If the correct file format is selected, the preview image should change.
After selecting a picture, you must click the “Apply” button. The desktop image will change.
If the location of the picture is unsatisfactory (it can be stretched or greatly compressed due to inappropriate image resolution), then you need to change the “Position” of the background picture in the “Properties: Screen” dialog box. The following options for placing the picture are presented in the pull-out list:
- “Centered”: The picture is displayed in its original resolution (size). In this case, outside the boundaries of the image, the background is filled with a color determined by the system. You can also select this color manually in the “Color” slide-out list in the screen properties;
- “Tile”: The image is also displayed in its original size, but the background is completely filled with this image, copies of which are placed end-to-end.
- “Stretch”: The image is stretched to fit the screen resolution
After selecting the image and the optimal option for its location, you must click the “Apply” button and then “OK”.
Sources:
- how to make an image fill the entire monitor in 2019
Screenshot – a screenshot taken using a standard program installed in the OS, or an application specifically downloaded by the user. Using a screenshot, you can diagnose technical problems with your computer from a distance, show a funny picture you saw on the Internet, or simply boast about an achievement in the game.

Instructions
The first program for screenshots is “FastStone Screen Capture”. The program's functions include shooting the active window with the ability to scroll, and basic image editing functions. Files are saved in the following formats: *.bmp, *.gif, *.jpg, *jp2, *.j2k, *.pcx, *.png, *.ppm, *.tga, *.tiff, *.pdf. After installing the program, a rectangle will appear on the screen.
“Free Screen Video Recorder” is a free version of the “1st Screen Recorder” program. Program functions: creating and editing screenshots, recording video sequences and several others. Paid, among other things, allows you to record sound. After installation, the program is displayed as a miniature rectangle. The captured image is instantly displayed in the program's graphic editor, where you can immediately make small changes: mirror, crop.
Another free program for taking and saving screenshots is “Floomby”. After installation and launch, click on the “f” icon in the tray and select the option (full screen or fragment). Then highlight the desired part of the screen and click the checkmark. When prompted by the program, copy the link and paste it into the address bar of your browser. You will find yourself on the server, send the picture to your computer or simply provide a link to it.
Sources:
- “FastStone Screen Capture”, “Free Screen Video Recorder”
A screenshot is a snapshot of an image from a monitor screen, saved as a graphic file on a computer. The image obtained in this way can be processed in the built-in editor of the program used, in standard Windows applications or in another program designed for working with graphics. On the Internet you can find many programs that allow you to take a screenshot of a page and save the image in a convenient format. Snagit is one such program, with a built-in image editor.

Instructions
Launch the installed program and select a screen fragment to take a screenshot. In the window that opens, click the red start button to start the image capture process. Select the desired fragment using the yellow boundary lines and arrows. Left-click to save the selected fragment. It is automatically sent to the image editor, the window of which will open immediately after taking the photo.

Save the resulting screenshot in the program library or in any other folder that you designate for storing such images. The file can be processed in the program editor or saved for editing in one of the proposed formats.

Video on the topic
note
An image file created using the program can be stored, processed in your own or third-party graphic editors, and sent by mail.
Helpful advice
To obtain a high-quality picture when capturing a video fragment, a static image is required. Therefore, you need to stop the video playback to take a screenshot by pressing pause in the place you are interested in.
Screenshots, or screenshots (from English - screen shot), help to quickly save some important information in the case when it is very difficult to present it in text form. They are usually used to capture the current image displayed on the screen, or some part of it.

You will need
- - Paint;
- - "Scissors".
Instructions
You can create your own photo using standard programs and functions of the Windows operating system. Press the Print Screen key to save the current screen image to the clipboard. Now open the Start menu and find the Accessories submenu. Click on the Paint program icon. After launching this utility, press the key combination Ctrl and V. The image copied to the clipboard will be pasted into the program window.
Open the File menu and select Save As. Specify the format of the future file and its name. Select the folder where you want to save the resulting image. To edit the resulting image, it is better to use a separate program, for example ACDSee. Install it and open the created image file. Open the Edit menu and go to the Crop function.
Select the area of the image that you want to leave. Click the "Done" button. Make sure the resulting image is correct. Open the "File" menu and click "Save As". Save the new image.
In the Windows 7 operating system, there is a function that allows you to capture the desired area of the screen and take a screenshot of it. This program is called “Scissors”. Open it by clicking on the desired shortcut in the Start menu. Use the left mouse button to select the desired area. After this, the editor menu will open. You can highlight individual elements with a “marker” or “pen”. Save the resulting finished image by pressing the Ctrl and S key combination.
It is worth noting that Windows 7 also has the Print Screen function. It produces images of higher quality than when working with the Scissors program. There are special programs that allow images located outside the visible area. They are usually used for photographing web pages.
Related article
Sources:
- how to find screenshots taken
A Screenshot is a snapshot of an image transferred to the screen of a computer or laptop. Sometimes this function allows you to create a snapshot of not only the visible area of the screen, but also an entire web page.

You will need
- - Paint;
- - WebSite Screenshot.
Instructions
Most keyboards have a Print Screen (PrtSc) button. Press it at the moment when you need to take a screenshot. After clicking it, the image will be saved to the clipboard. Open Control Panel and expand the All Programs tab. Find the Paint utility and run it.
Press the key combination Ctrl and V. After this, the screenshot will be displayed in the Paint program window. Open the File menu and select Save As. Select the file format to save and enter its name. Specify the folder where you want to save the photo.
The Print Screen function may not work properly when running certain games and applications. In such situations, it is recommended to use additional programs. Download the Fraps utility and install it. Open the program by clicking on the shortcut on your desktop.
Select the Screenshots tab and click the Change button. Select the folder where the screenshots will be saved. Now highlight the Screen Capture Hotkey column and select the desired key. Pressing it will activate the Fraps program.
Select the format in which the pictures will be saved. It is better to use BMP to get high quality images. Now minimize the program window. At the right moment, press the selected key.
If you need to take a snapshot of an invisible part of a program, such as a web page, then use the WebSite Screenshot program. It is installed as a browser plugin. Install this program and open its settings.
Set a hotkey that, when pressed, will create a snapshot of the entire web page. Open the website you want and click this button. You can also use this program to take a snapshot of a separate part of a page. You can edit the resulting file in Paint or another graphics editor.
Video on the topic
Related article
Screenshots are often used to quickly save important information. This technology allows you to capture the current state of a program or game. Sometimes screenshots are taken when saving elements of web pages.

You will need
- - Fraps;
- - “Scissors” program.
Instructions
Windows operating systems provide utilities that allow you to quickly capture screen images. On Windows Seven, use the Snipping Tool.
Open the Start menu and go to the Accessories directory. It should be in the All Programs submenu. Create a shortcut to the Snipping app by moving the icon to your desktop.
At the right time, launch this program and select the required area of the screen with the left mouse button. Immediately after completing this procedure, the quick parameter editing menu will launch.

When problems arise with the computer, this or that function does not work, the program does not work correctly, we try to find someone who will help us. But we cannot always correctly describe the current problem - either we do not have enough vocabulary, or due to our lack of education in this topic. In this case, a function such as “screenshot” can help us. It allows you to take a photo from your monitor. It can be done either with or without additional programs. Let's look at a way to take a screenshot without third-party programs.
Every keyboard has a Print Screen button (abbreviated as Prt Sc). It is equipped with the function of taking screenshots from the screen. Next, open any graphic editor, click “Create” or “New” and press the “paste” button or the Ctrl+V key combination. Next, we just have to save the resulting image. To do this, click File - Save As.... You can also use the key combination Ctrl+S. In the window that appears, write the name of the photo, select the format, indicate the saving path and click “save”.
Screenshots are a very useful thing. With their help, you can save the current state of your computer's desktop. A screenshot will help you save your favorite fragment of a movie, a moment from a game, or help show someone about your problem.
Video on the topic
PicPick – shooting tool
You can now take a picture from the monitor using a camera, from which you will then have to transfer the image to a computer, and then use it in your work. But there is hardly a person who will bother taking photographs. To do this, there are a number of programs that can take a screenshot of the working window in a couple of clicks.
One of these is PicPick. This program is distributed, but its quality does not suffer from this. With PicPick you can take a photo and capture the entire screen or just a part of it - selected or fixed, as well as an arbitrary area of the screen. In addition, the program allows you to edit the image and even make the necessary inscriptions on it. This property is necessary when you need to pay attention to a specific area of the screen.
To evaluate the program in action, install it on your computer and then launch the application. Then in the window that opens, select the “Screen Capture” section and indicate which area of the screen you want to take a screenshot from. You can first open any graphic image or website. PicPick will take a photo from any picture on the screen.
On the left side of the program’s working window is the “Graphic Elements” section, which you can use if you need to edit an image or make notes and notes on it. Once your photo is ready, click the “File” button on the toolbar and select “Save As” in the drop-down window. Nearby, on the right, another window will open in which you will need to specify the format of the saved file: JPEG, PNG, GIF and others. If necessary, you can immediately send the file to a text document, spreadsheet, or post it on the Internet or send it by mail.
Programs for taking screenshots
PicPick isn't the only screen capture software out there. Among its “relatives” is Free Screen Video Recorder. This program, in addition to a static image, can also save a video document. You should also pay attention to the Screenshot Captor and SSmaker programs. The latter takes and displays the finished photo within three seconds. A photo taken with SSmaker can be immediately sent over the Internet to friends or installed on your website.
The SuperScreen program is also popular among users; it takes a snapshot from the monitor screen, has a built-in delay function and the ability to take a screenshot from a video. ScreenShot, a program with a convenient set of tools and functions, will also help you create a photo and video. Simple, but no less popular, the Captor program also solves the problem of taking screenshots from the screen. Among its “advantages” is a convenient and intuitive interface and the ability to save a picture in any graphic format.
Related article


