Creation of a cross-platform Smart TV application based on the SmartBox library for Samsung, LG, Philips and others. Creating a cross-platform Smart TV application based on the SmartBox library for Samsung, LG, Philips and others. Aura hd emulator for Android
So, you will find a lot of useful information in this article if you:
- Smart beginner but have experience in classic js/html applications
- Advanced js/html developer and looking for a platform for a cross-platform SmartTV solution
- Beginner js/html developer and want to start with “Hardcore”
- Tester who needs to run applications developed by third parties
* Due to the fact that this article is intended not only for developers - the first and, as it seemed to our team, more interesting are the points about running applications in emulators and end devices. Testing the application Having plunged into the development of SmartTv applications, you will eventually be forced to test your creation in one way or another. The Tao of testing for SmartTv consists of the following points:
Far from corresponding to reality, as we found out, are the emulators that come with each SDK. (Samsung, Philips) Ultimately, running on emulators should become nothing more than a self-test for you. And a working application in the emulator cannot be considered as knowingly working on the device. And on the contrary, if something doesn’t work for you in the emulator, it’s not a fact that it’s a fiasco.
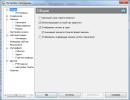
How to run an application in the Samsung emulator
To run the application in the latest version of the emulator you need: the emulator itself, which is an image for VirtualBox and is available for download on the SDK page. After importing the image, you need to specify the path to the directory with your projects and start the virtual machine. The main thing you should not forget is that the name of the directory in the virtual machine must be Apps, respecting the case. You will find explanations in the screenshots.
(pictures are clickable) 


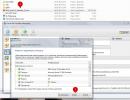
How to run an application in the Samsung emulator (old SDK)
If you are developing an application using the official SDK, then there simply cannot be any problems, there is a large launch button. In case you just want to run the application, you need to place the project in the SDK applications directory and launch the emulator by selecting the desired application. The pictures show how to do this.
(pictures are clickable) 


How to run an application in the LG emulator
After starting the emulator, which is installed along with the SDK, and is actually a virtual machine with the TV OS, you can specify the URL of your application (yes, the application must be accessible via http, it can also be a local service on apache/denwer/nginx). The pictures show the sequence of actions.
(pictures are clickable)

 >
>
How to run an application in the Philips emulator
Perhaps the most “wonderful” thing that could happen to GUI developers is to get a console when launching the emulator. I won't say anything, see for yourself
(pictures are clickable) 


Samsung took a further step in application testing by launching a laboratory on remote devices. In fact, these are real devices that allow you to check all the functions of your brainchild that cannot be seen in emulators (for example, the player’s operation with all formats, interaction with DRM systems).
To launch our application, you need to select a device on the laboratory website and follow the instructions:
How to run an application in Samsung Remote Test System
(pictures are clickable) 


We will look at what is, in my opinion, the easiest way to install and test applications on end user devices. For this we need:
- Http server with php support - for LG.
I have posted the app at http://paunin.com/content/demoApp/index.html - The application itself can be found in the Smartbox library repository, in the demo/demoApp directory;
Samsung
10-12 platforms:

To run the application on Samsung TV/BD. It is necessary to create widgetlist.xml in the root of the server which can be accessed by IP address. For example, http://xxx.xxx.xxx.xxx/widgetlist.xml. I posted the file at http://82.146.41.200/widgetlist.xml. The file is simply a list of applications to install. In the list of widgets, the main element is the download node, which provides a link to the zip archive of your application. The rest of the parameters don't matter, not even the size. As you can see from our widget list, I zipped my application and put it at http://paunin.com/content/smartbox.zip.
Now all that remains is to tell the device your IP address from widgetlist.xml and update the applications. This is done using the device, depending on the model:
10-12 platforms
13 platform

Probably the most exciting quest of all the devices under consideration. To install the LG application, you must register it on the developer page (registration/authorization required).
We fill out everything as indicated in the pictures and download the resulting file.
If anyone needs it, I posted my file at http://paunin.com/content/lg_wrapper.zip.
Registering the application
(Pictures are clickable) 

And now all that’s left is to deliver the application (or rather its signature, the application itself is on the Internet) to the TV:

To run the application on Philips SmartTv devices, we only need to launch it in the browser by specifying the HTTP address. In our case, we use the address http://paunin.com/content/demoApp/index.html. However, immediately after starting the browser, you will notice native borders around the elements in focus, which is not acceptable for a combat application, and which in reality will not happen when hosting the application in the LG hub.
Everything is decided by specifying the necessary headers when responding from the server, namely “application/ce-html+xml”. This is done by the philips.php script present in the PHP application. Accordingly, we get an address like http://paunin.com/content/demoApp/philips.php. To speed up dialing an address from the TV remote control, you can use a link shortening service, for example, http://goo.gl/. I got the address http://goo.gl/o93keD
Application development I will consider exclusively the development of an application based on the Smartbox library. If you decide that the library’s functionality is not enough for the tasks facing you, you can always use the native methods of the platforms by studying. Also, you can participate in the development and modification of the project on gitHub. Application structure Application Configuration Application configs must be stored in several files, and all of them are specific to the Samsung platform:
 Widget.info options (Samsung only)
This is a regular text file with self-explanatory parameters, where the parameter we are interested in is Screen Resolution, which determines the resolution for which your application is written, the currently recommended one is HD 1280x720. Acceptable: SD 960x540 and FullHD 1920x1080
Use Alpha Blending = Yes Screen Resolution = 1280x720
config.xml parameters (Samsung only)
Full dock
y y 0.1 y y n n y y y SmartBox DemoApp 1280 720 Smart [email protected] https://github.com/immosmart/smartbox Smart icon/sb_demo_115x95.png icon/sb_demo_115x95.png icon/sb_demo_95x78.png icon/sb_demo_85x70.png
index.html with a description of the included files and layout
Smartbox demo
Standard input Input value: Input with email keyboard Input with num keyboard and maximum 4 signsThe most important thing to note here is the organization of navigation. All visible elements with the nav-item class can receive focus and later fire events (focus , click , etc). To optimize navigation, the sidebar and video stage use data-nav_type="vbox" , which tells the navigation plugin to "stop using directional search based on the position of elements on the page, and the focus starts moving from one sibling element to another, which is much faster" (c) Navigation documentation. Another hack is the data-nav_loop="true" attribute, which allows you to loop navigation within a given element. The main object of the App application Let's look at the js/app.js file After initializing the Smartbox itself, the application is initialized SB.ready(_.bind(App .initialize, App)); , thereby triggering the display of the legend $$legend.show(); and adding event handlers this.setEvents(); from menu elements, player, remote control keys. Additional comments in the file itself. Legend change triggers While the application is running, we want to show the user hints on how to use certain remote keys. The easiest way is to update the legend depending on the event that occurred. This is what the file actually does
Not long ago, an article was published on the pages of our project about the Android OS environment. This material aroused interest among visitors to our site, which was the reason to contact the author of the program, Maxim Vasilchuk, and ask him a few questions.
Hello, Maxim! How did the idea of creating an IPTV emulator for MAG200/250 and Aura HD set-top boxes come about?
The idea of creating an emulator appeared a little over a year ago, at the end of summer 2012. I then worked as a PHP developer for one of the large Internet providers in Odessa (OO NPP TeNeT), and my work was to some extent related to the IPTV service, which this provider provides.
At that time, I wanted to buy myself a tablet on the Android platform, although I still had no idea what I needed it for. On one of the forums I read a description of the recently released Nexus 7, which I liked. I decided to buy it (by the way, this tablet is still my main device for development and testing). After some time, a package arrived from the USA, and I began experimenting with writing various programs.
At some point, I came across a description of the JavaScript API of two set-top boxes that were then used in TeNeT: Amino 130 and MAG 250. Realizing that, in principle, it was possible to emulate these set-top boxes on Android, I began to create my own application. Moreover, the console that I initially emulated was Amino 130. However, the development was slightly difficult. The fact is that the main language for writing programs for Android is Java, which I last wrote in 3 years ago and have forgotten a little.
A little later, when the first working version was made, and I managed to load my provider’s portal, I decided to simultaneously emulate MAG 250. As a result, it so happened that I began to pay more attention to MAG. Then, I abandoned the development of Amino 130 emulation, since there was not enough time for both consoles.
As a result, after more than a month of intensive development, on October 1, 2012, the application with version 0.1 alpha hit Google Play. At that time, the emulator did not yet support profiles and could only normally load the TeNeT portal.
To what percentage, in your opinion, is the emulator compatible with original devices?
Now the emulator supports almost everything that the original set-top box does, with the exception of encrypted channels, 3D, support for NFS network resources and recording channels to external memory (more precisely, there is recording of channels, but it is in its infancy).
Also, sometimes there are problems with some portals, since all development is carried out on the basis of incomplete JavaScript API documentation from the set-top box manufacturer, and on analysis of the work of portals (mainly Stalker from Infomir). It is often difficult to understand the purpose of a particular API function, which leads to incorrect implementation.
On what devices is the emulator primarily applicable?
Basically and initially it was developed to work on tablets and phones. But a little later support for control panels was added. Therefore, at the moment the application can be used on almost any arm6/arm7 device with Android version 3.0 and higher. However, I would like to note that very often there are problems with low-end devices made in China.
Are there plans to create a special program for emulating consoles on the so-called Mini PC?
At the moment, I started developing in C++, using the Qt5 library, a cross-platform console emulator that could run Linux, Windows, theoretically OS X and other platforms (including mobile) supported by the Qt library. True, development is still at a very early stage and I often don’t have enough time for it. But hopefully in a few months I will be able to release the first public version.
What are your plans for developing an emulator for the near future?
Currently - fixing existing errors that occur when loading some portals; Implementation of support for network NFS and improvement of channel recording.
We know that your plans include the development of emulators and other consoles. Are you planning to develop an emulator for the popular Dune console? And if so, how soon can we expect it to appear?
Some time ago I planned to make support for the Dune console, but later abandoned this idea, since the implementation of emulation for it is significantly different from that for MAG 250. In addition, now the application is very strongly tied to MAG, so adding anything else is difficult . Perhaps I will emulate Dune in the Qt version of the emulator, especially since this version already has support for plugins, and in theory it is easy to add support for emulating anything.
On behalf of the editors of the site project, we thank Maxim for his detailed and most complete answers and would like to wish him success in further development.
Mag200/250 and AuraHD set-top boxes are currently supported, with plans to implement emulation of other popular devices.
Not all functions are currently working, but will be implemented if possible.
Attention! The application DOES NOT SUPPORT m3u (or any other) playlists! The only way to play them in the application is to use a portal that supports such playlists.
Attention! If you are using a remote control, the top panel will not open when you press the remote control buttons (in most cases). To open it, move the cursor to the top of the screen.
ATTENTION! If the application does not work on your Android device, please create a ticket on https://bitbucket.org/vasilchmax/stb-emulator/issues
ATTENTION! The application has the ability to control from the keyboard. In this case, the keyboard (or any other control device via USB) must be connected BEFORE starting the application, otherwise it may crash when trying to launch video/audio.
The emulator is primarily designed for use on tablets running Android 3.0+, but also supports 2.3+ phones/tablets.
The ability to play video/audio depends on the presence of built-in (or externally installed) codecs, so if your video does not start, then most likely the problem is the lack of codecs and/or poor quality of the WiFi/Ethernet network.
Known bugs:
- in some cases, when returning from the settings menu/selecting a new profile, the portal scripts are not completely reloaded and it becomes inoperable.
- also sometimes incorrect scaling of portal pages occurs if the displayed page elements do not completely fill the screen.
In both cases, you must reselect the profile from the list.
Tags: iptv emulator, stb iptv emulator, iptv set-top box emulator, iptv set-top box emulator, iptv set-top box emulator, iptv set-top box emulator android, iptv stb emulator, iptv set top box emulator, mag 250 emulator
User overviewbased on 345 reviews
The application allows you to perform the following main functions:1. Broadcast your location to the support site www.roadwebcamera.com;2. Take pictures with your phone camera and send images to the website at selected intervals;3. Exchange short messages between the phone and the device chat. The support site includes…
Free 9 7.4
GO SMS Pro theme SkullGO SMS Pro Theme Skull theme for every dark soul. Let darkness consume your phone, life and heart. The flame that was Rosen from Hell will show the world your true nature and your tastes. Let people see how original you and your phone are! From now on, darkness will be with you wherever you go. The theme is very neatly colored and made for everyone who wants…
Free 189 8.6
Wallpaper for people in loveWallpaper for people in Love contains a set of dynamic love-themed objects (hearts, flowers, romantic animations) that respond to user actions. You can use these objects both on standard application backgrounds and on any other selected images.
$1.00 Free 0 0
Abay "Kara sozder"Yul gulama Abay Kunanbaevtin kara Sozderi.Okyp ozderinizge keregin alynyzdar!Zhana interface! Tugeldey zhana application! In the new application you can change the font sizes, night and day reading mode is turned on, plus you can control the screen brightness. And most importantly, you can put your favorite words in your favorites! Now you can change the text font!
Free 1.2K 9.4
Free 929 8.2
System requirements: The emulator is designed for Android version 4.0 or later. Requires 11.85MB of free space.
Installation using installation file1. Download the installation file. You can download it.
2. On your device, allow installation of applications from unknown sources.
3. Run the installation file.
Installation from Play Market.You can search for an emulator via QR-Code

You can also use the Play Market search engine.
1. Go to Google Play Market.

2. In the search field, enter “iptv set-top box emulator”.

3. Select an emulator from the list, developed by Maxim Vasilchuk. Please note that there are two versions of such emulators, “Free” is a free version and “Pro” is a paid version. The free version differs from the paid version in the presence of advertising. You can choose any version at your discretion.

4. A description of the emulator will open. Read the description, then click the “Install” button.

5. The “Application Permissions” window will open, review the permissions and click the “Accept” button.

6. Information about installing the emulator will appear.

7. After installing the emulator, click the “Open” button.

8. A portal will open.

1. For this emulator to work, you need to configure the portal. Call up the emulator menu by clicking on the device screen, a menu will appear.

2. In the upper left corner, click the menu button.
3. The emulator settings menu opens.

4. Select “Change profile data”.

5. The Settings menu will open.

6. Select “Profile name”, a window for entering a name will open.

7. Change the profile name (enter a custom profile name), and click the “Yes” button.

8. Select “Portal Settings”.

9. The portal settings menu opens, select “Portal URL”.

10. A window opens for entering the URL address, erase the URL address and enter the address - http://old.tvclub.us or http://iptv.tvclub.us, click the “Yes” button.

11. In the “settings” menu, select “STB configuration”.

12. The “STB configuration” menu opens, select “Set-top box type”.

13. In the “Set-top box type” menu, select “MAG250”.

14. Exit the “Settings” menu (when exiting the “Settings” menu, new settings are saved automatically) and open the emulator settings menu, select “Restart portal”.

15. After the device reboots, a menu will open for entering your login and password. Enter the username and password specified when registering on the TVClub website, then click “OK”.

If you have activated the “Multiroom” service, then you can use the login for an additional device (“Personal Account” / “Stalker portal settings” / “Additional set-top boxes”).

17. After the portal has finished loading, the client portal for watching TV will open.

1. To select a broadcast server, you need to go to your personal account in the main menu and select “Service Management”. To go to the “Service Management” menu, use the “left”, “right”, “up”, “down” keys on the device screen.

2. Press the “OK” button on the device screen.

3. The “Service Management” menu will open. Using the “up” / “down” keys, select the server. To determine the most optimal server, you need to perform a connection speed test (you can determine the speed by clicking on the link).

4. Having selected the desired server, press the “Connect” button on the device screen (“Connect” - green button).

5. A window for entering a password will open, enter the password and press the “OK” button (this button is indicated by an arrow), the “OK” button is selected using the “up” / “down” keys.

To connect/disconnect the server, use the following buttons:
Red button – disable the server (default password is “0000” - four zeros);
Green button – connect the server (default password is “0000” - four zeros).
6. To connect a package of channels, you need to select the package you want to connect.

7. Having selected the desired channel package, press the “Connect” button on the device screen (“Connect” - green button).

8. Enter the password and press the “OK” button (this button is indicated by an arrow), the “OK” button is selected using the “up” / “down” keys.

9. To view information about a channel package, select the package and click “OK” on the device screen.

10. The “About Package” menu will open.

1. To select a list of channels in the main menu, select “TV”. The screen will display a list of channel groups by topic.

2. From the list of channel groups, select a group to view. Press the “OK” button on the device screen.

3. A list of channels will open.

Channels are switched using the “up” and “down” keys, as well as the “page” buttons. down" and "p. up". On the right side of the screen there is a preview window for the TV channel, below it is the program guide for the selected channel. To switch to full screen mode and back, you need to press the “OK” button on the device screen.
Watching TV1. Watching a TV program is carried out in the “TV Guide” section. To go to the “TV Guide” section, you need to press the “right” button in the list of channels.

2. A menu opens with a TV program for the selected channel.

Watching a TV program is done using the “up” and “down” buttons. To the left of the TV program, you can select a day with a program for the selected channel by going to it using the “left” button and selecting the desired day, pressing the “OK” button. To go to the channel list, press the left button again.
View archived TV shows1. On channels marked with the “” icon, it is possible to view a recording of the program.

2. To watch, you need to go to the “TV Guide” section. We find the transmission marked with a dot.

3. Press the “OK” button on the device screen.

4. Playback of the broadcast recording will begin.

The recording you are viewing can be rewinded using the " ![]() ", you can also stop playback by clicking on "" and continue using the same button. Exiting the archive viewing mode is done by pressing the “back” button on your device.
", you can also stop playback by clicking on "" and continue using the same button. Exiting the archive viewing mode is done by pressing the “back” button on your device.
Additional options in the channel list menu.

Button F1 (red) – switches the channel list viewing mode (LIST / LIST WITH INFO);
Button F2 (green) – sorting the list of channels (BY NUMBER / BY NAME / ONLY FAVORITES);
Button F3 (yellow) – add or remove a channel to favorites;
F4 button (blue) – moves a channel in the list, this function is available only in the list of favorite channels (you can go to this list by pressing the F2 button and selecting “only favorites”).
Creating a list of channels in the “Favorites” category, moving channels in the favorites list Creating a list of channels in the “Favorites” category1. Open the list of channels.

2. Mark the desired channels with the “yellow” button (F3 – add or remove channels to favorites).

3. A “” icon appears next to the channels - this means that the channels have been added to favorites.

4. Press the “green” button (F2 – sorting the list of channels “BY NUMBER” / “BY NAME” / “ONLY FAVORITES”).

5. The channel sorting menu opens.

6. In the channel sorting menu, select “Only favorites”; the selection is made using the “up”/“down” buttons on the device screen.

7. Click the “OK” button.

8 The “Favorites” channel list opens.

In this list, you can move channels at your discretion using the F4 button (blue) - move the channel in the list. This function is available only in the list of favorite channels (you can go to this list by pressing the F2 button and selecting “Favorites only”).
Moving channels in the Favorites list1. In the “Favorites” channel list, select the channel that you want to move in the channel list.

2. Press the “Move” button - the blue button on the device screen.

3. The channel is ready to move; a move icon appears along the edges of the channel name.

4. Move the channel through the list using the “up”/“down” buttons on the device screen.

5 After moving the channel to the desired place in the channel list, press the blue button on the device screen.

6 The channel has been moved in the list.