DIY computer mouse. Is it really that simple? All service centers in Ukraine Do-it-yourself optical mouse repair for a computer
Reading time: 3 min.
A computer mouse is a key mechanism for comfortable work with a computer. It can be used to control PC menu functions. Since the mouse is used actively, it also breaks often and unexpectedly. Its device does not have a complex design. The mouse can be completely disassembled and repaired with your own hands, having a minimum set of tools and knowledge. To find out how to disassemble a mouse without bolts without consequences, you should study the features of its fastenings.
Features of fastenings
The mouse consists of two parts: a body, a wheel and internal parts. The top housing is divided into two main buttons. The upper and lower parts are bolted together. Usually manufacturers hide them under bearings or stickers. Most mice have four mounting screws located under the feet on the bottom of the case. These feet allow you to glide easily across the rug. They peel off and stick back.

Often you come across devices with one bolt on one side of the case. The second side is fixed with latches. If the screws are not visible at all, then there are latches around the entire perimeter. To disassemble the mouse, you need to press lightly on them.
Inside there is a printed circuit board, most often not secured with screws. It is mounted with holes on plastic rods protruding from the body. On some models, the board is secured with one or more bolts.
Device repair
A computer mouse can fail for various reasons. The most common:
- clogging;
- oxidation of metal contacts;
- damage to the wheel axle;
- wire damage.

Almost all problems can be fixed at home. To do this you need to follow some steps:
- Prepare the necessary tools.
- Disconnect the mouse from the computer.
- Disassemble the case by pressing on the latches or unscrewing the screws.
- Open the case halves using a screwdriver with a rubber or plastic bat that will not leave scratches on the plastic of the device.
- You need to disconnect parts of the mouse carefully, without sudden movements, so as not to break the internal wires.
- There is a chip inside. It needs to be disconnected and removed from the groove, as well as other buttons if we are talking about a gaming mouse.
- After repair, assembly must be carried out in reverse order.
Repair may consist of the following manipulations:
- The broken wire should be soldered.
- A broken wheel axle can be made from a regular paper clip.
- Clogged areas should be cleaned with a special wipe or clean soft cloth.
After all the necessary activities have been completed, you can begin assembly. First, install the wheel in place, screw the board and return the additional buttons to their place. Then you need to carefully connect the halves of the housing and screw in the bolts, or press the parts together at the locations of the latches until a characteristic click is heard. The mouse is assembled - you can check its operation.
Preparing tools

To disassemble and repair the mouse, you will need a minimum set of tools:
- Screwdriver Set;
- scissors;
- soldering iron
You should use medical gloves to avoid leaving greasy fingerprints on the board or internal contacts during the repair process. To remove blockages you need a special napkin. In extreme cases, a piece of soft, clean cloth will do. Do not use water with detergents or solvents for cleaning. You need to take regular alcohol. You can moisten a cotton pad with it and wipe the board, wheel, and body from the inside. The optical sensor is cleaned with a toothpick and cotton wool, also soaked in alcohol.
Wireless mouse repair
Wireless devices often fail due to dead batteries. If the mouse stops responding to movement or responds poorly to manipulation, then most likely the batteries should be replaced. Most wireless models have an operating indicator light, so the health of the batteries can be checked by the indicator glowing red.

Discharged batteries are easily removed. On the “sole” of the mouse you need to open the compartment cover and remove the batteries. It also wouldn’t hurt to check the contacts in the device and on the battery terminals. Over time they oxidize. The resulting deposits are removed with a rag soaked in alcohol. It is not recommended to use sandpaper - you can remove the protective galvanic film.
A computer mouse is a small but very important device for PC users. It experiences heavy mechanical load during active use. Over time, this leads to breakdowns, most of which can be fixed at home. A few screwdrivers, a soft cloth, ammonia and gloves, as well as a little patience and a serious approach to repairs will save money and time.
If the computer mouse breaks down, many users do not know how to continue living. The session ends and the search for a new device or recovery begins performance broken thing. If you have basic knowledge of electrical engineering and the ability to work with a soldering iron, you can very quickly repair a wireless mouse. Let's consider a step-by-step method for determining the causes of a device malfunction and restoring its resource. 
Sources of failure
In most cases, the cause of the malfunction will be non-critical, because modern laser mice are being manufactured made from reliable electronic components.
A loss functionality may occur due to:
- damage to the computer's USB connector;
- poor quality contacts in the power and control parts of the board;
- failure of an electronic element;
- microswitch failures.
Repair algorithm
Before starting work, you need to remove the wireless module from the computer, set the mouse switch to the “off” position and remove the battery. It would be a good idea to check the battery right away. If everything is in order with it, then we proceed to repair the mouse.
To determine performance USB computer just connect a flash drive or keyboard to it. If a synchronization signal appears on the monitor screen, it means the port is in working condition. To check the status of a wireless unit with a USB connector, you need to connect similar probes of the tester, which is in diode testing mode, to the positive and negative inputs of the plug. If the multimeter displays numbers from 500 - 700 Ohms, then the module is working. Of course, this method only indirectly determines the condition of the device and does not guarantee one hundred percent confirmation of its serviceability.
In most cases, the activities listed should help you repair mouse . In the rest - the breakdown will be hidden in microcontroller.
Hello beginner renovators. Today I’ll tell you and show you how to fix a mouse without any problems, saving on the family budget and gaining experience that will be useful to any man in everyday life in the future.
They brought me a mouse for repair, with the complaint that “it only works when I move the cord.” Malfunctions are common, especially considering the fact that the wire is tight, which means it is vulnerable in such cases.
DISASSEMBLY
I had to sweat a little until I figured out how it opens. It turned out that underneath the sticker there are screws that need to be unscrewed. You also need to release the latch in the window between the screws.
Disassembling the mouse
INSPECTION
The inspection revealed no oddities, burns, ring cracks or swollen electrolytic capacitors. Overall the board looked decent.
REPAIR
I immediately began repairing the faulty wire at the bend. To do this, I marked the color markings by scratching the capital letters of the colors of the wires on the board, so that later I wouldn’t bite my elbows trying to remember where which wires were soldered to each other. 🙂

Board overview and wire identification
Soldered them out. I cut the safety seal in order to return it to its place later. It turned out to be glued, so I had to carefully tinker with it to remove the wire.
In order to show you how a wire inside the insulation usually breaks, I bit off the damaged area with a reserve and cleaned it. The wire actually turned out to be broken, in two wires.

This is what damaged wires look like
Next, I stripped the wire, tinned it and glued the seal in place using rubber glue, Moment.” The seal also prevents the wire from jumping out of the mouse during operation. I wrapped it with electrical tape to make the gluing better.

Electrical tape on the seal during drying

Checking ESR capacitors with a meter
The capacitors turned out to be fine. I usually use a table to check ESR, although by and large, it is better to install new ones right away, for a guarantee. In order to conveniently solder radio components back, I often use an awl to free the holes for the legs of the radio components from tin.
The encoder, like variable resistors, is subject to wear. To do this, after disassembling it, I washed it with a rag moistened with alcohol, lubricated it with Lithol and carefully assembled it in the reverse order, using narrow-nose pliers during assembly.

Encoder and mouse wheels disassembled

Cleaning the encoder

Encoder lubrication

Encoder assembly
At this time, the glue had dried, so I boldly soldered the wire to the board.

We make sure to clean off any remaining rosin after soldering, under which snot often lurks.”

Cleaning rosin
Those. tin disordered by rosin, sometimes imperceptibly and meanly closing contacts. We clean off the remaining rosin with a brush, preferably moistened with alcohol, since rosin can lead to copper corrosion.

Remove any remaining rosin using alcohol and a brush.
ATTENTION. First I tested the mouse on the computer, which worked, and then I just assembled it. You know, I don’t really want to disassemble the mouse again after finding out that the mouse suddenly doesn’t work. 🙂
ATTENTION! PROTECT YOUR EYES FROM THE LASER BUILT INTO THE MOUSE, WHICH CAN DAMAGE THE RETINA!

Installed and glued seal

The weakest point of modern computer mouse- this is a scroller, a scroll wheel. Sometimes the wheel breaks down within the first week after purchase. Scrolling becomes capricious, does not work for a short rotation, scrolling accuracy is lost, large gaps occur during intensive scrolling, etc. And sometimes it happens that the window scrolls in the opposite direction!
This will throw anyone out of balance.
Mother! She won't scroll! Again!!!
If you have 15 free minutes, then you can try to fix the mouse using a minimum number of tools. And you don't need a soldering iron here!
Even if you have absolutely no skills in “tinkering” with electronics, I recommend that before throwing away the mouse, try to fix it and gain at least minimal experience. First of all, disconnect the mouse from the computer!
Take a thin Phillips screwdriver and disassemble the mouse. Sometimes manufacturers cleverly hide screws under sliding pads.
Happened? Now take a look at your mouse. Most often there are two main designs.
1. Mouse with optical scroll wheel sensor

The photo shows a mouse in which the scroll wheel is built on an optical encoder. This is usually a sign of more expensive and high-quality mice. Distinctive features are a ribbed partition inside the scroll wheel and 2 optical elements (emitter and receiver) on opposite sides of it.
In this case, repairs are simplified. It is necessary to clean wound hairs, wool, threads from the roller axis, which impede the uniform rotation of the wheel and block the operation of the optical system. If necessary, wipe off any dust, dirt, or stains from the emitter and receiver.
2. Mouse with mechanical scroll wheel sensor

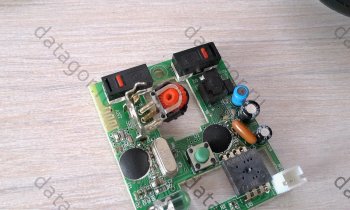
But mostly manufacturers make mice using electromechanical encoders in order to reduce the cost of the product. Next, we will consider in more detail the case of failure of such an encoder.
We remove all unnecessary things and see an electromechanical encoder, which is a bit like a tuning resistor. Here it is, with an orange octagon inside.

If you have a soldering iron and the accompanying skill, it is better to unsolder it for further disassembly and cleaning. Otherwise, you need to be very careful to avoid breaking the contact leg when bent.

Carefully bend the insides away from the frame, and if you have unsoldered the encoder, then simply disassemble it. The metal retainer is usually mounted on plastic legs. Everything is removed very easily, the main thing is to work without fanaticism.
And we see inside the true reason for the failure of the scroll wheel: the same garbage and dirt. Most likely it is a mixture of silicone grease, ground dust and hairs. The contact springs are also covered in dirt.

We take cotton wool, dip it in alcohol (isopropyl or ethyl), vodka, beer or special drink. cleaner for electronic contacts. It is better not to use acetone, because... there is a risk of dissolution and deformation of the plastic parts of the encoder.
Next, carefully wipe the contact pads and springs. Be very careful when cleaning the springs, otherwise you may ruin everything.

I think the difference is obvious. Look how much dirt has collected on the cotton wool.
Tweak the elasticity of the scroll wheel
If you want the roller to be more elastic, and its fixation when scrolling to become more rigid and clear, then you can make a small modification.The metal retainer, which helps secure the wheel, has a semicircular bend in its shape. Using very thin pliers or tweezers, you need to bend it along the middle of the radius to form a sharper protrusion.

Now the protrusion will fit more tightly between the teeth on the plastic ratchet.
The mouse manipulator plays a significant role in the life of a modern person, and its failure at the wrong moment can cause trouble if there is no store nearby or a spare one. In this article we will look at the main mouse failures and how to fix them. All currently available mice can be divided into wired and wireless. We will not divide into optical and ball mice; we will only note that among optical mice, laser mice are classified as more accurate. Optical manipulators also come in the visible spectrum (they emit red light) and the infrared spectrum; the performance of the emitter of the latter can be determined, for example, using a mobile phone camera.
To repair a computer mouse we will need:
- screwdriver
- nippers (side cutters)
- multimeter
- soldering iron and solder
- heat shrink tube or other consumables depending on the type of damage detected
Typical mouse failures and how to fix them
A mouse is one of the devices whose reliability has been brought to a high level (we are talking about devices produced by well-known brands, for example, I like the quality of A4-tech and Logitech products, and I absolutely do not like the quality of Gembird cords and buttons). Nevertheless, there are also weaknesses in this miracle of technology. Typical mouse failures include the following:
- broken wire
- button failure
- Scroll wheel is broken.
Broken wire and its repair
In 90% of cases, the breakdown of a wired mouse is associated with a bend in the wire at the base of the manipulator. This is due to the fact that it is in this place that the wire constantly bends when moving the mouse across the working surface. Signs of this breakdown are intermittent operation, or operation only with a certain “kink” in the wire. For compact “laptop” manipulators with a spring-loaded coil in the middle of the wire, wire breaks near the USB connector are also typical. Repairing a broken wire is simple: after making sure that you have localized the break point, use wire cutters to bite off the wire a couple of centimeters above and below the damaged area. Next, we solder both tails, observing the color scheme of the wires. Don’t forget to insulate them using heat-shrinkable tubing or electrical tape (as a last resort, wrap each wire in several layers of tape).

Finally, you have to fix the wire in the base of the mouse; to do this, you can carefully cut the original rubber “cable entry”, remove the old one from it, insert a new cable and pour in a little glue; it also doesn’t hurt to glue the cable to the board or case. For further maintainability, I use hot melt adhesive. See the photo to see what it looks like after repair.

Problems with buttons and how to fix them
Incorrect execution of mouse button presses can have several different reasons; you can find out the reason practically “by hearing and touch”. The most common causes of problems with button operation are:

Scroll wheel failure
In the case of scroll wheel problems, there are 2 main reasons for their occurrence:
- Problems caused by the operation of the encoder. Outwardly they manifest themselves in uneven scrolling, which is accompanied by jerking of the page up and down. This problem is solved by carefully opening the encoder and removing dust from the contacts. Another option is to loosen the attachment of the encoder basket to its base. You can see how to tighten the fastening in this video clip
- Problems caused by mechanical damage to the wheel axle. If you overdid it and broke the axle, don’t despair, there are several options for eliminating this damage: you can find a self-tapping screw of a suitable diameter, grind its head to create a semblance of a hexagon (trying it on the encoder so that there are no rotations) and, heating it over fire, screw it in instead of the missing part of the axle. The second option is to find a hexagonal key that exactly fits into the hole of the valcoder, saw it off along the length of the axle, carefully drill a hole in the scroll wheel and insert your new axle.
Finally, a few words about repairing wireless mice.
I haven’t had the opportunity to repair many of them yet, but a couple of directions for searching for breakdowns can be voiced:
- Nutrition. If the mouse is wireless, it means it has its own autonomous power source - a battery or a resonant induction power source (applies to wireless mice that work only on the surface of the USB mat that comes with them). In any case, look at what is indicated on the bottom sticker of the mouse and compare it with the measured results. Pay attention to the fact that the voltage on the battery without a load may be normal, but when a load is connected it may drop. This may indicate that the battery is low and needs to be replaced, or that the device is consuming a lot of current ( short circuit in the circuit, or failure of some elements). In the case of using saline and low-quality batteries, it is possible that the battery may depressurize and the saline solution may get on the board. In this case, you need to wash the board with a brush and ethyl alcohol. It also doesn’t hurt to measure the current consumption and compare the resulting value with the data on the sticker.
- Emitter operation. The most obvious thing is the operation of the emitter, but it is not always possible to see it with the naked eye. If you have an infrared optical system, you can see its performance using a digital camera, webcam or camera on your phone.
- Presence of radio interference. In a modern office, there are wi-fi access points on every square meter, radio mice, keyboards, wireless window break sensors, wireless fire sensors, and even motion sensors from the store opposite can create obstacles normal operation radio mouse. If radio mice from the same manufacturer are working near you, you can try installing software from the website of the manipulator manufacturer and force them to work on different channels (similar to wi-fi access points, if such a feature is available in software your manipulator)


