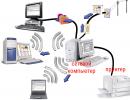
How to set up a network printer via Wi-Fi. Connect the printer to the laptop via Wi-Fi
Without a doubt, a printer is a very convenient and useful device in the household. But this device is quite bulky, especially in comparison with a miniature netbook or tablet. And connecting a mobile PC to a heavy stationary device via a “standard” cable connection is, to say the least, irrational.
Therefore, in this article we will look in detail at how to connect a printer to a laptop via Wi-Fi, as well as what to do if the printer does not see Wi-Fi.
One of the reasons to buy such a device is the ability to simultaneously connect to several computers. Let's assume that our device is available on. Go to the “Hardware” and Sound tab. From the list of available bookmarks, select Devices and Printers.
If we are in the device and printer window, we add the printer. The above step will open the Add Device window. The system will begin searching for devices connected to the computer. The printer has been added successfully. At this point we can print a test page or simply click on the finishing option.
And first of all, let’s focus on the “classics of the genre”: how to make wifi from a regular printer?
After all, you must agree that in order to set up a wireless connection between a printer and a laptop, both devices must support this function.
How to connect a regular printer to a laptop via wifi?
Unfortunately, developers of budget models rarely provide devices with a built-in wifi transmitter, so for regular printers the following methods of remote connection to a computer are used:
The Devices and Printers window has been enriched with other hardware. View of the “device and printer” window with the printer installed. Before setting up your printer, make sure your computer is connected to your modem. Follow the printer manufacturer's instructions.
Once the installation process is complete, disconnect the printer from your computer. Click Start, then Printers and Faxes. Select Network printer or printer connected to another computer. If the wizard does not find the printer driver, the following window will appear. Specify the driver to install. Select the manufacturer and model of your printer. You should skip straight to point 13 of this guide.
1. Installing additional network equipment– a print server, with which you can make the printer a node in a wireless local network;
2. Cable connection of the printer to the computer, which has access to a local Wi-Fi network: thus, any Wi-Fi device can communicate with the printer through an “intermediary”.
Specify the driver file to install and click Open. In this case, we used the driver disk that came with the printer. If you have a network where you use multiple devices and operating systems, it's probably not safe to use a home network sharing group. In such a scenario, you have to share folders and devices in various ways. For example, sharing a printer requires a set of different steps.
First, open the Devices and Printers panel. You will see a list of all external devices installed on your system. Go to the Printers section and select the printer you want to provide. Right-click or long-click on it and select Printer Properties from the context menu. If you have a multifunction printer that works as both a fax machine and a scanner, you may need to select the type of properties you want to open.

The advantage of this method is its cost-effectiveness: you do not have to spend money on additional expensive equipment. However, here you cannot do without a second computer, which must constantly work throughout the entire “communication session”.
A window will appear with all the printer properties. Depending on your printer model and its drivers, you will see different tabs and options. Go to the Sharing tab - this tab appears for any printer. Here you can share the printer with your entire network. Check the "Share this printer" option.
Running print jobs on client computers helps maintain the performance level of the computer to which the printer is connected, especially when running large print jobs. If you want to enable this setting, please check it. The printer is now shared with other computers on the network, regardless of the operating system used.
To set up a printer connection via wifi in this way you need to:
Connect the printer to the “intermediate” computer using a cable and install the necessary software (driver);
Go to “Start” -> “Control Panel” -> “Printers and Faxes” and open this printer for public access;
Connect the printer to the laptop via wifi. To do this, go over the local network to the computer “serving” the printer (see link at the end of the article) , find the shortcut to the shared printer, right-click on it once and select the “Set as default” menu item.
Below you will find useful tips to help you with this. You know this technology and you still use it every day. You know it too, and you still use it quite often. What if you combined all the strengths of these two? In this tutorial we'll talk a little about this technology and how it works. You certainly use a lot.
It is a wireless communication technology with many uses, the most common being Internet connectivity. A router is a physical device that creates a hotspot, or hotspot, that you see from your smartphone, phone, or computer when you are looking for a network to connect to.
Now, at the “Print” command, your laptop will automatically print to a printer connected via Wi-Fi.
3. Using a wifi router with a built-in Print Server function and a USB connector for external network devices on the case. To set up such a connection:
Connect the printer to the router using a cable;
Select the network you want, enter your passphrase and get it: you have Internet access. But there are times when you don't need the Internet, you just want to connect two devices and exchange data between them: send a file or print something on a printer. There is a technology that will help you in these cases, and it's called.
The need to send unmanaged data to another device without the need for a third device is nothing new. The way it works is also quite simple: the device detects another as if detecting a wireless network. Then enter the password or press the button and the equipment is connected.
Connect to the printer from a laptop via local wifi network (see link at the end of the article).

However, such difficulties are justified only when setting up Wi-Fi is required on a good old printer that has long “taken root” and is almost native. In other cases, it is more logical to immediately purchase a modern wifi printer with a built-in network module and not have to worry about setting up all kinds of additional equipment.
This procedure is performed automatically, you do not need to do it manually. The available services depend on what types of devices are connected: you can print to a wireless printer, send images to a digital photo frame, send files from your phone to your computer, or play music on your TV on a portable player or smartphone. Oh, and about passwords: you might forget them. As with modern routers, simply enter the screen number or press a button and the connection is made.
Find it in the printer window, then insert it into your computer's optical drive reader and run the setup wizard. If you don't have a CD-ROM reader, you have links below to the download pages of the world's leading printer manufacturers where you can get the drivers you need to install your printer for free.
Among the most popular time-tested vendors here are: HP, Canon, Epson, Konica, Panasonic, Samsung, Xerox, Brother and Minolta: such a printer can be easily connected to a laptop, router, tablet, etc.
However, depending on the specific situation, you can create a wireless connection with a laptop in different ways: let’s look at the main options for connecting a printer via wifi in more detail.
This program is nothing more than an initial setup tool that ensures that the printer is connected to the computer and is detected correctly, then install the drivers to make it work. To help you, we have created a list of technical support sections from major manufacturers.
After finding and downloading the driver or installation tool, depending on what the manufacturer provides, install it on your computer as if it were a regular program. All you have to do is connect the printer and turn it on.
How to connect a wifi printer to a computer and laptop?
Among the “classic” ways to connect a wifi printer, the following can be noted:
1. Using an internal LAN between the printer and laptop.
This is possible when a computer connected to a wireless network is capable of distributing wifi on its own.
The New Device Setup Wizard will appear on the screen. When the system is completed, the wizard will disappear and the printer will be visible in the print menu of document editing or viewing programs and can be used without user intervention. There will also be situations where you will not be able to find the required drivers and as a result you will not be able to install the printer using any of the methods presented.
It is possible, however, no one can guarantee this, he may be helped by one of the devices that were connected via his wireless cable to the computer. If you cannot cope on your own, ask for our help in the form of a comment published in this article, and we will try to help. Be sure to include the manufacturer and model of the printer you want to install, as well as the operating system you are using.
When different users want to use the printer at the same time, the router makes automatic changes to allow them to use the printer at the same time. Direct design that will help the user. For example: the cable is not connected to the router. . This is the easiest way to have the capabilities of a broadband router anywhere. With a high-capacity ink tank, users can print multiple pages at a lower cost. Customizing your device is hassle-free, increasing productivity.
Here to set up the printer:
Connect to your laptop's local network via the printer's built-in interface (see link at the end of the article) .
2. Connecting the printer via a wifi router:
- in automatic mode(using WPS technology).
To do this, first, and then using the WPS (QSS) button, connect your printer to your home wifi network.
Save up to 90% on your daily printing costs hassle-free. Improved performance The configuration is simple and trouble-free to be able to work immediately. The 200 dpi scanner lets you scan high-quality photos and documents, and with the multi-copy feature, you can quickly copy a page up to 99 times with the touch of a button to save time. The dedicated ink tank is fully integrated into the printer, so you can enjoy reliable color printing without the mess or complications often associated with non-genuine or third-party refill systems.

To print via Wi-Fi, just connect from your laptop to the installed printer via local network (see link at the end of the article).
- in manual mode: Through your printer's Setup Wizard.
To do this, run “Search for available networks” in the printer control panel and select your router’s network by SSID. Here you will need to specify the Wi-Fi password and confirm the connection to the network, after which the corresponding wifi indicator on the printer should light up.
Start the driver installation and select a wifi connection with manual settings, after which the printer will be available for a wireless connection over the local network.
Connecting a printer to a laptop is not much different from connecting to a computer. The only difference is that in the case of a laptop there is the possibility of wireless connection via Wi Fi.
To connect, you need to connect the USB cable that came with the printer to your laptop. Next, you need to insert the driver disk into the laptop drive. If such a disk is not available, drivers can be downloaded from the manufacturer’s official website. If the laptop has the Windows 7 operating system installed, then it may itself find or update drivers for the printer via the Internet.
It is advisable to copy the driver separately to one of the laptop drives so that it will always be at hand in the future. Installing the driver is simple, just follow the installation instructions. After this, the printer will be ready for use. It should appear in the list of printers. Having selected the installed printer, you need to start a test print. If the page prints, the installation was successful.
In order for the printer to be accessible over a local network, it must be connected to a computer on this network and shared access to it. To enable sharing, go to the Start menu, then go to Control Panel, and then to the Printers and Faxes menu. Having found the printer you need, go to its properties and select “access” to open shared access to the printer. After this, the printer will be available to other computers on the network.
Connecting the printer via wifi
Many modern printers connect via Wi-Fi. In this case, you do not need to use cords, which is much more convenient when connecting the printer to several laptops. The laptop is connected wirelessly via a router.
When connecting, you need to go to the “Control Panel” and go to the “Add a Printer” menu. Then you need to select “Add a local printer” in the new window. Then check the “Create a new port” checkbox and select “Standard TCP/IP Port”. Then you need to register the local IP address of the router to which the printer is connected. After detecting the device, select “Special” and go to the “Options” menu. Opposite the “Port name” menu, write “Local Printer”. On the menu
The built-in print server function, which most modern routers support, for many users still seems like something akin to the fifth wheel of a cart. At the same time, this option provides users with the most useful opportunity to use one printing device from all computers connected to the local network.
Therefore, in this article we will look in detail at connecting a printer via a wifi router, and also look at the correct configuration of the equipment on Windows 7.
So, to make a regular printer network using a router you will need:
Router with print server support and a USB connector on the case for connecting external devices;
The computer from which this printer will be configured;
You can connect a network printer via a wifi router not only to mobile PCs (laptop, netbook, etc.), but also to a desktop computer connected to the router via a network cable. However, if the device does not support the wireless function, you will not be able to print via wifi from it.
The actual printer with “full combat equipment”: USB cable, installation disk, etc.
Before proceeding directly to setting up the device, you should activate print server support on the router. For this:
Find the “Print server setup” or “Sadness server” tab there (depending on the router model, this section may be located on the “USB devices”, “USB applications” or “Multimedia” page);

Set the checkbox to “Enable print server” and be sure to save your changes.
Connecting the printer to the router via USB
You can correctly configure a printer via a wifi router only if the router “sees” this network device.
To do this, connect it to the USB connector of your router using the interface cable (supplied with the device), turn on the printer's power and wait until the device boots up completely.
Setting up a printer via a wifi router
Further installation of the printer is carried out through the “Control Panel” of the computer (from which you plan to use the wireless printing function). Of course, this should be configured and installed .
If you need to connect a network printer via a router to several functional nodes of the local network at once (computer, laptop, etc.), then a similar setup must be done separately on each PC.
For example, consider connecting a printer via wifi to a laptop running Windows 7:
1. Go to “Start” -> “Control Panel” -> “Hardware and Sound” -> “Devices and Printers”.

2. In this window, select the “Printer Installation” section and the “Add a local printer” subsection.

3. At the next stage, set the marker to “Create a new port”, select “Standard TCP/IP port” from the drop-down list and click “Next”.

4. In the next window, in the “Name or IP address” field, enter the IP address of your router (in most cases 192.168.1.1), click “Next” again and wait for the new parameters to load.


6. In the Driver Installation window, select the manufacturer and model of your printer.
If there is none, click “Have from disk” and load the driver from the disk (from the basic device package).

7. At the next stage, enter the name under which your printer will be displayed, click “Next”, then “Next” again and “Finish”.

If the printer has already been installed on this computer before, to make it accessible via wifi you must:
Go to “Start” -> “Control Panel” -> “Hardware and Sound” -> “Devices and Printers”.
Left-click once on the shortcut for this printer and go to the “Print Server Properties” section of the top menu.

In the window that opens, go to the “Ports” -> “Add Port” column, here select Standard TCP/IP Port and click the “New Port” button.
Further setup of the printer is carried out according to points 4 – 7 of the previous instructions.
You can connect the printer to your Wi-Fi router with a USB port using the built-in Print Server - it connects the printer to the router and allows access to it from any client computer on your network.
Connecting the printer to the router
In order to install a printer through a router, you need to connect the printer to the USB port of your router. In this article I will tell you how to connect the Asus RT-N56U Wi-Fi router and a printer in Windows 7. Connecting a printer to this router is also possible using a special utility:
The utility allows you to automate the connection and configuration of a network printer and works only in Windows OS. Next, I will tell you how to connect the printer through the router manually.
Attention! Make sure your printer model is supported by your router! You can check the compatibility of the printer with the Asus router.
Connecting a network printer in Windows 7.
Check your printer's connection using the web interface by opening any browser and entering the address bar http://192.168.1.1. In the window that appears, enter your login and password (admin and admin, respectively).
In the next window you need to select the printer port (see Fig. 4). Go to item "Create a new port" and select the item from the drop-down list Standard TCP/IP Port.
After pressing the button "Further" The printer installation wizard will ask for the IP address of the printer on the network, the printer’s IP address corresponds to the router’s IP address - 192.168.1.1. Enter it in the field Name or IP address and uncheck the box "Poll the printer and select the driver automatically". Click “Next”.
A window will open "Search for TCP/IP port." Wait until a window appears asking you to enter additional information about the port.
Select device type Regular (Generic Network Card) and click Next:
Now you need to install the driver for the printer. Select your model from the list or Click on the button "Install from disk..." and in Explorer, specify the path to the driver file. Then click Next. Enter any printer name and click Next again. A window will appear with the printer installation process, after which the installation wizard will offer to configure shared access to the printer via the local network.
Select an option "This printer is not shared" and click Next. The wizard will inform you that the driver installation was successful and offer to use the default printer. Now all you have to do is press the button "Ready" and configure the port properties.
Open menu Start - Devices and Printers. Find your printer, right-click and select "Printer Properties". Go to tab "Ports" put a check mark on the port that you created earlier and click on the button "Configure port..."
In the TCP port settings, select the LPR protocol and set the Name. Now click "OK" to save settings.
When organizing a home network, many people have a question: how to connect a printer via a router? Computer networks surround us everywhere: both at home and at work. Every competent user knows that combining several computers and printers into a single local network using a router provides many advantages. But what about a regular printer that does not have a single built-in network adapter? Is it possible to connect it to a shared network for sharing on multiple computers?
Connecting the printer via a router is necessary in order to use the printing function for multiple computers.
Connecting the printer via a router can be done without any adapters: you don’t need an Ethernet or WiFi connection - just a USB interface, which any modern printer has, is enough.
The only condition is that the router has a USB port and, at the functional level, supports the operation of a network printer. In this case, all that remains is to connect the printer to the router using a regular USB cable, correctly configure the parameters necessary for its operation, and then all its functions will become available to any authorized network users.
Why a router

You need to start the printer installation.
Of course, connecting a printer via a router is far from the only way to include this peripheral device in your home network. Traditionally, the printer was connected to one of the computers in the local area, and then you had to either run with disks and flash drives to this computer, or, more intelligently, open general access to printing devices on it.
However, any of these methods encounters a serious obstacle: in order to print documents remotely on a network printer, the computer to which the printer is connected must be turned on. Until the system starts on it, no printing.
This often creates a lot of inconvenience, so there is a need to consider alternative connection methods, one of which is using a router as an intermediary. After all, unlike a computer, it can work constantly, starts up faster, requires less electricity and is absolutely silent.
What is needed for setup
So, to connect a network printer using a router, we need the following devices:

Select the port type and enter the IP address.
- router with a built-in USB port and support for Print Server - network printing functions;
- a printer with a cable designed for USB connection;
- several computers (desktop PCs, laptops) connected to a network via a router.
Although almost any relatively high-quality (and therefore not the cheapest) router model now supports network printing, it is still recommended to check whether the router and printer you have are compatible. As a rule, this depends on both the model and its firmware version. The list of printer models supported by this router can be found on the website of the device manufacturer or the developer of its basic software (firmware).
Connect the printer via a router when the power is turned off for both devices. The printer cable must be connected to the appropriate port on the router. If necessary, you can use a USB hub. After this, the power is turned on and all network devices start up, from the router to the computers.
Let's start setting up
The printer and router are configured directly from each computer connected to this router. First, through the Start menu, go to the Control Panel, there we launch the “Devices and Printers” system application. At the top we find the “Install a printer” button and click on it. A dialog box should open with two choices, you need to click on the first one - “Add a local printer”.

By clicking the Next button, we move on to the next step. Here we see two points, select “Create a new port”, after which the drop-down list on the right will become active, in which you will need to select the line “Standard TCP/IP Port”. Then click Next again.
The next step requires you to fill out several fields correctly. In the field called “Name or IP address” you enter the network address of the router or its network name. It is most reliable to use the IP address that is indicated on the router itself or in its instructions. According to the standard, the router address is set in the range 192.168.Х.Х; one of the most common options is 192.168.1.1. In the “Port name” field, enter any suitable word, for example Router.
It is not recommended to uncheck the “Query the printer and select a driver automatically” checkbox; this will not increase the speed of the procedure. By clicking on the Next button, we wait for some time (usually a couple of minutes) while the system searches for the TCP/IP port entered in the previous step. Sometimes the search ends unsuccessfully, then a notification appears in the window that the print device was not found. You don’t have to worry too much about this; it won’t affect the printer connection process. To continue the setup process, in the “Device Type” subsection, click on the “Special” item, then click the Settings button.
In the port settings window that opens, check the parameters so that the port name and printer address fields have the values that we specified earlier. The protocol should be RAW, the port number should be 9100. The remaining items should not be touched, everything should be as in the image. After checking the settings, click OK, return to the printer installation window and proceed to the next step by clicking Next.
https://site/
After a short search, the driver installation window should open. Here you need to accurately select the exact printer model that you have installed. In the list on the left called “Manufacturer”, select the brand or manufacturer of your device, then on the right click on the name of the printer model in the list. Click Next.
Troubleshooting driver problems

Unfortunately, very often it is not possible to find the required driver in the list, since it was simply not pre-installed in the system or the printer was manufactured much later than the last update to the device database. You should not try to install a driver from another device, even if it has a similar name.
Fixing this problem is very simple, you just need to return to the printer installation window and click the “Have from disk” button. An Explorer window will open in which you need to specify the path to the folder with the driver. The driver files themselves can be taken from the disk provided with the printer, or you need to download all the software from the manufacturer’s website. Automatic installation of drivers using a special utility provided by the manufacturer is not always possible, since the installation program may refuse to work until you connect to the printer directly.
If drivers for this printer have already been installed on the system, the installation utility will display a message about this and ask which version to use. Select the item that is marked as recommended and move on. In the next step, specify any convenient name for the printer; it will be shown in “Devices and Printers”. Click Next again and you will be taken to the sharing permission window. Since the device is not directly connected to the computer, there is no point in opening access to it; the router will do this on its own. Check “No sharing” and move on.
https://site/
After all the operations have been completed, the final printer setup window will open, informing you that it has been installed successfully. Here you can test the operation of the network printer by printing a test page, and allow/disable its use by default. Keep in mind that the entire procedure for connecting the printer must be completed on all computers on the network without exception.

You need to understand what we are talking about
To make it easier to navigate the settings, you need to understand the existing printer interfaces - what they are, what they look like and what they are needed for.
- Wired USB port. The high-speed bus allows you to connect the printer directly to the device. By default, this is a computer, laptop and router. The interface cable is unique - on one side there is a rectangular connector for connecting to a PC, on the other side there is a trapezoidal port for connecting to a printer. It is the owners of USB devices who are primarily interested in how to make a network printer in order to print not only from a computer, but also from other mobile devices.
- Ethernet network port. It is present only in expensive devices and is designed to connect the printer to a network hub. This technology satisfies the printing needs of all owners of such devices.
- Wireless Wi-Fi technology. Most modern printers are equipped with such a module, but full functionality is not always possible. After all, printing requires proprietary software, which does not always work readily on smartphones and tablets.

Friendship with the router
We have to figure out how to make a USB printer network. Having a USB port on a network router without a built-in Print Server module will not give positive connection results. Therefore, it is first recommended to study the instructions supplied with the network equipment and make sure that the printer can be connected, down to the model. And if possible, you can safely perform the following actions:
- Connect the printer and router to power.
- Having connected the printer to the USB connector of the router, you need to make sure that it has become friends with the device. To do this, you need to open the web interface of the network device in a browser. The router's address, login and password can be found in the instructions, but if the wireless point was set up by the provider, then all issues with connecting the printer directly depend on the person who configured the router.
- After authorization, the name of the connected printer should appear in the Print Server section.

Correctly setting up a USB connection to a router
- On your personal computer, you need to go to the control panel and select the “Devices and Printers” tab. Next, everything follows the algorithm: “Add a local printer” - “Create a new Standard TCP/IP port.”
- After clicking the “Next” button, you must enter the router’s IP address (default 192.168.1.1) and be sure to uncheck the box next to “Select driver automatically.”
- After finding the printer, you need to select the device type “Generic Network Card” and click “Next”.
- The driver is installed manually from the disk using the menu of the same name.
- Going back to “Devices and Printers”, you need to select “Printer Properties” by clicking the alternative mouse button on the newly installed device.
Going to the “Ports” tab, you need to go to the settings, install the LPR protocol and set a name.

Having studied a simple description of how to make a network printer by connecting it to a router, it will not be difficult for the user to make all the settings independently. It would not be superfluous to open the instructions for the router and read them in detail - very often the manufacturer offers its own algorithm for connecting a printer via USB.
Office equipment has recently been equipped with a Wi-Fi module, offering the user a quick and easy way to make the printer networked. Windows 8, 10, as well as later versions of Android installed on smartphones and tablets, cannot always work correctly with the printer over a wireless network. The problem lies in the compatibility of the software with the operating system. Very often, users in the post-Soviet space do not have the opportunity to fully use Wi-Fi printing, the module of which is built into the printer.
In such cases, there are two solutions:
- Connect the printer to the router using USB according to the previously described instructions.
- Connect the printer via a WPS wireless connection. Naturally, the router must have a Print Server, support the existing printer model, and a fast WPS connection must be linked to the print server.
Wired network - a way out of a difficult situation
If you were unable to connect your printer to a wireless network using the methods described above due to the lack of technical support for the equipment, do not be upset. There is a very easy way to make a regular printer network via a wired interface. To connect, the user needs to purchase a device called Print Server, which can be found in any computer store at a price of 200-300 rubles apiece.
In most cases, a certified print server has factory settings, which the manufacturer indicates in the instructions or on a sticker placed on the device body. It is enough to connect the printer via USB to the print server, which, in turn, is connected to the router hub with an Ethernet cable.
The network address of the printer can be found in the router settings or found using special software on a PC. Next, proceed with the usual installation of the printing device according to the instructions described above.

Expensive solution
Many users wondering how to make a network printer from a local one are not deterred by the cost of the issue, so a wireless print server created specifically for such purposes should not be overlooked. The only thing that can confuse me is the price - it is higher than most worthy routers with great capabilities. You will have to pay from 4,000 to 8,000 rubles for the miracle device. Setting up a wireless Print Server is no different from a wired print server. All information on fine-tuning is present in the instructions for the network equipment.
The main feature that attracts buyers to such a device is support for Apple mobile technology. For some reason, many manufacturers of wireless printers and routers forget about this brand. Therefore, for owners of iPhone, MacBook and iPad, purchasing a wireless print server will be the only solution to the problem associated with printing to a printer.

Printer sharing
The simplest, but no less effective way to solve the problem of how to make a printer network is to provide shared access to the local computer. The algorithm is quite simple and even a schoolchild can master it.
- Having gone into the properties of the printer installed in the Windows system, go to the “Access” tab and check the boxes next to the “Sharing” and “Drawing jobs” fields.
- By going to the system properties and going to the “Computer name” tab, make sure that the “Workgroup” is registered the same for all computers on the local network.
- To make the printer networkable, Windows 7, 8 and 10 require additional network adapter settings. To do this, you need to go to the “Network Sharing Center” and change the additional sharing settings by checking the boxes next to all the fields starting with the word “Enable”.
- It is recommended to set encryption to 128-bit and disable password protection.
Remotely connect to an available printer
Having completed the first step in deciding how to make the printer network-ready, you can begin connecting the publicly accessible device to other computers on the local network. There are only two options - they are different, but the result is the same. The first option is described above, because for the settings there is not much difference what type of connection is used - the main thing is to know the IP address of the printer.
But the second method is suitable for people who are looking for easy ways. Essentially, these are instructions on how to make a network printer local. By going to “Network Connections”, which can be found in the Control Panel, you need to select “Network Neighborhood”. An alternative is to launch the “Network Neighborhood” shortcut from the desktop, if the user has not previously deleted it as unnecessary. Here you need to display the computers that are part of the workgroup - there is a corresponding button for this. Having found the desired computer, log into it. The printer will also be displayed in the list of available resources. If you double-click on the device name and agree to all warnings, the printer connects easily.

Finally
Having asked the question “how to make a network printer,” the user can always find any solution he needs. After all, there are countless options - if only there was money and desire. However, for some reason, many people forget about security when using an unsecured Wi-Fi communication channel. The printer will be visible to all users within the range of the wireless router. Judging by numerous reviews from IT professionals, it is not recommended to share computer access over a wireless network, because the safety of personal information always trumps any convenience.