How to take screenshots on iPad. Taking a screenshot on iOS (iPad and iPhone)
The 2018 iPad Pro doesn't have a Home button, so screenshots are taken with a different button combination.
- Go to screen, where you need to take a screenshot.
- Make sure that the screen contains all the elements you want to see in the photo.
- Simultaneously click power buttons at the top of the iPad Pro and volume up button on the right side of the iPad Pro.
The screen will blink white and you will hear the sound of the camera shutter clicking (if the sound is on).
How to take a screenshot on iPad, iPad mini, iPad Air or iPad Pro (2017 and older)
- Run application(or applications in picture-in-picture mode) that you want to take a screenshot of.
- Position the app(s) exactly how you want them to appear in the screenshot.
- Press and hold the buttons Power
- Quickly press the button Home.
- Release both buttons.

While you can try pressing both buttons at the same time, holding down the Power button a moment before pressing the Home button will reduce the chance of Siri accidentally turning on or if you need to take a screenshot of the screen. You must do this quickly or the power off screen will open.
Once the screenshot function is successfully launched, you will see a white flash and, if the sound is enabled, you will hear the sound of the camera shutter. This confirms that the screenshot was taken and saved to the iPad.
How to edit screenshots using Markup
In iOS 11 and later, as soon as you take a screenshot, it will appear in the lower left corner of the screen and will remain there for a few seconds before disappearing.
With Markup, you can use a marker, pencil, eraser, or text to edit and write comments on a screenshot. You can also change the color of these tools: white black, blue, green, yellow and red. There is a markup tool that can be used to crop a screenshot. Touch and hold one of the edges or corners and drag the markup to the position you want.
There are four additional tools that you can add to your screenshot in " Marking" by clicking on the " button Additionally" in the lower right corner of the screen (looks like a plus symbol), namely:
- Add a text field— allows you to add text to the screenshot. Click on it to select a tool, then click on the added text field so the keyboard appears so you can write your comment.
- Signature— if you already have a caption in Preview, you can add it to the screenshot.
- Magnifier- this function allows you to enlarge a specific area on the screenshot. You can change the size or border of the magnifying glass, and zoom in or out.
- Figures— you can add a specific shape to the screenshot. You can also change the shape's outline and adjust its size and shape by dragging the edges.


If you made a mistake, you can cancel the last step by clicking the cancel button in the lower left corner of the screen. Conversely, you can repeat any steps by clicking the repeat button in the same place.

If you don't use the Markup feature, you will still have access to screenshots. You can also edit and share them using the Markup feature or .
- Launch the application " Photo«.
- Press " Albums«.
- Press " Screenshots«.

You can also find screenshots in the main Photos and Camera albums, but you'll have to look for them among everything else.
Still don't know how to take a screenshot of your iPad? Unfortunately, not all experienced users iOS devices can do this simple procedure. In fact, taking a screenshot on the iPad 2 and any other Apple device is very easy. And there are several ways to do this.
About how to shoot iPhone screen and iPad 2, we’ll talk in detail in this article. Let's see how this procedure differs on an iPad and on a mobile device.
Sometimes it happens that the user does not want to study the iPad software that allows you to take screenshots. But a screen photo is often required. Moreover, these pictures from the iPad are not needed as further items for editing. You just need to take a photo of what is currently on the display. In such situations, it is recommended to use the usual tools embedded in the operating system of the iPad 2 or other Apple device.
You can shoot the screen this way without worrying about the quality of the pictures. They will be at their best - at least no worse than when using software. The features of the iPad 2 itself allow you to take bright and clear shots.
The screenshot taken on iPad two will be saved as an image. The user will be able to store it on a PC or laptop, share it on social networks, send it by e-mail, and exchange the photo in instant messaging services.
How to take a screenshot on iPad
If you don’t know how to remove the screen of the second version of Apple’s tablet (like any other), read the instructions below. From it you will learn how to take a photo of the display at any time and capture the information that you may need in the future.
How to remove a tablet screen? To do this, follow these steps:
- Log in from your iPad to the online resource from which you want to take a screenshot. Namely - to a specific page. You might want to take down a card, a message, or something else.
- Find the "Home" button.
- Find the button responsible for locking the device.
- Press the first button, and then the second (do not release the first). You will hear a click like a camera. The tablet display will blink. This will be a signal that the current screen image has been saved.
- Enter the photo application, where you can find the screenshot you just took.
Now you know how to capture the screen of your iOS gadget, namely a tablet. As you can see, this is done almost in one action. Note that editing the screenshot is still possible. And if you need it, use special software for these purposes. There are programs that allow you to change screenshots, like photographs (crop, increase brightness, etc.).
Let’s reveal the “secret” - on an iPhone, photographing a picture from the display is done exactly the same as on a tablet.

Special software for screenshots
To capture an image from the iPad display, in addition to the method described above, you can use software developed for these purposes. Next, let's look at the functionality of several similar programs.
Joxi
This software stores the pictures taken in a cloud service. Moreover, the files will remain there indefinitely - until you decide to delete them. Such an action is subject only to the owner of the pictures.
The application functions allow you to:
- Transfer pictures to the network.
- Forward them to friends on various social networks.
- Transfer files with pictures via instant messaging services.
- Send images by e-mail.
In addition, with Joxy, the user can send either one screen or several at once. You can send both through sources and in archives.
In addition to making a picture from the iPad screen, you can change it, that is, make editorial changes. This is very convenient when you can sign a picture, highlight the most important places, comment on something and much more.
Joxy's interface is simple and intuitive. And the editing possibilities are very wide. Using this software on the iPad is a real pleasure. With a simple movement of a finger, the user can move the borders of the picture if they do not suit him.
You can change the length or width of the drawn arrow. After the picture is changed, the finished frame is sent straight to cloud storage. And there the user will have access to a link to the uploaded image.
Benefits of Joxy:
- Easy screen making process.
- Ease of image editing.
- No need to use other software.
- The presence of a “cloud” icon on the desktop.
- Fast software operation and flexible settings.
ScreenshotMaker Pro
When using this software, the user has access to a screenshot of the entire screen, a separate area or the active window. You can save the frame in one of 4 formats. The user also chooses the save location. You can specify any address on your PC.
There is an automated function for making a series of screenshots. Pictures will be taken after any period of time. You can even set the period to less than one second. There is also a spy mode.
The feature of the program is the so-called pipette function. It allows you to cut out any element of the screen. The screen can be scaled. You can add comments with macros to it. The program interface is simple and easy to use.
Thus, taking screenshots on iOS devices is very easy. Moreover, it does not matter what the iPad owner uses – built-in functions or special software. The main thing is that the necessary information can be captured and saved in no time.
And you want to demonstrate a high score in a game, remember information about settings or text from some site, save a screenshot. It can be copied to a computer, posted online, edited, or sent to friends. This useful feature is available on Apple tablets. Although it is difficult to understand without instructions how to take a screenshot on an iPad.
There is no obvious PrintScreen key on the tablet. But you can save a picture in it using the built-in options.
- Click the "Home" button. It is located on the front panel of the device. Typically, you use it to close applications and call Siri;
- At the same time as “Home”, press “Lock/Shutdown” (“Sleep/Wake, On/Off”). It can be found next to the headphone jack;
- The screen will flash and the sound of a camera triggering will be heard;
- Go to your photos folder. There will be a screenshot saved in .png format. This can be done in any application. The main thing is to press the buttons at the same time and quickly release.

Programs for taking screenshots
With the built-in capabilities of the tablet, you have to try to save the screen. If you press “Home” at the wrong time or do it too slowly, the open window will be minimized. What if you wanted to record a high score in a game? It will not be so easy to repeat it. And if you press the lock button for a long time, the device will turn off altogether.
It is easier to use applications available in the AppStore. With them you can not only take a screenshot, but also edit it. Here are some of these utilities.
Joxi
With Joxi you can instantly take a screenshot on your iPad. Through this program you can exchange images. It provides its own cloud storage for . There is a function to send multiple pictures.
Editing tools are available in Joxi. With it you can crop the screen, add an inscription to it, make a comment, circle or underline something with a marker, point to a certain area with an arrow, draw simple geometric shapes. The utility can be customized to suit your needs.
ScreenshotMaker
If you don't know how to take a screenshot on an iPad, or want to simplify this task, use the ScreenshotMaker program. It has a huge toolkit. You can capture the entire screen or just a specific area. Add a comment, crop, scale.

You choose where to save the screenshot and in what format. PNG, bmp, gif, jpg available. You can take a series of frames at a certain interval.
There are other utilities. Each has its own interface and its own set of functions. It's up to you to install additional software or use the built-in capabilities of the iPad.
What applications for working with pictures do you recommend?
Areas of application of screenshots
It has long been known that products manufactured by Apple differ from other electronic equipment for a similar purpose, both structurally and in some ways. Many of those who are not personally familiar with its products believe that they are very heavy and difficult to handle, but this is far from the case. Some operations are much easier to do on Apple than on devices from other manufacturers. One of them is taking a screenshot from the iPad screen.
Saving screen content as a screenshot can be very useful in many cases. For example, It's much faster to take a snapshot of a website page with the information you want using the display snapshot option than highlighting and pasting text in the Notes app. It happens that users, in order to remember the final figure, create a screenshot with the calculations of the calculator. When planning a fishing or hunting trip, or moving around an unfamiliar city, take a screenshot from the Maps application, and .
How to take a screenshot on iPad?
To capture the contents of your tablet's screen, you need to:
- Open the desired image (photo, application, etc.) on the screen.
- Press the Home and Power buttons at the same time. A short flash and a click sound, like , will inform you that a screenshot has been taken.
- A photo taken using the screenshot function will be saved in the Photo Stream and Photos folders.

As you can see, everything is not so complicated. The gadget saves screenshots taken on the iPad in PNG format automatically. The properties of the resulting photo will be the same as those of other photographs or, that is, it can be edited as usual. The volume and size of images can range from 150 KB to 1 MB.
Video on how to take a screenshot on iPad:
By the way, to take a screenshot on an iPad, you don’t have to press the Home and Power buttons at the same time. It is quite acceptable to first press the Home button and, while holding it, sharply touch the power button.
How to edit a screenshot on iPad?
You can lightly save saved screenshots before sending or publishing them. For example, you need to crop a frame to remove unnecessary details from it. This can be done without leaving the photo album:
- Take your iPad.
- Click the "Edit" button.
- Select "Crop".
- Select the desired area.
- Save the result.
Don't forget that the photo is not edited forever. If you wish, you can restore the original at any time. If the cropped part of the image contains any secret information, then it is better to use programs other than the standard one for editing. For additional image editing, for example, to emphasize something, circle it, or apply additional filters, the best choice would also be to use them, which are available in large quantities for download in the App Store.

By the way, the iPad screen itself is one of the strongest aspects of this gadget. Therefore, what we see on it every time we pick it up deserves a photo!
Thanks to iOS 11, you can easily take, edit, and even annotate any screenshot on your iPad or iPad Pro using standard device functions. But many users simply do not remember the key combination on the iPad that must be pressed for the princescreen.
iPad gives you the ability to take screenshots of epic victories in various games, or screenshots of interesting moments from videos, funny conversations in in social networks(Snapchat, Facebook, Vkontakte), reviews about your projects, all kinds of bugs that you want to report, etc. Considering the larger screen sizes of the iPad Pro, iPad, and iPad mini, this opens up some really interesting possibilities.
How to take a screenshot of an iPad, iPad Pro or iPad mini
Launch the app (or split-screen/picture-in-picture apps) you want to screenshot. It can also be any messenger or favorite game.
Arrange all the elements the way you need.
Press and hold the Power button. It is located at the top of the device.
Click the Home button.
Release both buttons.
You can try to do this by pressing both buttons at the same time, but it is better to prefer sequential pressing. This will minimize the chances of accidentally activating Siri.
When the screenshot is taken, you will see a white flash, and also (if the sound is turned on) you will hear a characteristic sound reminiscent of a camera shutter clicking. All this confirms that the image was saved on the device in the Photos application in png format.
Edit a finished screenshot using Instant Markup
When running iOS 11 on an iPad air or iPad Pro (and later versions), immediately after you've figured out the screenshot process, an image will appear in the lower left corner (bottom) of the screen. After a couple of seconds the photo will disappear. During this time, you need to have time to click on it in order to activate the Instant Markup mode.
Instant Markup is the iPad's main image-editing feature.
You can use a marker, highlighter, pencil, eraser or magic rope. Your text annotations can come in a variety of colors. The ability to crop screenshots is also present.
Be sure to remember! Our instructions are suitable for any tablet from Apple, in particular:
iPad mini 2 and 3 series;
Standard iPad;
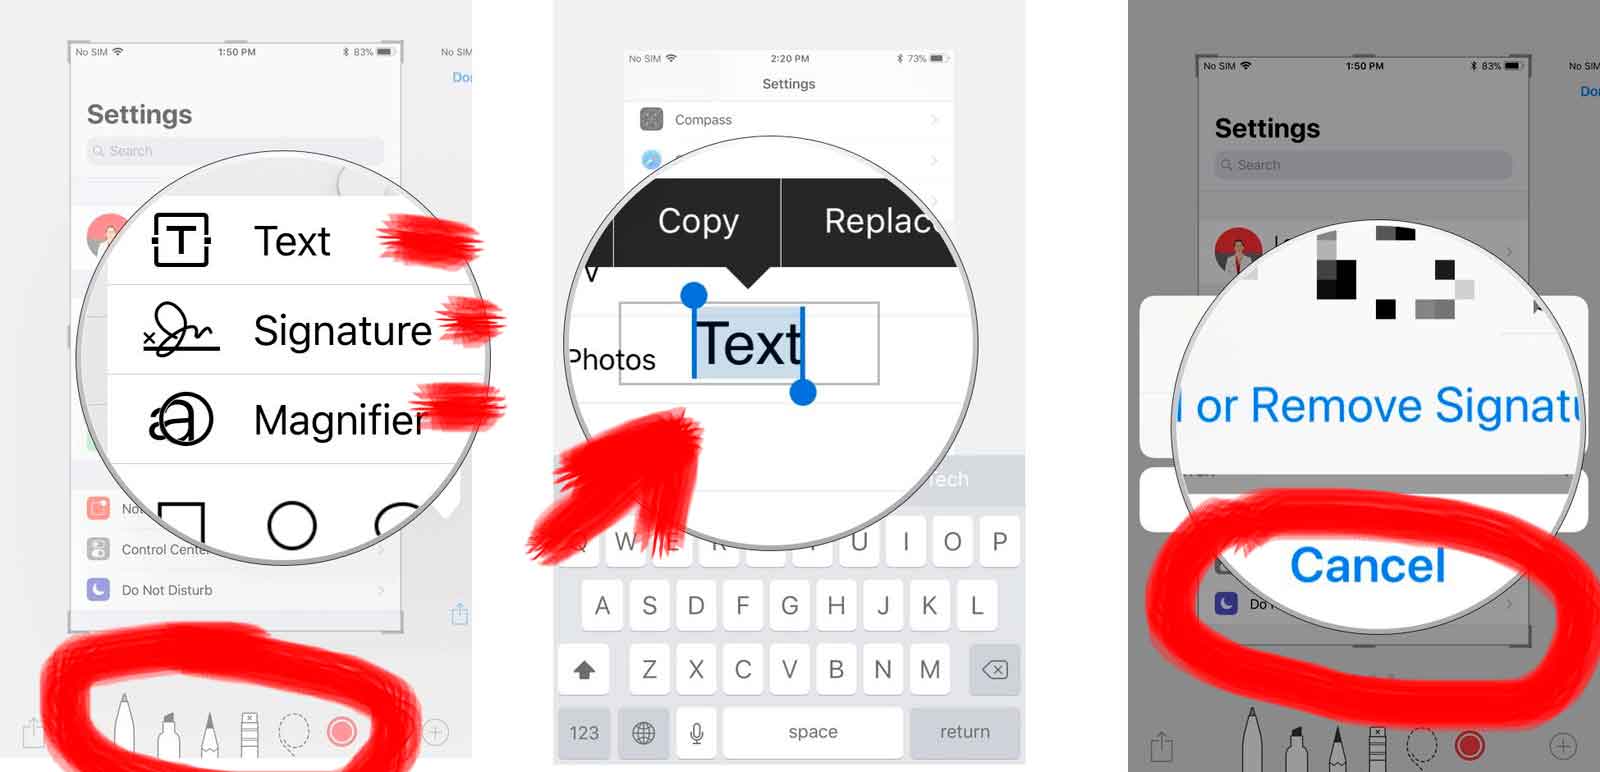
In the lower right corner there is a “More” button (the “+” icon). It will allow you to add four additional tools:
Text. Overlay any text messages onto the image. When the field appears, click on it. You will see a keyboard.
Signature. If you have already created a signature in Preview, then you will add it to the screenshot directly from there.
Magnifier. Point this tool at areas that you need to examine in detail. The boundaries of the Magnifying Glass are not fixed. Change the magnification scale.
Figures. The screenshot can be presented in the form of a quote frame, square, circle, or arrow. Drag the edges of the image to change shape and size.
In the lower left corner of the screen you will find an arrow, by clicking on which you can cancel any unsuccessful action. It is also possible to restore actions performed previously.
How to Find Screenshots on iPad or iPad Pro
On the home page you will find the Photos application.
Click on Albums.
Click on "Screenshots".
Screenshots can also be found in the main photo albums. However, for this purpose you will have to search for the desired images among hundreds of others.

Create and save any moments and seconds of everyday life that are important to you without any problems. If after reading you still have questions about how to take a screenshot on an Apple tablet, be sure to ask them in the comments. The most similar information about taking a screenshot on other device models is available on the official Apple website -.


