Two-channel thermometer, clock on ATmega8, DS18B20, DS1307, LCD1602. Clock on Atmega8 and seven-segment indicator Do-it-yourself clock on atmega8
This article describes the design of digital hours on the Attmega8 microcontroller, which are equipped with a stopwatch, alarm clock, and countdown timer. The watch has a day and date display function with the ability to display the date and time combined. There is automatic switching between summer and winter time, as well as leap year accounting.
The display is built on six 7-segment LED indicators with brightness adjustment. The watch is also equipped with battery backup.
Description of the microcontroller clock design
As mentioned above, the watch has a six-digit display, consisting of two three-digit T-5631BUY-11 displays, operating in multiplex mode. The indicator anodes are grouped by category and are switched using transistors T1...T6.
The cathodes are grouped into segments and are powered directly from the IO1 Attmega8 microcontroller. The multiplexing frequency is 100Hz.
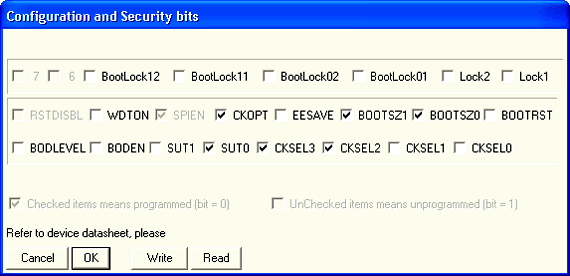
The clock is controlled by a low-frequency quartz crystal X1 with a frequency of 32768 Hz. By activating the CKOPT bit, which allows the use of internal 36pF capacitors for quartz, there is no need to use external capacitors.

If you have problems starting the generator, you can try connecting 2 22pf capacitors. For even greater clock accuracy, you can completely turn off the internal capacitors (reset the CKOPT bit) and leave only the external ones.
The piezo emitter REP1 emits an alarm sound and signals the end of the timer. During the sound signal, logic 1 appears at pin 16 (port PB2). This signal can be used to control any load.
The watch is controlled by three buttons - minutes, hours and mode. The buttons are connected through resistors that protect the ports of the Attmega8 microcontroller. The circuit is powered by a 5 volt source (7805). Current consumption mainly depends on the number of active indicators, as well as on the degree of brightness adjustment.
At maximum brightness, current consumption reaches 60 mA. The watch is equipped with a backup battery. While running on battery power, the watch enters an economy mode in which the display is turned off. Also in this mode, the buttons are not active, except when it is necessary to turn off the sound signal.
The backup voltage is from 3 to 4.5 V. This can be one 3V battery, three 1.2V NiMH or NiCd batteries, or one Li-Pol or Li-Ion battery (3.6 to 3.7V). The current consumption from a 3V battery is only 5...12mA. Time battery life Hours in economy mode from a 3V CR2032 battery with a standard capacity of 200mAh should theoretically last for about 2.5 - 3 years.
The software for the microcontroller is at the end of the article. The configuration bits must be set as follows:
Clock management
The clock is controlled using TL1-minute, hour-TL2 and TL3-mode. The hour and minute buttons are used in clock mode to assign hours and minutes. In other modes they have different functions. The mode button switches between different modes, of which there are 8 in total:
Mode 1 - Clock
In this mode, the display shows the current time in the format “HH.MM.SS”. The clock button is used to set the clock. Minutes button to set the minutes. When pressed, the seconds are reset.
Mode 2 - Enabling daylight saving time and setting the year
Here you can turn on or off the automatic changeover between summer and winter time and set the year. The data is in the following format “AC ‘RR” (AC – automatic time, space, last two digits of the year).
Mode 3 - Countdown timer
This mode allows you to organize a countdown from a given value to zero. After this time has elapsed, a beep will sound and LED1 will light up. The beep can be stopped by pressing the Mode button. The data is in the following format: "HH.MM.SS". The maximum possible value is 99.59.59 (almost 100 hours).
Mode 4 – Combined information output
In this mode, the following are displayed alternately:
- current time in the format "HH.MM.SS"
- date in the format “AA.DD.MM.”
Each format is displayed for 1 second. In this mode, the Hour and Minute buttons are used to adjust the brightness of the display (Hours-, Minutes+). The brightness changes logarithmically in 6 steps: 1/1, 1/2, 1/4, 1/8, 1/16 and 1/32nd. Default is 1/2
Mode 5 - Setting the day of the week and alarm mode
In this mode, you can set the day of the week - from Monday to Sunday (displayed as Mon, Tue, Wed, Thu, Fri, Sat, Sun), turn on the alarm and select its operating mode. The data is in the following format: “AA AL._” (day of the week, space, AL., alarm setting).
The clock button sets the day of the week. The minute button is used to turn on/off the alarm sound and select its operating mode: “AL._” = alarm is not active, “AL.1” = alarm beeps 1 time (then automatically switches to “AL._” position), “ AL.5" = alarm sounds only on weekdays (Mon-Fri, except Sat-Sun), "AL.7" = alarm rings every day
Mode 6 – Setting the day of the week and date
The clock button allows you to set the day of the month. The minute button allows you to set the month.
Mode 7 - Stopwatch
The stopwatch allows you to measure time with an accuracy of 0.1 seconds. The maximum measurement time is 9.59.59.9 (almost 10 hours). The data is in the following format "H.MM.SS.X". The minute button is used to start and stop the stopwatch. The clock button is used to reset.
Mode 8 - Alarm clock
This mode is used to display and set the alarm time (ALARM). The data is in the following format "HH.MM.AL". The Minutes button sets the alarm minute, the Clock button sets the alarm hour.
Below is a diagram of a similar watch that has an indicator with a common cathode

(downloads: 811)
This electronic clock, built on the Atmega8 microcontroller, is equipped with an easy-to-read LED display, an alarm clock with a snooze function, and a power recovery function.
Watch specifications
- time display format: hours, minutes;
- alarm clock with snooze function;
- simple control using 2 buttons;
- Battery operation support;
- supply voltage: 7…12V / 0.2 A;
- dimensions of two printed circuit boards: 60×21 mm, 58×44 mm.
The schematic diagram of the clock is shown in the figure below. The clock circuit must be powered with a constant voltage in the range of 7...12V. This can be any with a current load of at least 200 mA.
A buzzer with a generator can be connected to the CON5 connector of the board, which will act as an alarm signal. To terminals SA1 and SA2 printed circuit board buttons are connected that are used to enter settings and service the watch.

Setting the time and alarm
When you press the SA1 button, we get to the “Set1” clock menu, where we have the ability to set the current time, and another short press of the SA1 button takes us to the “Set2” alarm time setting menu.
To select and change settings, use the SA2 button. After selecting both in the time setting mode and in the alarm setting mode, the first digit will begin to flash on the display, after which you can set dozens of hours using the SA2 button.
Pressing SA1 again will cause the second digit to blink and using SA2 you can set the hour units. The next two presses of SA1 will allow you to set tens of minutes and units of minutes. When setting the hours and minutes, only one digit is always set. A fifth press of SA1 returns the clock to normal operation. Also, a long period of time without pressing any buttons will terminate the installation procedures.
While the clock is running, long pressing the SA2 button turns the alarm on/off. When the alarm is activated, the start time is displayed for a few seconds. The alarm status is indicated by a dot located in the fourth digit. When the alarm is active, this indicator lights up.
After turning on the alarm, you can press any button to turn it off for about 5 minutes, and the snooze function will be activated. This fact is indicated by a flashing dot on the fourth digit of the indicator. After 5 minutes, the alarm will sound again. By pressing any button again, it can be postponed for another 5 minutes, etc.
The alarm signal is completely turned off after a long press of the SA2 key, or about a minute and a half of lack of reaction from the user.
The clock operation has been tested in Proteus:

If during operation of the watch it turns out that the watch is significantly behind or in a hurry, you can try to reduce or increase the value of capacitor C1.
(34.7 Kb, downloads: 1,923)
- 10 alarms for every day of the week.
- Delay signal, if the alarm is not turned off, goes off after about 5 minutes.
- 8 alarm clocks on a separate MK leg, load on/off.
- Two DS18B20 temperature sensors (at home and outdoors).
- Timer 99 hours.
- The brightness of the indicator is adjustable for daytime and nighttime.
- The variable parameter smoothly changes the brightness, as in Caller ID.
- When 220 volts are lost, the battery consumption is 40 microamps.
- The alarm goes off in any power mode.
- The watch can show up to 4 modes sequentially.
The watch has the ability to sequentially show 4 modes, for which you can select one of ten display formats and the time of its display.
| Display formats. | ||
| 0 | ||
|---|---|---|
| 1 |  | Hours-minutes-seconds. |
| 2 |  | Hours and minutes. |
| 3 |  | Hours-minutes, Day of the week. |
| 4 |  | Day_of_month_day of week. |
| 5 |  | |
| 6 |  | |
| 7 |  | |
| 8 |  | |
| 9 |  | |
| A |  |
|
| b |  | Temperature 1 sensor, Temperature 2 sensor. |
|
||
Button F - exit the mode. Choice of 3 main modes.
SET button - enters the selected mode. Next, move to the next parameter (flashing field).
PLUS button - plus/on. In SETUP mode, scroll through the main menus.
MINUS button - minus/__(off). In SETUP mode, scroll through the main menus.
All modes, except zero and timer modes, have a time termination. If there are no presses for more than 30 seconds, mode is set to zero.
CALLS mode
 | on/__-alarm clock on/off. |
|---|---|
 | Days of the week on which the alarm will go off (here on days 6 and 7 the alarm is turned off). |
 | Alarms A B C D E F G H on/off conclusion call a_h mk. An alarm clock is useful for load management. Using it, the output call a_h can be set for any number of minutes. |
 | ___-off, SET-leg bud. A-H mouth to 1, CLS mouth to 0. n-will work once, o-on. Always. |
SETUP mode.
To write values to EEPROM, you need to confirm all values in the submode by pressing SET.
Example: LIGHT ->SET-> L.ooooo ->SET-> НО4ь L.2 ->SET-> LIGHT.
PORT mode.
Clock mode.
Set SEE mode.
| Display formats. | ||
| 0 | Date, Day of the week, Hours-minutes. |
|
|---|---|---|
| 1 | | Hours-minutes-seconds. |
| 2 | | Hours and minutes. |
| 3 | | Hours-minutes, Day of the week. |
| 4 | | Day_of_month_day of week. |
| 5 | | Temperature 1 sensor, Temperature 2 sensor. |
| 6 | | Temperature 1 sensor (house sensor). |
| 7 | | Temperature 2 sensor (sensor outside). |
| 8 | | Temperature 1 sensor, Hours-minutes. |
| 9 | | Temperature 2 sensor, Hours-minutes. |
| A | | Temperature 1 sensor, Temperature 2 sensor. |
| b | | Temperature 1 sensor, Temperature 2 sensor. |
In modes where tenths of degrees are not indicated, the point determines more than 0.5 degrees. |
||
Mode USt Bud. Alarm settings.
 | Bip alarm signal - PWM. Pin alarm signal - mouth in 1 output bud. Both Shim and output. |
 | Signal delay. When off When snoozing, the alarm clock is turned off by pressing any key. When on |
 | alarm snooze off button F, when you press the SET PLUS MINUS buttons, the signal turns off, but it will work again after about 5 minutes, if the alarm clock is not turned off, then after 8 times it goes off. automatically. When signal delay is active, in zero mode, the dot of the last digit blinks. Disable delay (if there is no signal). In mode 0, pressing SET on. this mode. The presence of an active delay induces the symbol |
O
at the 4th acquaintance place. Pressing PLUS MINUS turns off the delay.
| DS18B20 mode. | |
|---|---|
| DEFAULT mode. | Other modes (SETUP). LIGHT |
| L ooooo - daytime brightness of the indicator. | NIGHT L2 - brightness from 23-00 to 6-00. SIGNAL After entering the mode, use the plus/minus buttons to select: wake up S or button. S respectively, the PWM frequency for the alarm clock and buttons. When entering these submodes on the indicator: To turn off the signal from pressing buttons, set H000 L000. If the PIN option is selected in the Alarm mode, no PWM signal will be output for the alarm clock. |
Actions in zero mode.
F - mode selection.
SET - signal delay cancel mode
PLUS - Set SEE mode.
MINUS - setting alarms.
If you set the alarm clock to turn on the output, you can use the chip from a musical card.
The program is written in C in WinAvr.
Download source, HEX and EEP files. clock_t.rar (18 Kb)
When flashing the microcontroller, set the CKSEL3..0 bits to 0011 (internal RC generator 4 Meg). Program the CKOPT bit (connection of internal capacitors). Then flash the EEPROM, or reset the main variables in the program in this way - SETUP -> DEFAULT -> SET.
Electrical circuit diagram

One device combines two functions: the actual measurement of temperature and time (clock). The display is performed alternately, changing every ten seconds. To set the clock, two buttons are used, similar to simple Chinese ones electronic watch: one is responsible for selecting a parameter, the second for changing it. The device is powered from the network using a constant stabilized current source with a voltage of five volts (board from charger phone).


The temperature sensor is a DS18B20 chip. Since the Clock-Thermometer device does not have its own battery, if the power is lost, the readings will naturally be lost. And so that this does not cause a person to be late for vital matters, there is an interesting “trick” - when power is applied, dashes will be displayed on the display instead of time until you press one of the two setting buttons.


The body of the homemade temperature meter was a suitable cufflink box. The clock-thermometer board itself and the board taken out from the telephone charger were placed in it. The DS18B20 sensor is made remote and connected via a connector.


List of required parts
- Atmega8 microcontroller - 1 pc.
- Quartz 32768 Hz - 1 pc.
- Temperature sensor DS18B20 - 1 pc.
- Seven segment indicator (4 digits) - 1 pc.
- SMD resistors size 0805:
- 620 Ohm - 8 pcs.
- 0 Ohm (jumper) - 1 pc.
- 4.7 kOhm - 1 pc.
- Tact buttons - 2 pcs.
Video of the device on YouTube channel
- alarm.
– thermometer.
1. Functions.
– indication. Alternately.
PLUSMINUS
2. Setup.
2.2. By pressing a buttonMENUSET
Group CLOC:
– minutes;
- watch;
PLUS or MINUS);
With".
Group ALAr:
OnOFF" if disabled;
Group diSP:
tc
tt
E.F., Ar
P
Group LiGH:
A", in the younger ones" OnOF
L_ ".
L¯ ".
L– ".
2.4. By holding the buttonsPLUS/ MINUS
3. Notes.
subject .
Video of the program working t userwolf2000.
– watch with digital accuracy correction.
- alarm.
– thermometer.
– indication on a seven-segment indicator.
– automatic adjustment indicator brightness.
1. Functions.
– clock, time display format 24-hour, hours:minutes.
– digital accuracy correction. Daily correction is possible ±25 sec.
The set value of 1 hour 0 minutes 30 seconds will be added/subtracted from the current time. - alarm. IN specified time
Short double signals are heard within one minute. You can turn off the sound ahead of schedule by pressing any of the buttons. When the alarm clock is enabled, a dot is displayed in the least significant digit when the time is displayed.
– indication. Alternately.
– thermometer. The range of measured temperature is -55.0 ÷ 125.0 o C. If the temperature is above 99.9 or below -9.9 o C, tenths of a degree are not displayed.
– customizable animation of changing readings.
– use of non-volatile memory of the microcontroller to save settings when the power is turned off.PLUS– if in the main mode you press the buttonMINUS, then the time is displayed on the indicators if you click on
- temperature. When the buttons are released, the automatic change of readings resumes.
2. Setup.
– automatic adjustment of the brightness of the indicator depending on the illumination.
2.2. By pressing a buttonMENU2.1. When the power is turned on, the clock is in main mode.SETenters the settings mode and selects a group of parameters to install. Within a group, the parameter to be set is selected using the button
Group CLOC:
– minutes;
- watch;
. Available for installation in turn:PLUS or MINUS);
– seconds (reset to zero when you press the buttons With".
Group ALAr:
– correction value. In the highest order the symbol "On– activation of the alarm clock. On the indicator "OFF" if disabled;
"if the alarm clock is enabled, "
– minutes when the alarm goes off;
Group diSP:
– alarm clock hours.tc– time of indication of the current time. In the highest digits the symbols "
". Setting range 0÷99 sec. If set to 0, the time will not be displayed;tt– temperature indication time. In the highest digits the symbols "
". Setting range 0÷99 sec. If set to 0, the temperature will not be displayed;E.F.– selection of animation effect. In the highest digits the symbols ", ". If set to 0, information changes will be carried out without effects A if automatic mode is selected (symbol "r"), then the effects will change one by one. If the mode is selected
, then the effects will change randomly.P– select animation speed. In the highest order the symbol "
Group LiGH:
– enable automatic control of the indicator brightness. In the most significant digit the symbol "A", in the younger ones" On" if automatic regulation is enabled, "OF" if the brightness is set manually;
– minimum brightness threshold for automatic mode. In the highest digits the symbols "L_ ".
– maximum brightness threshold for automatic mode. In the highest digits the symbols "L¯ ".
– brightness level in manual mode. In the highest digits the symbols "L– ".
2.3. The parameter being set flashes.
2.4. By holding the buttonsPLUS/ MINUSthe parameter is quickly set.
3. Notes.
1. For the minimum and maximum brightness thresholds, the setting range is 0 ÷ 99, but the program introduces restrictions: the minimum cannot be greater than or equal to the maximum and vice versa.
2. When setting the brightness parameters, the information on the indicator is displayed with the selected brightness value.
3. It is necessary to compare the speed of animation and the time of displaying information. If slow animation and short display time are selected, it may turn out that the information does not have time to be completely updated before the next shift.
A topic has been created to discuss the materials in this article.
Video of the program working t userwolf2000.