Problems with VPN and ways to solve them. Creating a connection to a virtual private network How to install VPN on a laptop
When it comes to installing a VPN on Windows, there are several paths to take. You can download your provider’s application specifically, you can install a third-party OpenVPN application, or you can use dial-up to configure everything manually.
Installing a VPN on Windows is a very easy process and will not take more than a few minutes. We will explain each of the three methods so that by the end of the article, you will be able to surf the web safely, even if someone is spying on your online activity.
What you will need
You'll need an account from your provider, so be sure to set one up before you begin. The VPN company may ask you for confirmation via email, so be sure to do this.
If you're not yet ready to upgrade to a paid subscription, then most VPN providers will offer a free trial period, which is also great for getting started. ExpressVPN offers a 7-day trial. To do this, you need to register through the app and not through the website.
We will show the installation process on Windows 10. This article was written under Windows 10 Home. If you have a different version of OS installed, then you have nothing to worry about. Try installing the software using Method 1 (below), and then we'll move on to a little more difficult ones.
Method 1: VPN provider software
All popular VPN service providers provide a dedicated application for Windows. Using apps like this is usually the fastest way to connect your devices. You will also have access to all servers at once without additional configuration of each.
In our example, we are using ExpressVPN as an example, however, the installation process is not much different from other providers, so you should just take the gist from the screenshots included here. If you still couldn’t, then your provider’s technical support will help you.
So, let's begin:
- Download the installer from your provider's website. If you have an activation code, copy it to your clipboard.
- Double click on the installer. Next, give permission to the application to make changes to the system.

- Click "Sign In"

- Paste the activation code that you copied above in step 1. If you don’t have it, we advise you to return to the provider’s website and do a good search.
- Click on "Sign In" again.

- Click Allow if you want ExpressVPN to start when you turn on your computer. This option is optional, but can be very useful.

- Click Allow if you would like to share crash information and other technical information. If you are very concerned about your privacy, then click on Don’t Allow to skip the step.
- Click the big round button to connect to the location that ExpressVPN Smart Location has selected.

Using a special application when installing a VPN on Windows provides superior protection, speed and ease of access to some useful features:
- Click the Choose Location button on the connection screen to easily switch between the servers that ExpressVPN provides. All information about connections is already preinstalled in the application, so you do not need to download it additionally.
- A network lock or Killswitch prevents your computer from accessing the Internet if the VPN connection is lost. This will protect you from accidentally neglecting the VPN. You can find the switch by clicking on the burger menu (three horizontal lines) in the top left corner and then clicking on Options.

There is another useful feature on the screen. If you want all your computers and printers to have access to your network, then check the box next to Allow access to local network devices such as network shares or printers

This comes in handy when you are using a VPN on an office network or in a business center while traveling. Your internet traffic is still tunneled, but you can access your local network if you need it. This is the only option you need to change to get your VPN to work the way you want it to.
Method 2: OpenVPN
Your provider's app should work well. But as an alternative, you can use OpenVPN, which is an open-source third-party application. This means that the code of this application is available to anyone who wants to study it. This fact gives a little confidence in the security of this application.
OpenVPN is an extremely minimalist program; it doesn’t even have an interface. Most settings are done through the tray, which is hidden behind the arrow in the lower right corner of your screen.
Here's how to quickly get to grips with your VPN. We're using ExpressVPN again, but the steps are similar for most providers:
- Download OpenVPN software from the OpenVPN website https://openvpn.net. Don’t forget to check the site address, its security and other nuances before downloading. The fastest and easiest option is the installer file.

- Double click on the downloaded file to begin the installation.
- Click Next.

- Review the terms of the agreement, and if you are happy, click agree.

- Custom installation is available on the feature selection screen. As shown by default on the screen, this build works great. Click “Next”.

- Select the installation path. Again, the default path is fine. So you shouldn't change it without good reason. Click “Install”.

The installation process may stop and ask you to install TAP. This is a natural part of a VPN connection, so you don't have to worry about it. Click "Install".
Note: If you click "Don't install", your OpenVPN connection may not work.
Completing the installation:- Once the installation is complete, a corresponding message will appear in the installation log window. Click Next.

- Installation completed. The last window will present an option that will optionally show you a ReadMe text file. It contains brief information. If you don’t want to open it, just uncheck the box before clicking “Finish.”

At this step, you need to log into your provider account on the site. You should find the OpenVPN connection details and accompanying files.
Here's a screenshot of what you should look for in ExpressVPN, for example. To find this, click Set up ExpressVPN on all your devices, then Manual config. Make sure OpenVPN is selected on the right side.
Scroll down a little and you will find the necessary information: the username and password for your OpenVPN connection, as well as a list of available servers. Each location has a special downloadable file called a configuration file. You need to download at least one of them. If you are not sure which one you want to download, we recommend choosing the one that is closest to you.
We continue the process:- Find the files you just downloaded and move them to C:\Program Files\OpenVPN\config

- Go to the OpenVPN GUI, which is located in your startup menu. You should also have a shortcut on your desktop. Launch from wherever is convenient.

- In the tray you will find a small OpenVPN icon; right-click on it and you will see the name of the configuration file(s) that you moved to the desired folder. Move the cursor a little to the right and click “Connect” in the menu that appears.


- You will be asked for a username and password. Return to your browser and copy the input data from the OpenVPN setup page. Don't use the credentials you use to log into a website, that's different.

- Click OK.
The tray icon is green, which means we are connected. To view the connection status, just hold the cursor over the icon and right-click to disconnect.

Method 3: Manual setup using Dialer
In our manual connection example, we are using Windows 10. This method does not require downloading any VPN software. Instead, we use L2TP/IPSec using Dialer.
On other versions of Windows and for other providers, the requirements will differ from step to step. But you must understand the main idea of the whole process.- Log in to the ExpressVPN website. Click Set up ExpressVPN on all your devices, then Manual Config. Now on the right side, select and click the PPTP & L2TP-IPSec button.

- Scroll down, skip the username and password, and the list of servers. Below them you will find a button that says Download Windows Dialers. Click on it and keep your browser open.

- Locate and extract the zip file to a folder.
- Find the file called ExpressVPN Windows L2TP and double click on it.
- After a short pause, you will see the network connection window. Click on Properties.

- Go to the Security tab and make sure that the Microsoft CHAP Version 2 checkbox is checked. It is checked by default, but this is a very important item, so it’s better to double-check.

- Once verified, you should select the encryption level you prefer. Select Optional…, Require encryption…, or Maximum strength. Just don't select "No encryption allowed..." because this will break your connection.
- Click on the Advanced settings button, which is located directly above the drop-down list of encryption levels. In the pre-shared key field, write 12345678 and click OK.

- Click OK again to close the Properties window.
You should be returned to the Network Connections window. All available servers are shown in the drop-down list. Select one below to test your connection. It doesn’t matter which one you choose, but it’s still better to start checking with the one that is closer to you geographically to know for sure that everything works.
The last step is to fill in the login details for L2TP. This data is located in your open browser.
Click "Connect" to make sure everything is working. That's all!
Need more help?
If the connection fails, the best thing to do is take a few steps back and try the easiest method: opening your provider's app. If everything works, it means you configured something wrong somewhere in OpenVPN or in the settings manually.
If your provider's application does not work, then perhaps you forgot to confirm your account. Check your email for emails with verification links. If you still have no luck, then contact their technical support department, this is the easiest way to get the information you need.
- Select the installation path. Again, the default path is fine. So you shouldn't change it without good reason. Click “Install”.
- Custom installation is available on the feature selection screen. As shown by default on the screen, this build works great. Click “Next”.
- Review the terms of the agreement, and if you are happy, click agree.
The best VPN services for Windows in 2019:
The best VPN services in 2019:
Denial of responsibility: This article is written for educational purposes only. The author or publisher did not publish this article for malicious purposes. If readers would like to use the information for personal gain, the author and publisher are not responsible for any harm or damage caused.Please note that the task here is not to explain everything thoroughly and technically correctly, the task is to explain it “on the fingers” so that even novice users can understand. I hope it worked out. If you have questions, ask them in the comments.
The essence of how a VPN server works is as follows:. For example, you want to go to the website yandex.ru. More precisely, connect to a server with IP 77.88.21.11 (residents of the eastern regions of Russia may be sent to a server with a different IP, but that’s not the point). When working without a VPN, your computer sends a packet (you could say a request) directly to the server with the address 77.88.21.11 and receives a response from it. When working via a VPN, your computer sends a packet to the VPN server, the VPN server sends the exact same packet to 77.88.21.11, 77.88.21.11 sends a response to the VPN server (because it was the VPN server that originally sent the request), and the VPN server sends this packet to your computer.
What do we have? Requests to the address 77.88.21.11 are sent not by your computer, but by the VPN; accordingly, the server 77.88.21.11 records the IP address of the VPN server, and not your computer.
One possible reason to use a VPN is need to hide your IP address.
Other uses – need to change traffic route. Let's take an example from life. The author of this article lives in the city of Orel (Central Russia) and wants to connect to the yunpan.360.cn server located in Beijing. The author uses (or rather, used at that time) the services of the Beeline Internet provider. As the tracert yunpan.360.cn command entered into the Windows command line showed, outgoing Internet traffic to this Chinese server goes through the United States. The trace does not show how the traffic goes back, but judging by the ping, it follows approximately the same route. Below is a screenshot from VisualRoute 2010.
This routing is due to the fact that Beeline did not pay backbone Internet providers for a more direct channel to China.
With this route, large packet losses occur, the speed is low, and the ping is huge.
What to do? Use a VPN. This is a VPN server to which we have a direct route, and from which there is a direct route to yunpan.360.cn. I (the author of the article) searched for an acceptable solution for a very long time and eventually found it. A virtual server was rented (what this is will be discussed later) in Krasnoyarsk (immediately imagine where the city of Krasnoyarsk is located) from a hosting provider. Tracing to the server showed that the traffic was traveling across Russia, the ping was 95 ms (I had a mobile LTE (4G) Internet, on a wired Internet the ping would be 5-10 ms lower).
Ping– this is the delay of the Internet signal. The delay for the passage of Internet traffic in both directions (round trip) is measured. It is impossible to measure the delay in only one direction using standard means, since your computer sends a request to the pinged server and records the time it takes for the response to arrive.
In traces, the ping to each point (to each point of the route, otherwise called a hop-hop) is also shown for traffic in both directions.
It often happens that the route is different in different directions.
Next, a trace was made from the Krasnoyarsk server to yunpan.360.cn. Ping is around 150 ms. The tracing showed that traffic from the Krasnoyarsk server to the Chinese one goes through direct peering (internetwork interaction) between the Transtelecom and China Telecom providers.
Here is this very trace (made from Linux):
tracepath yunpan.360.cn
1?: pmtu 1500
1: srx.optibit.ru 0.361ms
1: srx.optibit.ru 0.381ms
2: border-r4.g-service.ru 0.392ms
3: kyk02.transtelecom.net 0.855ms asymm 5
4: 10.25.27.5 112.987ms asymm 8
5: ChinaTelecom-gw.transtelecom.net 125.707ms asymm 7
6: 202.97.58.113 119.092ms asymm 7
7: 202.97.53.161 120.842ms asymm 8
8: no reply
9: 220.181.70.138 122.342ms asymm 10
10: 223.202.72.53 116.530ms asymm 11
11: 223.202.73.86 134.029ms asymm 12
12: no reply
What do we see? The Krasnoyarsk server is hosted by optibit.ru (hosting is a service for placing and renting server capacity) and is connected to the Internet provider “Igra-Service” (g-service.ru). Igra-Service, in turn, sends traffic to yunpan.360.cn through the large Russian backbone provider Transtelecom (for which it pays him money). TTK directs traffic through its direct connection to the network of the Chinese backbone provider China Telecom, the ChinaTelecom-gw.transtelecom.net hop domain tells us this.
Let's remember what our problem was. Our traffic to that Chinese server went through the USA, the speed was low. What I've done? I installed a VPN on this Krasnoyarsk server. And configured my computer to work through this VPN server. What happened? Now the traffic to yunpan.360.cn did not go along the old Orel-Moscow-USA-China route, but like this:
first to the VPN server – Orel-Krasnoyarsk,
then from the VPN server to Beijing - Krasnoyarsk-Beijing.
Did you get the point? We have changed our route. What did it give? The speed of the outgoing connection from me to yunpan.360.cn has increased. Ping has been reduced. The result was achieved.
How to determine your route? For beginners, the easiest way to do this is to use the VisualRoute program, which can be found on the Internet in both licensed and hacked forms.
You need to run this program and set the following settings:

It will turn out like this:
Using this table you will see which countries the traffic passes through. Once again, I draw your attention to the fact that the trace shows the route of outgoing traffic only (that is, traffic from your computer to the server). The route in the opposite direction can only be shown by a trace made from the server to your computer. VisualRoute has a small glitch: it often shows Australia (?) as a country when it cannot determine the real geoposition of the node.
VPN– Virtual private network – a virtual private network is, one might say, your own network on top of the Internet, all traffic within which is encrypted. You can study this technology in detail. To explain it very simply, then:
- your computer and VPN server connect over the Internet
- all traffic between you and the VPN server is encrypted
- The VPN server sends it to the destination
- your IP is hidden and the IP address of the VPN server is visible instead
It is recommended to use a VPN when working through free (or simply someone else's) WiFi, since it is possible to intercept all traffic passing through the WiFi router. And when using a VPN, all traffic will be encrypted. Moreover, if you go to yandex.ru, vk.com and google.ru without a VPN, then connections to yandex.ru, vk.com and google.ru will be recorded at the level of the router and your Internet provider. When using a VPN, all connections go to the VPN server address.
There are many paid VPN services available. Their advantages include only ease of use. Disadvantages include high cost and lack of 100% confidentiality (you can write a lot, but what actually happens on the VPN server, whether traffic is intercepted, cannot be guaranteed). The inability to change the IP address in a couple of clicks should also be considered a disadvantage of paid services.
Let's compare the cost of our self-configured solution and paid VPN services. The latter cost around 300 rubles. per month. Our solution will cost $0.007 per hour. If we don’t use VPN right now, we don’t pay. If used for 2 hours every day for 30 days, this pleasure will cost us 30-50 rubles.
We will do the following:
- We rent a server for VPN.
- Let's set up a VPN on it.
- We will use them and pay only for each hour of actual VPN use.
Step #1. Server rental.
No, we will not rent a full-fledged server. We rent virtual server – VPS(virtual private server). In many cases, hosting websites on the Internet or for other purposes (including organizing a VPN) does not require large server capacities, but you need to customize the server operating system. Several operating systems cannot run simultaneously on one computer (including a server, because it is the same computer, only usually more powerful). What should I do? Virtual machines come to the rescue. This technology allows you to run an operating system within an operating system, which is called virtualization. In the case of servers, analogues of virtual machines are also created - virtual servers.
There are several common virtualization technologies. The most common are OpenVZ, KVM, Xen. Roughly speaking, Xen and KVM create their own “hardware imitation”, their own OS, etc. for each virtual machine. In the case of OpenVZ, a common OS kernel is used, as a result of which some functions (for example, making changes to the OS kernel) become unavailable, or they can be enabled or disabled only for all VPS at once. VPS on Xen and KVM are, as a rule, more stable in operation, but the difference is significant only for large projects for which server fault tolerance is critical.
VPS on OpenVZ is always cheaper, since one virtual server requires fewer resources. Due to the lower price, we will turn our attention to VPS based on OpenVZ.
Attention! Some hosting companies (companies that provide server rental services) deliberately block VPN operation on OpenVZ-based servers! Therefore, before renting such a server, you need to check with the support service (with a good hosting they should respond within 15 minutes, maximum an hour) whether the VPN will work.
To work on a personal VPN server, a minimum configuration is enough - 256 MB of RAM and a 0.5-1 GHz processor. However, not all hosting providers provide VPS with 256 MB of RAM: many have a minimum tariff of 512 MB of RAM. Such a VPS will be more than enough for us.
What other criteria for choosing a VPS exist? As you already understand, Internet traffic will constantly “walk” from you to the VPS and back. Therefore, the main canals must have sufficient capacity in both directions. In other words, the speed of the Internet connection between your computer and the VPS must be sufficient to perform the tasks you require. For everyday comfortable work, 15 Mbit/s is enough, and if you are going to download torrents via VPN, then you may need all 100 Mbit/s. But! If you and the VPS are on the networks of different Internet providers (especially in different cities), it is unlikely that the backbone networks will “stretch” more than 70 Mbit/s within Russia (or your country) and more than 50 Mbit/s with servers in Europe.
Most hosting services require monthly payments. It is worth noting right away that the price range is very large with approximately the same quality. We will use services with an hourly rate: $0.007 per hour of our server’s work. Thus, if we use VPN for 2 hours every day, then we will pay about 30 rubles per month. Agree, this is not 350 rubles/month for a paid VPN service!
First of all, you need to go to the website and register:


Next, a page will open on which you need to provide your bank card details. Without this, the system will not work and will not allow you to take advantage of the bonus 10 dollars (more on this later). You can specify any data, the system will “eat” fake data.

In this case, an amount of several rubles may be blocked on your card, which will then be returned. Charges from your card will only be based on the fact of using the servers.
What to do if you don’t have a bank card? Get yourself one, it automatically gives you a virtual card, the balance of which is equal to the balance of your wallet. You can top up your wallet almost anywhere, see.

However, if you enter your Qiwi card details into DigitalOcean, the system will spit it out, citing the fact that DigitalOcean does not work with prepaid and virtual cards. In this case, you need to top up your balance by $5 via PayPal by paying with a Qiwi card.

After all this, on the same page in your DigitalOcean personal account, enter the promo code DROPLET10, which credits us with 10 dollars, which we can fully use on the servers without fear of additional charges from our card.

Ready! Now let's move on to creating a VPS. Watch the video tutorial:
When creating a server, choose Ubuntu OS version 14.04, and not any newer one, incl. do not select 16.04.
|
Server location |
Domain for ping |
|
|
Frankfurt, Germany |
http://speedtest-fra1.digitalocean.com/ |
speedtest-fra1.digitalocean.com |
|
Amsterdam 1, Netherlands |
http://speedtest-ams1.digitalocean.com/ |
speedtest-ams1.digitalocean.com |
|
Amsterdam-2 |
http://speedtest-ams2.digitalocean.com/ |
speedtest-ams2.digitalocean.com |
|
New York-1, USA |
http://speedtest-ny1.digitalocean.com/ |
speedtest-ny1.digitalocean.com |
|
New York-2 |
http://speedtest-ny2.digitalocean.com/ |
speedtest-ny2.digitalocean.com |
|
New York-3 |
http://speedtest-ny3.digitalocean.com/ |
speedtest-ny3.digitalocean.com |
|
San Francisco, USA |
http://speedtest-sfo1.digitalocean.com/ |
speedtest-sfo1.digitalocean.com |
|
London, Great Britain |
http://speedtest-lon1.digitalocean.com/ |
speedtest-lon1.digitalocean.com |
|
Singapore |
http://speedtest-sgp1.digitalocean.com/ |
Speedtest-sgp1.digitalocean.com |
Note. For most residents of Russia and the CIS countries, Amsterdam or Frankfurt will be suitable (ping to Frankfurt in most cases will be slightly less than to Amsterdam). I recommend that residents of the Russian Far East test Singapore and compare the performance with European servers.
The location of servers abroad will allow you to use a VPN to bypass government bans on visiting certain sites (if this is relevant to you).
DigitalOcean includes 1 terabyte (1024 GB) of traffic in the price (see). For most people this will be enough. Other hosting providers have formally unlimited traffic, but it becomes unprofitable for them once the threshold of 1-2 TB/month is reached.
That's it, we ordered VPS. Congratulations. Now it's time to move on to setting it up.
Step #2. Setting up a VPN.
Don't be intimidated, the process of setting up your own VPN is as easy as two-twos!
In the video tutorial above, we connected to our server using Putty. Now let's continue.
Copy and paste (by right-clicking the mouse, as we did in the video tutorial) the command:
Now copy and paste the following into the file editing window that opens:
Press Ctrl+O, then Enter.
Press Ctrl+X.
Copy and paste the command:
Enter 1 and press Enter. We wait. According to the system requests, enter the desired login and press Enter. Same with the password. For the questions “[Y]/[N]”, enter Y and press Enter. After completing the setup, our login and password and server IP address will be shown.
Ready! VPN is configured!
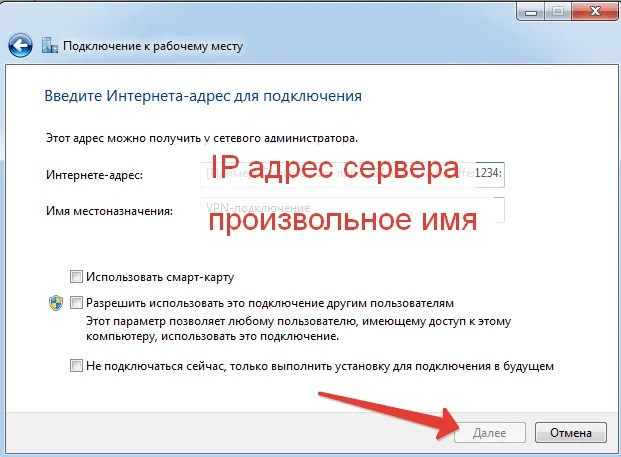
Now open the Windows Network and Sharing Center:
Select the settings for a new connection:

Select “Connect to a workplace”:


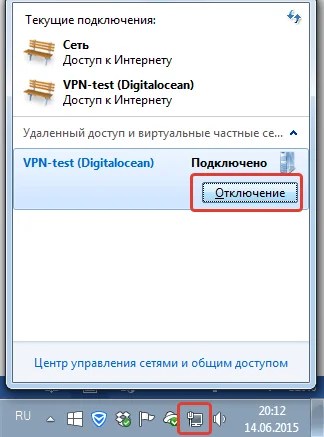
We're waiting a little. We now work via VPN! To make sure of this, go to and make sure that our IP address shown to us matches the IP address of our VPS.
Now attention! Through our DigitalOcean personal account, we can turn off our VPS (droplet in DigitalOcean terminology), however, even for a server in the off state, funds are written off at the standard rate. So we'll backup our server, delete it, and when we need the VPN again, we'll restore it from the backup!
Let's move on to server management (the DigitalOcean control panel is located at cloud.digitalocean.com, you can enter it through the Sign In button on the main page of digitalocean.com in the upper right corner).

We need to create a backup (snapshot) of our VPS. But to do this, you first need to turn it off.
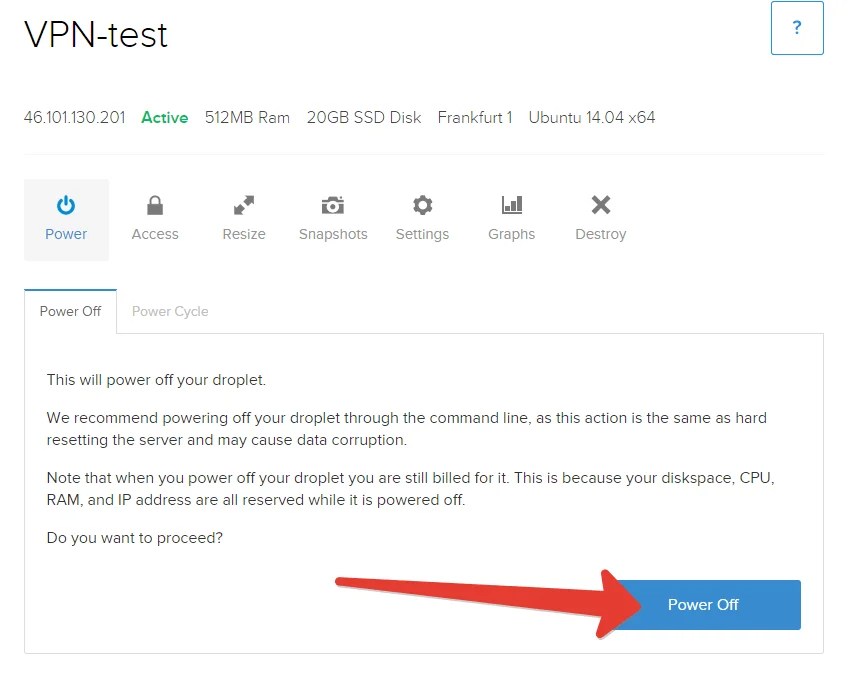
We wait about a minute until the server turns off. Then go to the Snapshots section, enter a custom name for the snapshot and create it:
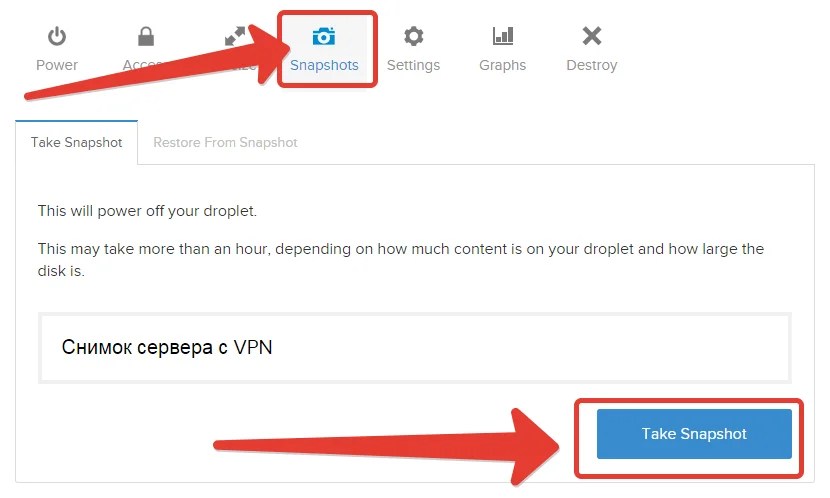
For each gigabyte of “weight” of our VPS, 2 cents will be charged when creating a snapshot. Creating a backup (snapshot) will take a few minutes.
Now we delete the server:

All! No more money will be deducted from us for anything.
What to do when you need a VPN again
We need to create a new VPS from the backup we made before.
Click “create droplet”:
Now, as before, enter any server name in Latin letters without spaces, select the first minimum tariff, the region must be the same, the same as the one in which we previously had a server.
Just below, click on the name of the photo we took (it was gray, but should turn blue):

...and click the big green “Create droplet” button.
We wait about a minute.
Let's see if the IP address of our server matches the previous one. If yes, then in Windows we simply resume the previously created connection:

If not, then right-click on the name of our connection and change the IP address to a new one:

Enter the new IP and click “OK”:

Attention! Now, to turn off the VPN, we don’t need to make a backup copy, we just delete the server right away, and next time we’ll restore everything from the old snapshot. It is not necessary to shut down the server before deleting. Just in case, this is the procedure in the screenshots:
We removed the VPS while not using the VPN. Now let’s restore it from the old snapshot:
Again we check whether the old IP is still there and continue working.
On the same server (or another one) you can raise your personal proxy, for example, to the 3proxy software base, but this is not the topic of this article.
Currently, in order to ensure communication between computers in the office, Virtual Private Network technology is actively used. allows not only to ensure reliable communication between corporate PCs, but also to provide all units of computer equipment with the best cryptographic protection. For this reason, you can be confident in the security of the transfer of corporate information, in the complete exclusion of third-party intrusion.
Setting up a VPN connection in different versions of Windows OS has differences.
It is very important to understand that setting up a VPN creates a new dedicated zone. All technical devices, including scanners, printers, will be visible to every user connected to the VPN. Every attempt by an outsider to penetrate the corporate network will be accompanied by absolute failure.
Of course, it is simply impossible for an ignorant user to connect Windows 7, 8, 10 to a VPN. First of all, it is very important to saturate yourself, first of all, with a sufficient portion of theoretical knowledge regarding the features of various operating systems.
If you have the slightest knowledge of computers, but are actively trying to figure out how to set up a VPN, we recommend that you familiarize yourself with our recommendations, and then, strictly following them, sequentially perform each step we have outlined. In this case, we can guarantee you a positive result.
To connect to the VPN network, first click on the “Start” shortcut located at the bottom right. When the secondary menu opens, select the Control Panel option.

After this, it is important for you to go to the network settings. To make such a transition, find the desired parameter. In this case, it all depends on what type of display you have previously selected. Even if you didn’t choose it yourself, it means that it was chosen independently by the operating system or by the person who originally installed Windows on your computer.
You can easily switch categories if you wish. This kind of switch is located at the top of the window on the left side.

So, if the “Browse by category” option is set there, look for the “Network and Internet” line and click on it. If the “Classic style display” option is selected, then it is important to find the line “Network and Sharing Center”.
So, after making these transitions, you will be able to seamlessly visualize the “Set up a new connection or network” sentence. Just click on it with the left mouse button, you will immediately go to a new page on which you will be asked to create a new connection to the network.

If you decide to connect your PC to a VPN network, then select the “Workplace Connection” offer, which is often fourth on the list. Next, you just have to strictly follow all the advice that appears, but also be sure to take into account some of the nuances that arise as a result of installing different versions of the operating system.
Connecting to a virtual network is carried out only after installing a kind of VPN server, which can perfectly serve as one of the corporate computers. It is this VPN server that will control access to all other computers included in the corporate network space you created.
Of course, Windows itself will not be able to perform the “magic” manipulations that provide you with a successful corporate network. In this case, your participation will be required, which involves making certain settings.
ADVICE. Of course, it is difficult to figure out how to set up a VPN on your own, so we recommend that you do not break through an impenetrable wall, but carefully study our recommendations on how to connect to a VPN server if different versions of the operating system are installed on your PC.
Settings in Windows XP
If Windows XP is installed on your computer, click on the “Start” button, find “Control Panel” in the list that opens, go to it. After performing these simple manipulations, a window will open, on the left side of which the “New Connection Wizard” will be located, activate it, just run it. In the new window that opens, in the second position there will be the parameter that we will need to use.
Click on the line “Connect to a network at your workplace”, and then go to the line “Connect to a virtual private network”.

Now the connection wizard will confidently guide you to your desired goal, only recommending that you enter some information. In particular, he will initially ask you to come up with and enter the name of the corporate network you are creating. Of course, no one limits the flight of fancy, so the name can be anything. Next, the connection wizard will ask you to register the server. If it was decided to use one of the computers as a server, then it is better to enter the IP address of this PC in this field.
At the final stage, the wizard will automatically create a shortcut to the corporate network space you created. It wouldn’t hurt to make some additional changes, so double-click on the shortcut that appears to bring up a dialog box in which all the necessary settings are made.

There will be four tabs in this dialog box, go to one of them “Security”, select “Advanced (Custom Settings)”. Next, all that remains is to carefully study all the proposals and choose the acceptable parameters for your corporate network.
Settings in Windows 8
If Windows 8 is installed on your PC, then the algorithm of actions will not just be different, but as automated as possible. Of course, if you own a PC with Windows 8, you may be relieved that everything will be so easy to implement, but this does not mean that you can ignore our recommendations. One wrong step and you won't be able to successfully connect between corporate computers.
At the bottom of the screen on the right side, in the part where the clock is located, you can easily find the network status icon; in appearance it resembles a monitor. Right-click on this shortcut. After this, a new window will open in which you will find the “Network and Sharing Center” option. After clicking on this option, a new shortcut “Create a new connection or network” will appear, click on it and confirm that your PC has a direct connection to the Internet.

The Connection Wizard will also ask you to enter a name for your environment, and will also prompt you to make changes to various options if necessary. In this case, you can make additional network security settings, including:
- data encryption;
- password verification protocol;
- access parameters.
You can contribute whatever you consider necessary. This completes setting up a VPN network in Windows 8.
Settings in Windows 7
If your computer comes with the Windows 7 or 10 operating system, then you are also somewhat lucky. Even if you are a beginner, but fearless user who took the risk of following the route we described in order to install a VPN network, we can rejoice in you that everything will certainly work out for you.
ADVICE. Connecting to a VPN network on a PC with Windows 7 or 10 is quite simple and fast; you just need to follow the prompts that appear on the screen. Once the connection is established, you also need to make some useful changes.
In Windows 7 and 10, there is a shortcut near the clock indicating the connection status to various networks. If you click on this shortcut with the left mouse button, a list of all connections that can be considered as a possible option for connecting to the Internet or a public network will immediately open.

Among this list you can find the name of your VPN network, select it, and immediately after that the “Connect” button will appear. By clicking on this button, you will have the opportunity to make some changes to the parameters.
Carefully read the security, login, and data encryption settings that Windows 10 offers in this case, and check the checkboxes next to the settings that are most important to you.
So, if you set out to connect several computers running Windows XP, 7, 8 and 10 to the corporate network, do not hold back your technical impulses. You can do everything if you carefully study the recommendations, and also make changes to the settings without undue haste, reading the suggestions of the network setup wizard more than once, but even 10 times, in order to understand why and what specific actions need to be taken.
Greetings! And straight to the point. What is a VPN server for? It is mainly used to change the IP address and your country in order to bypass various site blocking at work and at home. In addition, a VPN connection helps to encrypt the traffic and thus ensures the security of the transmitted data.
For example, using public Wi-Fi, all data transmitted through the network can be “hijacked”. Theoretically, these could be any files, but usually they steal passwords from wallets, mail, Skype, and anything else. In this article we will set up our own VPN server, it is not difficult. Despite the volume of the text, the main action takes up a small part, and the rest is buns :) The article also contains a video.
There are a lot of small ones on the Internet, from free to very paid ones. Disadvantages of free VPN services:
- limited in speed
- instability (everything is fine, then it’s terribly slow)
- traffic restrictions (up to several Gigabytes per month)
- Free period restrictions
- periodically you need to look for other services
- It’s not a fact that the transmitted data will be safe; you shouldn’t hope for anonymity at all, I would say.
Disadvantages of paid ones:
- the desired country or city is not always available
- hackneyed IP addresses (used by hundreds of clients), also applies to free ones
- there is simply a scam without a refund, for example, the traffic is not unlimited, some servers do not work or are too slow
There are also advantages of VPN services - ease of use and relative cheapness.
Own VPN server on VPS/VDS hosting
So, if you need a specific country or city, or you need a lot of traffic that VPN services do not provide, or a guarantee of security, then it makes sense to bother setting up a personal VPN server. Typically, this requires in-depth knowledge of server system administration. But I tried to explain everything simply so that even a teapot could understand it)
This method also has disadvantages:
- there is only one IP address to which you can “transfer”, but there are additional ones for a fee
- non-trivial setup for the first time
- paid
Read to the end, and I will show you how to use your VPS server to bypass blocks without setting up a VPN on it.
What is a VPS/VDS server?
There are countless hosting providers on the Internet. All of them allow you to host your websites with them. The most popular service is virtual hosting. A more advanced one is a dedicated virtual server - VPS (VDS is the same thing). On a VPS you can host websites, set up a VPN server, mail server, game server - whatever!
You need to know that VPS servers come in several types: OpenVZ, Xen and KVM. For the VPN server to work you need KVM. The server type is indicated in the hosting plans. OpenVZ and Xen are also sometimes suitable, but you need to write to the hosting technical support and ask if the “TUN” module is connected. Without going into details about what it is for, just asking. If not, can they enable it. It also doesn't hurt to ask if the VPN itself will work (even on KVM), because... some companies cover this possibility. Oh yes, the server operating system is Debian, Ubuntu or CentOS (in general, Linux-like). Server power doesn't matter.
Setting up a VPN server
I have a KVM VPS server at my disposal. Everything works here right away, you don’t need to write anywhere.
- When ordering a service, you can choose the simplest tariff plan “Micro”
- All sites open even on servers in Russia
- There is a free trial period of 7 days
- Technical support helps
- For my visitors, when you enter the promotional code: itlike60 - you will receive a real 60% discount on your first payment.
“Hostname” enter any or the name of your site (if you will in the future). “OS Template” select “Ubuntu 14.04 64bit” or any of Ubuntu, Debian, CentOS:

The operating system can then be changed if suddenly something does not work out.
After payment, you will receive an email with login details for the control panel and a Root password for setting up the server. And also the IP address of the server, and this will be your IP address when we install a VPN and connect to it from a computer


Click the “Manage” button and get into the administration window:

We don't need to touch anything here. The only thing that may be needed is to reinstall the operating system - the “Reinstall” button, more on that later.
Now we need to connect to the server to send commands to it. To do this, we will use the free Putty program.
Unpack the archive with the program and run the file putty.org.ru\PuTTY PORTABLE\ PuTTY_portable.exe
In the “Host Name” field we paste the IP address of the server that came in the letter, you can also copy it from the control panel:

and click “Connect”. If a window like this pops up, then click “Yes”:

A black console window (command line) should appear in front of us. This is where we will give commands. But first you need to log in. To do this, enter “root” in the “login” field

Then copy the root password from the letter and paste it into the “password” field. To paste here from the clipboard, you just need to right-click once on the console window. However, the password is not printed on the screen, it feels like nothing happened. Everything is fine, press “Enter”. Lines with information about the system should appear. If you wrote some error, check it again. Also, the console will not wait long while you look for the root password. If by that time an error occurs, then launch Putty again.
Installing and running the main script
We are already at the finish line in setting up our own VPN server. There are many instructions on the Internet on how to install a server, but they all require the knowledge of a system administrator, because small nuances are overlooked. To the delight of all dummies, there is a universal script “OpenVPN road warrior” that will do all the work itself. We only need to give the command to download and run it.
So, copy this line and paste it into the console window with the right button and press “Enter”: wget https://git.io/vpn -O openvpn-install.sh && bash openvpn-install.sh

All sorts of lines will flash through and, if the script has been successfully downloaded and launched, a dialogue with us will begin with the VPN server setup wizard:

The script finds the expected value for each parameter and offers to agree with it, i.e. Press “Enter” or enter your value.
- The first parameter is "IP address". The script should offer the same IP of the VPS server. This should be the case in 99.9% of cases, but if for some reason this is not the case, then correct it to the correct address.
- Second - protocol UDP or TCP. Leave the default UDP.
- Go ahead, "Port: 1194"- we agree.
- "What DNS do you want to use with the VPN?"— select “Google”, i.e. Enter the number “2” instead of one, Enter. If Google is blocked, then we leave it as default.
- "Client name"- Username. You can create access for different users. By default “client” - we agree.
- "Press any key..."— press “Enter” and wait a few minutes until everything is installed and configured.
In general, the creation of a VPN server is now complete, it’s time to reap the benefits. During the installation process, the script created a file with settings for our computer. In order for us to use the server, this file must be downloaded. To do this, insert into the command line: cat ~/client.ovpn

The contents of the “client.ovpn” file will be displayed on the screen. Now you need to carefully copy it to the clipboard. Scroll up until you enter the command, select with the mouse all the lines except the very last one (for new commands), i.e. the last highlighted line will be “ " To copy the selection to the clipboard, press “Ctrl-V”.
Now on a computer in Windows 7/8/10, open Notepad and paste the copied text into it. Save the file on your desktop under the name “client.ovpn”.
If you plan to give access to the server to other people, then it is better to create separate files for them, for example vasya.ovpn. To do this, simply run the script again and now select the 1st item - creating a new user.
Client installation for Windows 7/8/10/XP and Android
Congratulations, we are at the finish line! Now all that remains is to install a free program that will connect to our VPN server. It's called "OpenVPN".
Download the version for Windows and install it, no need to run it.

If during the installation process all sorts of windows pop up, we agree with everything.
To connect to the server, right-click on the “client.ovpn” file on the desktop and select “Start OpenVPN on this config file”:

A black window will appear indicating the connection initialization process. If everything went well, then the last line should be something like:

A window may also pop up asking you what type of new network to use, then select “Public Network”.
You can check, go to the website 2ip.ru and look at your IP, it must match the IP of the VPS server:

The server console window can now be safely closed. And to close the VPN connection and return the old IP, you need to close the OpenVPN window.
To connect next time, just right-click the “client.ovpn” file from the desktop; you don’t need to do anything else.
With phone It’s even simpler, you need to install the OpenVPN application through the playmarket, download the client.ovpn file into memory, select it in the application and connect to our VPN server.
What if something went wrong
If you feel that because of your mistake, everything is now going wrong, then you can reinstall the operating system on the hosting. To do this, click “Reinstall” in the control panel (see screenshot of the panel) and select a new operating system (or the same one):

Press the “Reinstall” button and wait 10 minutes. A new Root password will also be issued, do not lose it!

Connection errors
Most problems arise at the stage of connecting to the server in the OpenVPN program, especially in Windows 8/10. The black window may contain errors, for example:
- FlushIpNetTable failed on interface
- All TAP-Win32 adapters on this system are currently in use
- CreateFile failed on TAP device
- DNS failed..
In this case, the first thing to do is to give the program administrator rights and, accordingly, log into the system with administrator rights. Let's go to "C:\Program Files\OpenVPN\bin\", right-click on the file openvpn.exe -> properties. On the “Compatibility” tab, check the “Run this program as an administrator” checkbox. Now everything should work.
More treatment options:
- remove the program and reinstall as administrator
- disable the “Routing and Remote Access” service via “Control Panel -> Administration -> Services”
- try reinstalling from or here
- remove all VPN programs and gadgets from other paid and free services
You can find out whether the problem is with your computer or laptop if you install the OpenVPN application on your phone or tablet through the play market, upload the client.ovpn file to it and connect to our VPN server. If this doesn’t work, then you need to look for the reason on the server and write to support.
If everything works, the sites are stuck and open intermittently
Pay attention to the messages in the black window to see if there are repeated lines “read from TUN/TAP ... (code=234)”

and also to the message somewhere in the middle “WARNING: ‘tun-mtu’ is used inconsistently, local...”:
In this case, open the client.ovpn file in Notepad and in the new very first line write:
tun-mtu ‘server value’
server value is the number indicated at the end of the line in the text “remote=’tun-mtu 1500′”. Substitute your meaning! In the end it should look like this:

This is done because for some reason the MTU value on the computer and on the VPS server are different. We leave the .ovpn file for the smartphone untouched!
We allow traffic through a proxy without any settings at all
You can use our VPS/VDS server as a Proxy Server. To do this, we do everything as before until we click the “Connect” button in the Putty program. There is no need to open the console and run the script. Go to the “SSH->Tunnel” tab, set Source Port: 3128

Oops, I finished the article later, here I have Putty in English, but the essence is the same.
If it writes the error “You need to specify a destination address in the form host.name:port”, then switch to “Dynamic” instead of “Local”.
On the “Connection” tab, in the “Seconds between keepalives...” field, set it to 100 seconds, this is necessary so that the connection does not break due to downtime. Now let’s connect - click “Open” and enter your login/password. Next, go to the network settings in the browser and register the proxy server there. In chrome it's “Settings->Search for settings->write ‘proxy’->Proxy server settings.” We do everything as in the screenshot:

Now all sites will work through our server, but only in the browser and some programs. Other programs will not see the proxy and will work directly. In each program, in the connection settings, if provided, you need to specify the address, port and proxy type: Socks4/5. Or install OpenVPN and don't use a proxy.
How to allow only certain sites through a proxy
Install the extension for Google Chrome or Mozilla Firefox, called . In the settings you need to add our proxy server:


On the “URL Patterns” tab we add masks for sites that should be opened through our server. The site mask is its name with asterisks on the sides.

That's it, now the added site will go through a proxy, and all others will go directly. If you click on the extension icon, you can choose to allow all sites through it or none at all.
Shortcut for automatic connection
You can connect Putty to a proxy with one click. To do this, before connecting, you need to enter the server login in the “Connection->Data” section, the one that usually root


Now you need to create a shortcut on the desktop in which you specify the following parameters:

“C:\Program Files\PuTTY\putty.exe” -load myvpn -pw server_password
Where myvpn is the name of the saved session. That's it, there is only one detail left - remove the Putty window from the taskbar to the system tray. You need to download a modification of the utility and replace the exe file. Now in the settings tab Behavior a corresponding check mark will appear, but you don’t have to do this.
A VPN service increases user privacy on the Internet by increasing the security of connections, which is especially important for insecure public networks. In addition, a VPN makes it difficult for online trackers to track user activity and allows you to visit sites that have regional restrictions.
Requirements: Opera web browser 40 or higher. Make sure you disable other proxy services before using VPN in Opera.
- In your browser, press Alt+P or go to Opera menu > Settings.
- Choose a section More > Security Enable VPN.

The "Bypass VPN in search engines by default" option will be enabled by default. You can disable it if you want to use VPN also in search engines Google, Yandex, etc.
- VPN.

How to set up an Opera VPN connection on MacOS
- In your browser, press the keyboard shortcut Command + , or go to Opera menu > Settings.
- Choose a section More > Security and in the VPN section make the switch active Enable VPN.
- A button should appear in your browser's address bar VPN.
- Click the icon to select a server location or view the amount of data used. When the VPN is active, the button will be blue.
Selecting VPN server location
Opera 55 supports locations divided into regions: Europe, Asia and the USA. You can use the "Optimal location" mode to select the optimal server for performance.


