Cloning a hard drive to a smaller drive. How to clone to a smaller hard drive? Why clone a hard drive?
Often, users of computers and laptops have a situation where the old hard drive must be replaced with a new one, faster or with greater capacity. Therefore, there is a need to copy existing information from one disk to another. Then it becomes relevant to simply clone the old hard drive.
Computer hard drive
Hard drive cloning
The process of cloning a hard drive is an operation in which all data from one hard drive is transferred to another. Since cloning a hard drive is a procedure for low-level sector-by-sector data transfer from one storage medium to another storage medium, the clone hard drive will be completely identical to the original hard drive.
In this case, transferring all user files, personal photos, films, documents may take you a lot of time. It is also worth knowing that if you transfer operating system files manually, then it will not be copied to the new hard drive in working condition, that is, you will need to go through the installation process again. The cloning process allows you to copy the partition structure of your hard drive, a working active operating system, as well as installed programs and saved settings.
Hard drive cloning
Hard drive cloning programs
In order to quickly and efficiently copy all data from one hard drive to another, while keeping the operating system in working condition so that after copying it can be easily launched, you should use special programs for cloning hard drives.
Quite a lot of programs, both free and paid, have been developed for the purpose of creating clone disks. Among this variety of software, there are highly specialized programs that work only with hard drives of a certain brand, but there are also universal programs that allow you to clone any HDD and SSD drives.
Programs that include the hard drive cloning function include Paragon Hard Disk Manager, Acronis True Image, AOMEI Backupper, EASEUS Disk Copy, etc. But the most popular program among users is Acronis True Image.
Acronis True Image program
Acronis True Image program
True Image is a modern software product from Acronis. It is compatible not only with older versions of Windows such as Windows XP and 7, but also with the new OS Windows 8, 10. Acronis True Image can be called a panacea for all problems with Windows because, in addition to the cloning function, the program has a lot of additional advantages such as:
- creating Windows backups;
- it acts as a system cleaning tool;
- allows you to test Windows in trial mode with the ability to undo changes made;
- saves backups in cloud storage;
- disaster data recovery.
In addition, when cloning a hard drive using Acronis True Image, it is possible to exclude individual unnecessary files. At the user's request, you can configure cloning not only the entire disk, but also individual files or partitions. Other programs do not offer this option. This program is not only multifunctional, it also has high operating speed, a convenient interface in Russian, automatic and manual operating modes.
Acronis True Image 2016 program interface
The disadvantages of Acronis True Image include only a paid license. It can be purchased on the official website of the developer. But, despite this, Acronis True Image remains the most popular program for cloning hard drives.
Features of Acronis True Image terminology
Before cloning disks, you need to familiarize yourself with some features of the Acronis True Image software package. So, in the process of preparing to clone a hard drive, you will come across the concepts of “source” and “destination” disks. The source disk in Acronis True Image is the disk from which important data is transferred, that is, this is the disk from which the clone is created. The target drive in this program is considered to be a hard drive that will become a clone of the source drive, that is, a drive to which user data, system files and software are transferred.
Identification of hard drives in Acronis True Image
When cloning a hard drive with Acronis True Image, the disk discrepancy in size is not critical. With the ability to exclude unnecessary files from the cloning process, the target drive can be much smaller in size than the source drive. The main thing is that there is enough free space for the necessary information from the source disk.
Cloning a hard drive with Acronis True Image
Let's look at the process of cloning a hard drive using the Acronis True Image 2016 version as an example. To do this, follow the instructions below step by step.
Step 1. Launch the program, this version prompts you to log in to your account to use Acronis cloud storage, you can close the login window.
Logging into cloud storage Identification of hard drives in Acronis
Step 2. In the side ribbon of the interface, select the “Tools” tab, then in the menu that opens, select the “Clone disk” item.
Acronis True Image interface
Step 3. Follow the prompts of the Disk Cloning Wizard, at the point where you need to select the cloning mode, click “Automatic”. It is always selected by default as a preset mode, click on the “Next” button.
Selecting a cloning mode in the Disk Clone Wizard
Step 4. After this, a window for selecting the source hard drive opens in front of you. In this window, you need to left-click on the disk from which we will transfer data. Disk names in Acronis True Image differ from disk names in the built-in Windows utility. In this case, it is better to navigate by the volume or model of the disk. Having selected the hard drive to transfer data, click the “Next” button.
Selecting the source hard drive
Step 5. In the window for selecting the target disk that opens, left-click on the name of the hard disk to which you want to transfer the data, Windows OS and partition structure. Click on the “Next” button.
Selecting the target hard drive
Step 6. Since in this case the target disk is not a new disk with unallocated space with information stored on it, the program displays a warning window with information about the possible loss of important data. If all the most necessary files have been saved, you can click on the “Ok” button.
Acronis True Image warning window
Step 7. After this, a window for selecting a recovery method opens. By default, the “Copy partitions without changes” checkbox is checked; you do not need to change this setting, just click “Next”.
Selecting a recovery method
Step 8. The Disk Clone Wizard enters the final stage of the data transfer process and displays the Summary Window. This window allows you to start cloning your hard drive by clicking the “Proceed” button, but this is relevant if there are no files that need to be excluded, so as not to take up space on the target disk with unnecessary data and not increase the time required to complete this procedure. If you chose the method of cloning the source disk not in full, then click on the “Exclude files” button.
Summary window in the Disk Clone Wizard
Step. 9. In the File Exceptions menu that opens, we see a tree structure of the entire contents of the hard drive. Thanks to this structure, system files that cannot be excluded are immediately visible. In our example, we exclude non-system video files from section E by checking the appropriate boxes next to their names. You need to wait a little while for the process of excluding these files to complete.
File exclusion window in Disk Clone Wizard
Step 10. We exclude partition F of the source disk in its entirety by checking the box next to its name, and all included files and folders are then selected automatically. After the cloning operation is completed, this partition will be created on the target disk, but will not contain any data. When all partitions and files that we do not need on the target disk are excluded from cloning, we can start the whole process by clicking on the “Proceed” button.
Excluding source hard drive partition when cloning
Step 11. After all the preparatory steps have been completed, Acronis True Image will ask you to reboot the system. And it carries out the cloning process in preload mode of the Windows operating system. In Acronis True Image preboot mode, you can see the default function of shutting down the computer immediately after the cloning process is completed.
Cloning is carried out in Windows preboot mode
The next time you turn on the computer, you will be taken directly to the BIOS menu, where you can set the priority of loading the operating system from the created clone disk. In addition, this window shows the remaining time until the end of cloning and the progress of the task.
Hard drive cloning progress window
Step 12: Once cloning is complete, you can boot from the target drive.
Selecting boot from target disk
Transfer your desktop to another drive in Windows 7, 8, 10
Copying the desktop along with shortcuts and files to a non-system drive is a very beneficial solution from all sides. After all, this will not only preserve the previous appearance of your desktop after reinstalling the operating system, but will also allow you to save it in the event of a sudden system failure resulting in the inoperability of your OS. In addition, there is much more free space on the system disk for your documents. When a computer is infected with malware, the damage most often occurs to the system partition, and since the desktop directory will no longer be on the system drive, it will be completely protected from this type of sabotage.
In order to copy the “Desktop” folder in such major operating systems as Windows 7, 8 and 10, there are two ways - through Windows Explorer and using the Windows Registry Editor.
Windows desktop
Copying desktop in Windows 7, 8, 10 via Explorer
In order to copy the desktop with all the files and folders it contains to a non-system local drive, you need to follow the instructions below step by step.
Step 1. Create a folder to store data from the desktop on a local drive with user data (in our case, drive D).
Creating a new folder on drive D to store desktop data
Step 2. Then open the user's folder. In Windows 7, click on the “Start” button and in the left column, select the user name and left-click on it. For Windows 7 OS users, follow the path Drive C:\Users\*username*. A package opens with the following data.
Opening the folder of the user whose desktop you want to move to another drive
User folder on drive C
Step 3. Right-click on the “Desktop” folder and thereby open the folder properties.
Calling the context menu of the Desktop folder
View of the Desktop Folder Options window
Step 4. Left-click on the “Location” tab and then click “Move” in this tab.
Folder Location tab Desktop
Step 5. Find and select the “Desktop” folder that we created in step 1 and click on the “Select folder” button.
Selecting a folder to move the desktop
Applying the changes made
Step 7. In the dialog box that opens, agree to transfer the “Desktop” folder to another local drive by clicking the “Yes” button. Next, a progress window for moving the desktop appears.
Dialog box that pops up when moving a desktop to another drive
Progress window for copying desktop to disk D
Step 8. All files and folders have been successfully copied to local drive D. For the changes to take effect, you need to completely restart the computer.
All desktop files and folders were successfully transferred to local drive D
Video tutorial on transferring a desktop to another drive
Copying the desktop in Windows 7, 8, 10 using the Registry Editor
Transferring your desktop using the Windows Registry Editor in any version of the operating system is much easier to do than through Windows Explorer. To this end, we perform the following steps.
Step 1. To open the registry editor, press the Win+R keys on the keyboard at the same time, and in the command line that appears, enter “regedit” without quotes. Next, click “Ok”.
Calling the Registry Editor in Windows
Step 2. Go sequentially along the path HKEY_CURRENT_USER\Software\Microsoft\Windows\CurrentVersion\Explorer\Shell Folders. You need to find the Desktop parameter in the displayed list.
Registry Editor window in Windows
Step 3. Double-click the left mouse button to open the parameter and change the path in the “Value” line, directing it to the folder in which we plan to save the desktop data. Click on the “Ok” button below.
Changing the desktop path
Step 4. Reboot your computer or laptop for the changes to take effect.
This is how you can quite easily copy your desktop along with all the files stored on it to another partition of your hard drive.
Transferring operating system memory from HDD to SSD
Copying operating system memory from a hard drive to an SSD creates an exact image of the system partition on the SSD. This action is performed to increase the performance of the operating system.
After transferring memory from HDD to SSD, loading the operating system when you turn on your computer or laptop will last only 10-15 seconds.
SSD vs HDD
Benefits of rewriting OS memory to SSD
Transferring operating system memory from a hard drive to solid-state drives has a number of advantages:
- During operation, a lot of operations are performed to read information from the system partition of the hard drive against the background of a small number of operations to write information to the disk; in this case, it is the SSD that provides the fastest process of reading data from the disk;
- the amount of information stored on the system disk is usually small and can rarely be changed significantly, so for ordinary computer or laptop users, a solid-state drive with a capacity of about 20 GB will be sufficient, and only in quite rare cases an SSD with a capacity of more than 30-40 GB may be needed;
Internal SSD and HDD device
Copying operating system memory from HDD to SSD with third-party programs
To transfer OS memory to SSD, special programs are also used. Such programs include Acronis True Image, Clonezilla Live, Paragon Migrate OS to SSD, Handy Backup Professional. They already have built-in functions for creating an image of the operating system and cloning it to another medium. It is worth remembering that the volume of the solid-state drive must be no less than the volume of the system partition on the hard drive.
Paragon Migrate OS to SSD program
Conclusion
Above, we examined in detail how to clone a hard drive using the Acronis True Image program for Windows 7, 8, 10. We found out various ways to transfer a desktop to another local drive on a computer. We learned about options for transferring operating system memory from an HDD to an SSD.
In addition, we looked at programs designed specifically for cloning hard drives and copying data from OS system files. Among the proposed methods, the choice of the best option is up to the user.
With solid state hard drives (SSD) being smaller in size than older mechanical hard drives (HDD), it can be difficult to clone the drive. Especially with manufacturers having recovery partitions this can make this more difficult. I came across software that can only clone hard drives of the same size or smaller. There are several software that can clone to smaller hard drives.
Important Note: If the size of your data on your old hard drive is larger than the total size of your new hard drive, then you will have to delete some data.
In order to clone a hard drive from a larger HDD to a smaller HDD (e.g. SSD), you will need 2 Peices of software:
- Markup Software
- Cloning software (which supports cloning from large HDD to small HDD).
Partition Master Free
Partition Master free PEACE is a free partitioning utility. This program is easy to use and allows you to do most of the tasks needed with the volume of hard drives and partitions. Partion Wizard works for free only with basic disks. This allows you to change the size, movement, merge and separate partitions. It supports MBR, GPT and RAID disks. The software can be installed on XP, 7, 8 and 8.1. It runs on both 32-bit and 64-bit platforms. If you have a dynamic disk, then you will need to download the trial version of Partition Master Professional. Checking the disk type (basic or dynamic) can be done in disk management by running diskmgmt.msc from Windows Search.
Disk Copy Home
Disk Copy Home REST is a disk or partition cloning tool. This allows sector-level cloning which ensures that the destination hard drive is exactly the same as the original. Disk Copy Home only allows cloning of basic disks. Disk Copy Home starts at system boot and requires a USB drive. Disk Copy Home is free software. If you require cloning dynamic disks, then Todo Backup Workstation is the . Todo Backup Workstation is not free, but there is a trial available. Downloading Disk Copy at Home or a trial version of Todo Backup Workstation requires leaving your email and a link to download the file emailed to you.
Steps to clone a larger hard drive to a smaller hard drive
- Remove all unnessary data from the source hard drive
- Make sure the source hard drive data is smaller than the target hard drive size
- Use Partition Master Free or Professional. Heat shrink sections with the required dimensions. Additionally, any partitions you want to keep should be placed at the beginning of the disk by dragging parttions. When you're ready, click on apply and the software will perform the tasks you just installed.

- Now you are ready for cloning. Use Disk Copy Home or Todo Backup Workstation. Please note the software clone will copy from the beginning of the disk. Otherwise, partitions at the end of the source disk that do not fit on the destination disk will be discarded.
Hello admin. I want to clone the Windows 8.1 operating system from a regular hard drive to an SSD in Acronis True Image 2015, I think this method is much simpler than all others, first I specified the Source disk, then the Destination disk and that’s it. The capacity of a 500 GB hard drive is naturally larger than the capacity of a 120 GB solid state drive, but in the cloning settings you can exclude unnecessary disks, folders, and even just files?
Of course, I can do everything myself, but I’m afraid, since I have little experience working with the Acronis True Image program, and I see that this is the only way you are “fiddling around” with it!
How to clone the Windows 7, 8, 8.1 operating system from a regular hard drive to an SSD solid-state drive (drive sizes vary) using Acronis True Image 2015
Hello friends! If you often work with Acronis True Image, you probably noticed that in the program settings there is an option called Cloning, and as our reader correctly noted, this option is very finely configurable.
As an example, I suggest you clone my Windows 8.1 from a regular 250 GB hard drive to a 120 GB SSD. A simple 250 GB hard drive is almost filled with files and naturally all the information from it will not physically fit on the SSD, but when cloning we can exclude unnecessary folders, files and even entire disks, as a result of the cloned information there will be exactly 120 GB of information, that is, as much as SSD capacity. But we need to do everything correctly, because the Windows 8.1 operating system cloned onto another hard drive should start for us!
First, let's connect the SSD solid-state drive to the system unit as a second device.
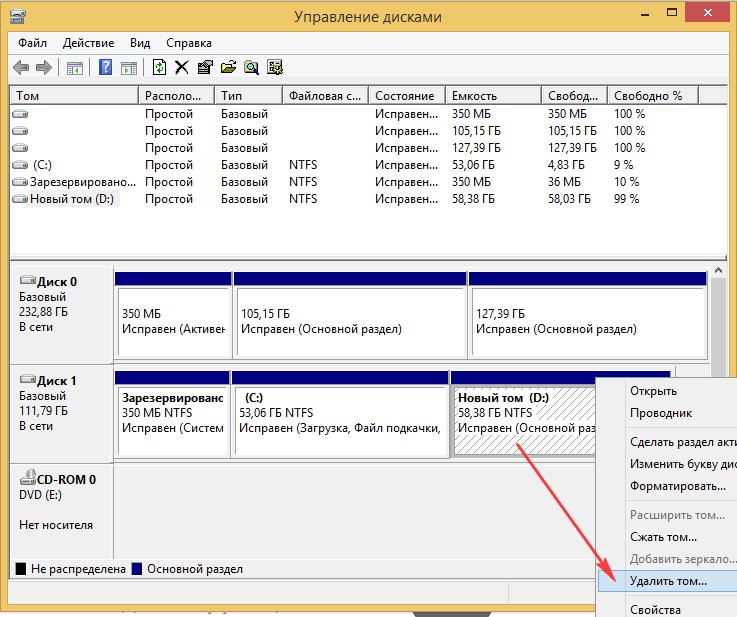
For the success of this serious operation, you must be well versed in Disk Management; pay attention to this window on my computer and you will immediately understand what’s what.
Disk 0
A simple SATA hard drive with a capacity of 250 GB.
1 . The first hidden section (we will clone) System Reserved, has a capacity of 350 MB. The main purpose of the hidden partition is to store Windows 8.1 download files. If you have Windows 7 installed, then this partition will be 100 MB in size.
2 . The second partition has the letter (C:) (we will clone) Volume 105 GB, Windows 8.1 operating system installed.
3 . The third section under the letter (E:) volume 127 GB, with data files: music, movies, etc., occupied by 100 GB. We can't clone this partition completely, we'll just exclude large files when cloning. Or we can completely exclude this partition from the cloning operation and instead, at the end of the process, an empty partition is formed on the SSD.

Disc 1. Solid state drive SSD, when cloning all information on it will be deleted
Acronis True Image 2015
For cloning, it is better to use the Acronis True Image 2015 boot disk, since this version works without errors with SSD solid-state drives and has UEFI support. It is better not to install Acronis True Image in Windows and work with the boot disk of this program, this way you will avoid many errors.
A bootable USB flash drive with Acronis True Image 2015 can be made in the program itself or using this article of ours .
So, we boot from a disk or flash drive with the Acronis True Image program. Who doesn’t know how to boot from a disk or flash drive, read our article - .
For example, I enter the boot menu of my computer with an ASUS motherboard, often pressing the Delete key when turning it on, then select “Boot Menu” and select the drive or flash drive from there.

In the main window of Acronis True Image 15, select
Tools and Utilities

Disk cloning


With the left mouse, select the Source disk (the disk from which you want to clone the Win 8.1 operating system), in our case a simple hard disk 3 MAXTOR STM 3250310AS and click Next.

Select with the left mouse the Target disk (the disk to which you want to clone the Win 8.1 operating system), in our case a solid-state drive SSD Silicon Power and Beyond

Acronis displays a warning "The selected target hard drive contains partitions on which data can be stored. Click OK to confirm deleting all partitions on the target hard drive." Click OK and Next.

Window Exclude by files and folders.
In this window, Acronis True Image 15 tells us that in order to clone information from the Source disk to the Target disk, we need to exclude 23.72 GB of files on the Source disk. You cannot exclude files from the first section (System Reserved) because it contains Windows 8.1 download files. It is also undesirable to excludefiles from the disk with Windows 8.1 installed. The drive with the Windows 8.1 operating system installed is assigned a letter (D:); if you click on it with the left mouse, the operating system files will open.


This means we will exclude files from disk (E:).
Attention : Friends, you can simply exclude this entire drive (E:) from cloning, as a result Disk C: will be cloned onto the solid-state drive.(System Reserved) containing download filesoperating systemand another drive (D:) containing Windows 8.1 files, but you can choose a more complicated option. Let's open the disk(E:) and select an unnecessary file or folder on it. For example, on this disk the virtual hard disk NewVirtualDisk1.vdi has been an eyesore for me for a long time, I haven’t needed it for a long time and its capacity is about 50 GB, let’s exclude it from cloning and mark this virtual disk with a tick. Program

As you can see, after excluding the file, we still have 30 GB of free space left. Click Next

If you click Proceed now, the cloning process will begin exactly as shown in this window.
Before - what is on the solid-state drive now and all of this will be deleted.
After - what will be on the SSD after cloning, that is, two small partitions.
I want to say that I personally do not need this state of affairs. I need a hidden partition on the SSD disk (Reserved by the system) containing the operating system boot files and another disk (D:) containing the files of Windows 8.1 itself

So I'll go back to the window Excluding files and mark the entire disk with a tick
(E:). Acronis True Image 15 starts recalculating the space for cloning.

Friends, pay attention to the disk (E:), it will be created early, since this is a drive cloning operation, but the disk (E:) will be completely empty. After cloning, we will simply delete it in Disk Management, and the resulting unallocated space will be attached to the C: drive, that’s all.
Get started. The cloning process begins.


The Disk Cloning operation has completed successfully.

We restart the computer and enter the boot menu, select the SSD solid-state drive to boot and boot from it.

Cloned Windows 8.1 boots perfectly. Activation from Windows did not work. We go to Disk Management and see this picture.
The drive letters have disappeared from partitions on a simple hard drive, but you can simply assign them and that’s it.
As intended during cloning, the SSD has three partitions. The first one contains the operating system boot files. Second drive C: with cloned Windows 8.1. Third disk D: completely empty.


We remove the D: drive and attach the unallocated space to the C: drive.


I would be glad if I could help.
Disk cloning, also known as disk imaging, is the practice of copying the entire contents of a hard drive or partition, including the file structure and system files, in order to move or restore the data on the drive. Cloned disks are often written to a single file, a disk image, that represents the entire disk. This disk image can be used for many purposes, including transferring data to a larger hard drive or restoring an unstable system with a blank disk image.
Libraries, schools and cyber cafes often restore their computers using a cloned disk image to easily manage and protect large numbers of machines. The practice of creating a disk image can create some problems, but many programs provide features to compensate for this.
When operating systems and backup copy the contents of a disk from one location to another, they often ignore some files, change the data in some way, or do not preserve all attributes of the files on the disk. In many cases this is actually useful for the user. When you back up a folder to an external hard drive, for example, the date and time the file was last modified may reflect the time of the last backup rather than when the original file was modified. When it is necessary to create an exact copy of a disk, many users may turn to disk cloning software.
Disk cloning software creates bit by bits to copy onto the disk, meaning every last piece of data is saved. The data can be written to a second disk or saved as a disk image file. The disk image file can be used to transfer data to one or more new hard drives, or to reinstall it onto the original drive. For example, an unstable system can be rolled back to the point where it is still functional using a cloned disk image.
Organizations with large numbers of computers can use disk cloning to deploy a standardized set of applications and data across different computers. They can also use this technique to apply updates and security patches to all their computers at once. For example, in libraries, schools and institutions, computers are often restored from a cloned disk image to destroy any viruses or other unwanted software that scanners might load. Disk cloning can also be used in conjunction with disk wiping, the practice of securely wiping the disk, removing any personal data, and returning the machine to its original state.
Creating exact duplicates of a hard drive can have disadvantages. Computers running Microsoft® Windows® are assigned a unique security identifier (SID) when they first install the operating system. Disk cloning will copy the computer's unique SID; if this cloned image is used on multiple computers on a network, security may be compromised. When cloning a disk, drivers for a specific set of hardware are also copied, which can cause problems when the target system has different settings. Some disk cloning applications provide features to overcome these problems, so potential customers should be sure to evaluate their own needs before purchasing such software.
You clearly can't clone larger partition into a smaller partition (using dd etc.) because there simply isn't enough space.
However, if the files that are on the larger partition will also fit on the smaller partition, you can use rsync to copy those files. The exact uses depend on your specific use case, but for a simple copy of all files the following should do the trick:
Rsync -av /mount/point/of/large/partition/ /mount/point/of/small/partition
Change: Again: you can't clone a large partition onto a smaller partition. (But read on, your problem may be solved yet.)
The reason is simple: your source partition is larger than your destination partition. What are you expecting? Should some blocks just be discarded? Which? And who knows? Of course, you can use dd "s bs= and count= options to copy only the first as many blocks of your source partition to match your destination partition, but you'll end up with a broken partition. That's certainly not what You want.
So since you can't clone larger partition to smaller partition, the only thing you can do is at first Shrink the source partition to a size less than or equal to the size of your destination partition, with something like gparted which knows the filesystem spec so you won't lose data. But only Then you could use dd to clone the partition. Ideally, the new size of the original partition should be equals the size of your target partition (not just less or equal), otherwise you will end up with some unallocated space on the target partition after cloning.
Please also note that you Not you should simply copy the MBR of the larger disk to the MBR of the smaller disk (or vice versa, for that matter). The MBR, which is 512 bytes in size and is the first section of your hard drive, contains information about the layout of the hard drive:
- 446 bytes – Bootstrap.
- 64 bytes – partition table.
- 2 bytes – Signature.
(Note that 446+64+2=512)
If you insist on cloning the MBR, then only cloning the first 446 bytes:
Dd if=/dev/source of=/tmp/mbr.bak bs=512 count=1 dd if=/tmp/mbr.bak of=/dev/target bs=446 count=1
... replacing /dev/source and /dev/target with the device names of the source and target hard drives, for example, /dev/sda and /dev/sdb , respectively. (More information is available here.)
However, the correct way to do this is to do a clean reinstall of Grub (or whatever is on your MBR) on a new hard drive.
To summarize, if you want to clone a larger drive to a smaller drive, proceed as follows:
Place the partition table on the destination disk with the same number of partitions as the source disk. There should be a one-to-one correspondence between the partitions on your source drive and the partitions on the destination drive, except that (some of) the partitions on the destination drive may be smaller than the corresponding partitions on the source drive. To do this, use a tool like fdisk or cfdisk.
For each partition on the destination disk that is smaller than the corresponding partition on the source disk, reduce the size of that corresponding partition on the source disk to match the size of the partition on the destination disk. Use a tool like gparted for this.
For each partition on the source disk, run the command
Dd if=/dev/sdaX of=/dev/sdbY
...clone the /dev/sdaX partition from the source disk to the corresponding /dev/sdbY partition on the destination disk (replace the device names, of course).
If you insist on cloning the MBR, use the two dd commands described above in this post (the ones for /tmp/mbr.bak). However, keep in mind that a clean refactoring of Grub will be better.
Exact cloning is not possible since Malte Skoruppa has already been published. However clonezilla can perform this task as long as the larger disk is not full (Malte mentioned this already).
Basically you need to enable advanced options and "ignore" the warning message about the smaller drive. See the Clonezilla docs with screenshots for details. I had the same problem when restoring a 160GB HDD backup to a 64GB SSD. It worked well for me.
Another solution that should be the result you want would be to restore to the same size drive and remake it to fit the new partition scheme on the smaller drive. See Jsm-techblog.blogspot.de for more details.
Gparted should do the job
After resizing with gparted, boot from disk to give the OS a chance to fix any errors before rendering with Clonezilla.
Then it launches Clonezilla and creates a copy of the required hard drive partitions
Another option that I found great for me: MondoRescure
Mondo Rescue is a GPL disaster recovery solution.
It supports tape, disk, network and CD/DVD as backup media, multiple file systems, LVM, software and hardware Raid.
A simple guide can be found here
I'll post some screenshots:
STEP 1 BACKUP (SCREENSHOT)
1.Select from a list of supported media types.
2.If you are backing up to CD/DVD-+R[W], then Mondo will ask you if your CD burner has BurnProof technology, is inside a laptop, or is eccentric. If you are backing up to a tape drive, you will not see this message
3.How much compression do you want? Not if the tape drive has built-in hardware compression. Maximum if your processor is fast. The average should be very good for most situations.
4.If you want to back up your entire computer (excluding /sys, /run and /proc, naturally, as well as /tmp), leave this as / by default. Otherwise, specify subsets (e.g. /usr/local|/home) that will be sure to fit between each path.
5.If you are backing up your entire computer, you may want to exclude some directories, such as /shared/MP3. Please specify them in the Exclude Directories dialog box. Please put a pipe between each path like /shared/private | /scratch | /nfs | /windows
6. Is your core normal? Users of Red Hat, Mandrake, SuSE, Debian and Slackware should generally say yes, because these vendors know how to build reliable kernels. If you're using Gentoo or LFS, your kernel may be non-standard, in which case say no to using Mondo's fault-tolerant kernel (provided separately).
7.If you want to check the archives after they are burned to media, say “yes” here. If you have absolute faith in your hardware and Linux distribution, say no... and a little prayer.
8.If you're sure you want to continue, say yes and find something else while Mondo supports your computer. If you say no, you will be unceremoniously dumped at the command prompt. 🙂
9. The backup process will now begin. There are some preliminary backup jobs that need to be done first, but the backup is mostly done. To make the backup process easier, you have been asked a series of questions. Next time, if you like, you can call mondoarchive with different command line switches to control its behavior rather than answering a series of questions. See the man page.
10.Mondo will create a directory of all files for backup. This may take up to five minutes. The list of files will be divided into sets, approximately 4 MB (before compression) of files per set. This usually takes one minute.
11.Mondo calls Mindy. Mindi creates images of a bootable media image and supporting data that are based on the existing Linux distribution and file system. So you can be sure that Mondo tools will be compatible with your existing file systems and binaries: Mondo tools are your tools. Mindy takes up to five minutes.
12. Finally, Mondo begins backing up your computer. This process could take a few minutes or a few hours, depending on how much data you're backing up, how fast your processor is, how much RAM you have, etc. It will copy your regular files and then your large files (files larger than 32 MB). If you decide to check your backups, Mondo will do that too.
STEP 2 RESTORATION (DEPARTMENT CODE)
1. Select the backup media type. The real-time restore process is very similar to what you will experience if you type mondorestore without parameters after booting from Mondo media.
2. Click "OK" when you have inserted the cassette/CD. If you created a tape backup, the tape itself should be sufficient. If you created a CD backup, the first CD should be sufficient. Otherwise, you may need bootable media.
3.Flag the files and directories you want to recover. Use the More and Less buttons to open and close subdirectories.
4. Specify the location to restore files. In general, "/" is appropriate. If you don't want to overwrite newer versions of the files you restore, specify /tmp/BKP or a similar recovery path.
5.Mondorestore will receive configuration information from the environment. (The sample screen is for tape users. CD users will see something different.)
6.Data will be restored to your hard drive - regular files first, and then any large (32 MB or more) files in the recovery set.
"Pseudo-cloning" a larger hard drive to a smaller one can be done using Clonezilla. Effectively, you can save and restore disk partitions. The following steps (designed for HDD to SSD transfer) will get you there:
- Once the SSD is installed on the target machine, the second trick is to use the partition manager again to create the required partition structure on the SSD.
- Clonezilla is then used to restore the saved partitions (using restoreparts) to the SSD.
The first trick is to use Gparted to resize partitions on your hard drive, shrinking each partition to reduce the amount of unused space it contains. Obviously, the partitions should be such that the total space required for all partitions is less than the capacity of the SSD.
Clonezilla then launches and creates a copy of the individual hard drive partitions (using the saveparts option), temporarily storing them on an external USB drive. Please note that you need to save the partitions (savepart) and not create an image of the entire disk (saved).
See Cloning a Hard Drive to a Smaller SSD for a more detailed discussion of the process and a number of links for reference sources.
Because most of the examples above seem to involve actually resizing your original drive. You are risking your data by changing it before making a copy if this happens.
There is another method that is less risky, although very manual, that I use. Because it leaves the original disk untouched if you want to fall back because something didn't work out.
Also, when cloning/recalibrating, you can switch to the new file system by moving to the new drive when you do the swap drive. In the below procedure, you need to create a file system of your choice on the target drive.
Install the new target drive on the side of the original drive on your computer.
- boot computer from ubuntu live cd.
- On the target disk. use gparted create: a ext4 (or whatever new fast filesystem you decide to switch to) (volumes, swap volumes and swap filesystem
- In gparted, set bootflag to the new volume
In my example, the source (source drive) is /dev/sda and the destination (new smaller drive) is /dev/sdb. It may be different in your setup
mount src as read only in /mnt/source
- mkdir/mnt/source; mount -o ro /dev/sda/mnt/souce
mount the destination disk at /mnt/destination
- mount /dev/sdb1/mnt/destination/
copy the src filesystem to the target filesystem with:
- rsync -log /mnt/destination/rsync-copy.log –progress -avr –exclude = /mnt/source/dev/ -A -H -X –numeric-ids /mnt/source/*/mnt/destination/
ubuntu uses uuid instead of device name to find and mount the disk, since we have a new disk we want to change the fstab assignment to use the new disks uuid to mount the disk
ls -la /dev/disk/by-uuid
now change uuid to / and replace /mnt/destination/etc/fstab. don't forget to change the file system for the mount point if you decide to change it to something other than the original disk
if it is important that grub be the same version, boot the original drive again and run and run the command below to install grub on the new drive
- grub-install /dev/dev/sdb
Now remove the source drive from your computer and boot into the destination drive. grub will not be able to fully boot and exit to the recovery shell in the grub recovery shell:
load some necessary grub modules - insmod ext2 - insmod linux lists your disk devices - ls
select the appropriate device (in my example it is hd0, msdos1)
- set root = (hd0, msdos1)
find the exact name vmlinuz-xxx and initrd-xxx to configure grub to use
-
see and use your own name for vmlinuz and initrd that you got from ls above and use those instead of the example version I use here below
initrd /boot/initd.img-2.6.32-5-amd64
- boot
linux /boot/vmlinuz-2.6.32-5-amd64 root = /dev/sda single
if /dev/sda is a device, the drive will be the rootfs drive the next time you reboot > a machine with only the dst drive
this should have booted the machine successfully. Finally, to update grub to use the new disk uuid, you don't have to repeat this procedure manually every time:
- update-larva
You can move your data to a smaller drive using Clonezilla and GParted.
Using a GParted Live CD shrinks your partitions to fit the new drive. Move the partitions so that the empty (gray) space is at the end/right of your drive. If there is empty space left before your first section, it may contain downloads or other hidden information.
Using Clonezilla does device-device cloning. Select advanced options and enable the -icds option to skip disk size checking. Continue with the clone, remove the old disk and try to boot from the new disk. If you are getting errors, try the -fsck-src-part option which will help you fix the errors on the source disk.
From the Clonezilla docs:
If you are confident that all the data from the image can fit on the smaller disk, meaning it won't be written to the wrong disk space, you can check the "-icds" option. Warning! To select this option, you must know what you are doing!
One of the FAQs I read suggested using both the -icds and -k1 options with Clonezilla, but that didn't work for me. Others have mentioned that you can copy partitions using GParted, but you can't copy all types of partitions, and I couldn't get my machine to boot after using this method, probably due to some hidden information between the partitions that are not copied.
This may not be the correct answer to the question, but I come to this page trying to solve a similar problem:
I wanted to clone an old 256 MB compact flash card into a 32 MB that was busted, the flash card contains a small Linux device that produces small spring coils.
It was decided like this:
(Of course, the effective space used in 256 MB was<32 Мб, поэтому оно хорошо вписывается)
create an image of a 256 MB flash card with "dd" (i.e. assume the card is installed in /dev/sdb):
Dd if=/dev/sdb of=image256.iso
Use unetbootin to read "image256.iso" ISO (Diskimage option).
Select the USB drive that has the 32MB card installed and move the image to the 32MB card.
That's it, the 32MB card successfully booted up my machine.
You can try to do this in two steps, first make a clone of the system into a sparse image (the image gets bigger when you add more things to it). Now restore this image to a second, smaller disk.
it can be done.. Using a live cd, just shrink the filesystem (resize2fs) than the lvm (if any) of the last partition (eg /dev/sdc3) from the large drive so it can fit on the small drive.
With fdisk removed and recreated with smaller sectors of the last partition (/dev/sda3), so the last sector of the large disk has the same value as the last sector of the small disk.
Than your #dd if=big=small bs=10M until free space runs out.
Taking special care when compressing from one bad value will cause dataloss.
After compressing the file system on the larger drive using GParted, I place the two drives in a RAID array in mirrored mode, with the larger drive as the source and the smaller drive as the target. I just need to press the reset button inside the case (don't change mode, i.e. Raid 1 to Raid 0) to start cloning. Great! 🙂 I used the GW3.5AX2-SU3/MB raid case.
I'm posting my experience shrinking the boot drive from 250gb (sda) to a 120gb drive (sdc)
sda contains 2 sections:
- sda1 -> /boot (ext3)
- sda2 -> lvm2: / (245gb) and swap (5gb)
so I do:
- dd sda mbr for sdc
- fdisk sdc and write the changes, so it creates a structure in sdc
- dd sda1 – sdc1
this is how my gparted does NOT work with lvm:
from the rescue disk:
- first umount VG/LV00
- e2fsck VG/LV00
- resize2fs/VG/LV00 xxxxxxxxK (I give 1gb more than used space)
- lvreduce -L xxxxxxxxxK VG / LV00 (I give 1gb more fs space)
- pvs -v –segments /dev/sda2 (to see segments)
- pvmove –alloc anywhere /dev/sda2: segment_min-segment_max (from the segments I saw "on the right" on the disk)
pvresize /dev/sda2 –setphysicalvolumesize xxxxxxxxxxxxK (I'm giving 1 gb more than this LV space) (I have an ERROR here... like this:
But still the partition was large since I was only shortening FS-LV-VG, so:
I'm recreating the partition using fdisk:
Fdisk /dev/sda d --> 2 n --> p --> 2 --> default --> (new reduced size!!!) w
the system will then prompt you to use the old partition table until the next reboot. But I forgot to reboot and make the image:
dd if=/dev/sda2 of=/dev/sdc2 bs=4096 (at this point I thought something would be wrong and I wouldn't be able to boot from sdc since the partition table doesn't reflect the end of the new sda2)
BUT everything was fine after the reboot, and even the system selects sdc partition to boot(it complains about duplication of PV, LV and /boot)
I don't know if they get lucky, or if I take unnecessary steps... any comment would be appreciated.
Disclaimer: I am the original author of WereSync
This is possible using WereSync. WereSync follows the general process of Malta's answer, but requires only one command rather than several. Also, if you use your clone as a backup, it can update that backup incrementally since it uses rsync.
To install WereSync, use pip:
Pip install weresync
From there you can simply use the WereSync command
Weresync -C -g 2 -E 1 /dev/sda /dev/sdb
The above command copies data from /dev/sda to /dev/sdb. The -C flag indicates that WereSync should check if the partitions on the two drives are equivalent, and if they are not WereSync, copy the partitions from /dev/sda to /dev/sdb and resize them so that they match each other. The UUIDs of new partitions will be different. The system used to test partition validity can be quite complex, so after the first backup I recommend leaving this flag off.
The -g and -E commands can be omitted, but installing the bootloader will almost certainly fail in this case.
G refers to the "grub partition", or a grub partition must be installed. This is usually the partition mounted to /. So if you have /dev/sda2 installed, you pass -g 2 to WereSync as in the example above. If this is omitted, WereSync will try to open its own partition on its own, but this is error prone. I recommend just passing the flag.
E refers to the EFI partition. If your EFI partition is /dev/sda1, pass -E 1 to WereSync as in the command above.
If you have a separate partition for the /boot folder, you will also need to know WereSync. If you have this on /dev/sda3, pass -B 3 to WereSync.
More information about the possible flags for this command can be found in the WearSync Command Documentation.
I came to this problem because Win 10 update to 1607 broke after reboot, caused by my NVMe (Samsung 950 Pro) not being recognized, so I cloned the NVMe to another (larger) internal drive (in my case "Toshiba" "), updated Win 10 and restored the system to NVMe.
Here are the steps I need to take to achieve this (since restoreparts with -icds doesn't work).
Tools:
- Windows 10 1607 DVD (bit depth and language depending on current OS)
- Clonezilla Live DVD (2.4.5+)
- or Clonezilla Live DVD (20160203-xenial+) as it can boot with UEFI set in BIOS
- (optional) GParted Live DVD (0.27.0-1)
Preparation:
- burn all instruments to CD/DVDs
- run Clonezilla and clone (image drive) NVMe to image (eg external drive)
The note:
If you were using Clonzila from the stable branch, you must change to Legacy boot mode in the BIOS to be able to boot from the CD. Otherwise, if you are booting from an alternate branch, it should support UEFI boot.
Denial of responsibility:
Follow the guidelines at your own responsibility. The steps and commands here are checked and double-checked, but typos can lead to data loss or hardware failures, so know what you're doing first and use these steps as pointers in the right direction.
Procedure:
- run Clonezilla and clone (disk for drive) NVMe on Toshiba (in my case another internal drive that I cleaned/backed up beforehand)
the first time I think I had some conflicts in Windows, NVMe still has Win boot information, so this time I immediately after the initial cloning in Toshiba (so before switching to UEFI boot) deleted all partitions on NVMe drive
~removal is easily done in the Clonezilla shell with:
sudo su dd if=/dev/zero of=/dev/nvme0n1 bs=512 count=1
~alternatively, boot into GParted and do it visually there
(switch to UEFI boot in BIOS)
- boot (Toshiba will be used)
- launch Win 10 1607, install the DVD and select Install, check the Download updates box and select Keep apps and data. This should upgrade your Toshiba to the latest Win 10.
- (switch to Legacy boot in BIOS) just in case, Toshiba backup to image (via Clonezilla)
- Win!
- (reinitialize Toshiba in disk management)
- (optional) backing up the upgraded NVMe drive (clone to image using Clonezilla)
since copying MBR didn't do anything for me, GPT is important in this story, so enter a shell (Clonezilla) and copy GPT from Toshiba to NVMe using
sudo su sgdisk /dev/sda -R /dev/nvme0n1 sgdisk -G /dev/nvme0n1
(explanation)
since Clonezila (even using Expert switch -icds) refuses to restore partitions, goes into the shell again and does:
partprobe #forces kernel to reload partition infos fdisk -l #shows all disks info dd if=/dev/sda1 of=/dev/nvme0n1p1 bs=64K status=progress dd if=/dev/sda2 of=/dev/nvme0n1p2 bs= 64K status=progress dd if=/dev/sda3 of=/dev/nvme0n1p3 bs=64K status=progress ...
(more details)
Toshiba MBR and GPT backup:
sgdisk --backup=sda.gpt /dev/sda
copy the backup to a safe location (so we can restore it and not the entire disk image we made in step 6)
mkdir /mnt/usb (put in usb flash or similar) mount /dev/sdb /mnt/usb cp sda.gpt /mnt/usb umount /dev/sdb
clear Toshiba partition information so it doesn't cause conflicts with Windows
dd if=/dev/zero of=/dev/sda bs=512 count=1
(switch to UEFI boot in BIOS) boot from Windows 10 (1607) DVD, select Repair > Troubleshoot > Command Prompt and do all of the following:
bootrec /fixboot bootrec /scanos bootrec /fixmbr bootrec /rebuildbcd exit
(more details)
reboot Windows 1607 to NVMe drive


