How to unload the price from 1s. Uploading data to Excel with setting different parameters
Configuration: 1c accounting
Configuration version: 3.0.44.177
Publication date: 20.01.2017
In the 1C: Accounting program, it became possible to regularly upload and download data from Excel spreadsheet documents, without the use of third-party processing and configuration changes. Loading and unloading is so easy that experienced users will quickly fall in love with this convenient mechanism, and new users will quickly master it.
Loading from Excel 1C: Accounting 8.3 ed. 3.0
For example, we have such an Excel spreadsheet document for loading a list of items and prices (retail and purchase).

Come in.

Press at the top Nomenclature and Prices - Download. This is where loading and unloading from spreadsheet documents is hidden.

The download supports xls(excel 97-2003 old format) and xlsx(new format), as well as mxl and ods formats. Now we select our file with the nomenclature and wait for the download.

The spreadsheet document has loaded in the form as we saw it in Excel, now we will assign the columns and remove the excess.

Click on Specify props and select the desired item from the list.

Select the line that has unnecessary entries, namely the table header and press Delete line.

Now we remove the column with the purchase price, note that processing is able to fill in only 1 type of price for 1n time!!! Then you can do this operation again and load the 2nd type of price, for the 1st load Retail for the 2nd purchase.

Fill in the blank data, Price type, Set prices for. The buttons All, Found, New, Duplicates will greatly facilitate the search and help to compare the nomenclature. Fill out and click Download after which the data will be loaded into 1C: Accounting.

New positions appeared in the item list, filled in and with assigned prices. If you need to load another price type, do all the steps again, but select a column with a different price, 1C will find the already created positions and will not try to duplicate them, but simply add a new price type.

As you can see, the download created 2 item price setting documents, for the Purchase price and for the Retail price. The difference between this processing Downloading from Excel to 1C: Accounting 8.3, The fact is that this is regular processing and it works without failures and taking into account all the features of filling out the document.
Uploading to Excel from 1C: Accounting 8.3 ed. 3.0
A very useful feature in version 3.0.44.177 and higher is uploading to Excel from 1C: Accounting 8.3, this processing will help you create a company price list or transfer your list of items to suppliers or buyers immediately with prices.
It's all there in the guide. Nomenclature - Nomenclature and Prices - Upload.

In point speakers, select those columns that need to be built in the Excel document. Selection serves for selection of nomenclature by Groups, properties, names... etc.

For uploading to excel, we will add a new column, namely the VAT rate, it seems not really necessary, but we are practicing.
Code 1C v 8.x // The procedure unloads data from the specified directory in export mode to a file in Microsoft Excel format
// with the specified name, using data conversion to number type and string type;
Procedure MainActionsFormsExport(Button)
Attempt
Attempt
// Load the Microsoft Excel object
Status("Uploading data from 1C to Microsoft Excel...");
ExcelApplication = New COMObject("Excel.Application");
Exception
Show("Error starting Microsoft Excel."
+ Symbols.PS + ErrorDescription(), MessageStatus.Attention);
Return;
End of Attempt;
// Create a book, by default it already has sheets
Book = ExcelApplication.WorkBooks.Add();
// Use the first sheet of the Excel workbook
Sheet = Book.WorkSheets(1);
// Form a document header in the first line of the sheet
column = 1;
For each page from the TP cycle
If pageUpload Then
Sheet.Cells(1, Column).Value = p.AttributeName;
Column = Column + 1;
EndIf;
EndCycle;
// Upload directory data
selection = Catalogs[DirectoryName].Select();
SheetString = 2;
While fetch.Next() Loop
column = 1;
For each page from the TP cycle
If pageUpload Then
Attempt
// Set value in row and column
If ValueType(selection[pageAttributeName])=Type("Number") Then
// Set format for Number type
Sheet.Cells(SheetRow, Column).NumberFormat = "0,00";
Format(selection[p.Attribute Name],"CH=0");
otherwise
// For all other types, set the format to "Text"
Sheet.Cells(SheetRow, Column).NumberFormat = "@";
Sheet.Cells(SheetRow, Column).Value =
String(selection[p.AttributeName]);
EndIf;
exception
// in case of an error, display the line and column number
Show("Error setting value for: " +
selection[p.Attribute Name]);
Report("Page: " + SheetLine + " Qty: " +
Column + "Rec: " + p.Name of Props);
End of Attempt;
Column = Column + 1;
EndIf;
EndCycle;
SheetString = SheetString + 1;
Status("Export from 1C to Excel" + SheetString);
EndCycle;
// Save the created book to an xls file
Book.SaveAs(Filename);
// Be sure to close the connection to the COM object to free memory
ExcelApplication.Quit();
Show("File uploaded successfully: " + Filename);
Exception
// Handling data export errors from 1C to Excel
alert("Error writing file data:" + filename);
Report(ErrorDescription());
Attempt
ExcelApplication.Quit();
Exception
End of Attempt;
End of Attempt;
EndProcedure
Code 1C v 7.x //The simplest example of output from 1C:Enterprise 7.7 in MS Excel. Ensuring that the workbook has a single sheet,
//setting the size, weight and color of the font, the width of the columns, frames and cell filling. Text alignment
// cells, grouping rows, setting the number format of cells, fixing the area.
Procedure Output()
Attempt
Application=CreateObject("Excel.Application");
Exception
Report(ErrorDescription(),"!!!");
Show("MS Excel may not be installed on this computer.");
Return;
End of Attempt;
//Create workbook
WorkBook=Application.WorkBooks.Add();
// Get the window
Window=WorkBook.Windows(1);
//Set window invisible to speed up output
Window.Visible=0;
//Ensure that the workbook has a single sheet
If WorkBook.Worksheets.Count=0 Then
WorkBook.Worksheets.Add();
Otherwise
Application.DisplayAlerts=0;//don't issue alerts
While WorkBook.Worksheets.Count>1 Loop
WorkBook.Worksheets(1).Delete();
EndCycle;
Application.DisplayAlerts=-1;//restore alert flag
EndIf;
//Get worksheet
Worksheet=WorkBook.Worksheets(1);
//Set worksheet name
Worksheet.Name="Example Output";
//Document title
Worksheet.Range("A1").Value="Example of output from 1C:Enterprise in MS Excel";!}
Worksheet.Range("A2").Value="today"+ТекущаяДата();!}
Worksheet.Range("A1:A2").Font.Size=14;//font size
Worksheet.Range("A1:A2").Font.Bold=-1;//bold font
//Set column widths
Worksheet.Columns(1).ColumnWidth=60;
Worksheet.Columns(2).ColumnWidth=15;
Worksheet.Columns(3).ColumnWidth=15;
//Document header
Worksheet.Range("A4").Value="First column";!}
For s=7 by 10 Loop//Frames
Worksheet.Range("A4").Borders(s).LineStyle=1;
Worksheet.Range("A4").Borders(s).Weight=-4138;//xlMedium
EndCycle;
Worksheet.Range("A4").Interior.ColorIndex=15;//grey fill
Worksheet.Range("A4").HorizontalAlignment=-4108;//center text alignment
Worksheet.Range("B4").Value="Second";!}
For s=7 by 10 Loop
Worksheet.Range("B4").Borders(s).LineStyle=1;
Worksheet.Range("B4").Borders(s).Weight=-4138;
EndCycle;
Worksheet.Range("B4").Interior.ColorIndex=15;
Worksheet.Range("B4").HorizontalAlignment=-4108;
Worksheet.Range("C4").Value="Third";!}
For s=7 by 10 Loop
Worksheet.Range("C4").Borders(s).LineStyle=1;
Worksheet.Range("C4").Borders(s).Weight=-4138;
EndCycle;
Worksheet.Range("C4").Interior.ColorIndex=15;
Worksheet.Range("C4").HorizontalAlignment=-4108;
//For grouping rows:
Worksheet.Outline.SummaryRow=0;//display "total" rows on top (if below, then 1)
//Output strings
Worksheet.Range("A5").Value="Analytics object";!}
Worksheet.Range("A5").Font.ColorIndex=5;//font color - blue
Worksheet.Range("B5").Value=123.45;
Worksheet.Range("B5").Font.ColorIndex=5;
Worksheet.Range("C5").Value=678.9;
Worksheet.Range("C5").Font.ColorIndex=5;
Worksheet.Range("A6").Value="Analytics object";!}
Worksheet.Range("A6").Font.ColorIndex=3;//font color - red
Worksheet.Range("B6").Value=123.45;
Worksheet.Range("B6").Font.ColorIndex=3;
Worksheet.Range("C6").Value=678.9;
Worksheet.Range("C6").Font.ColorIndex=3;
Worksheet.Range("A7").Value="Analytics object";!}
Worksheet.Range("B7").Value=123.45;
Worksheet.Range("C7").Value=678.9;
Worksheet.Range("A8").Value="Analytics object";!}
Worksheet.Range("B8").Value=123.45;
Worksheet.Range("C8").Value=678.9;
Worksheet.Range("A9").Value="Analytics object";!}
Worksheet.Range("A9").Font.ColorIndex=3;//font color - red
Worksheet.Range("B9").Value=123.45;
Worksheet.Range("B9").Font.ColorIndex=3;
Worksheet.Range("C9").Value=678.9;
Worksheet.Range("C9").Font.ColorIndex=3;
Worksheet.Range("A10").Value="Analytics object";!}
Worksheet.Range("B10").Value=123.45;
Worksheet.Range("C10").Value=678.9;
Worksheet.Range("A11").Value="Analytics object";!}
Worksheet.Range("B11").Value=123.45;
Worksheet.Range("C11").Value=678.9;
Worksheet.Range("A12").Value="Analytics object";!}
Worksheet.Range("A12").Font.ColorIndex=5;//font color - blue
Worksheet.Range("B12").Value=123.45;
Worksheet.Range("B12").Font.ColorIndex=5;
Worksheet.Range("C12").Value=678.9;
Worksheet.Range("C12").Font.ColorIndex=5;
Worksheet.Range("A13").Value="Analytics object";!}
Worksheet.Range("A13").Font.ColorIndex=3;//font color - red
Worksheet.Range("B13").Value=123.45;
Worksheet.Range("B13").Font.ColorIndex=3;
Worksheet.Range("C13").Value=678.9;
Worksheet.Range("C13").Font.ColorIndex=3;
Worksheet.Range("A14").Value="Analytics object";!}
Worksheet.Range("B14").Value=123.45;
Worksheet.Range("C14").Value=678.9;
Worksheet.Range("A15").Value="Analytics object";!}
Worksheet.Range("B15").Value=123.45;
Worksheet.Range("C15").Value=678.9;
Worksheet.Range("A16").Value="Analytics object";!}
Worksheet.Range("A16").Font.ColorIndex=3;//font color - red
Worksheet.Range("B16").Value=123.45;
Worksheet.Range("B16").Font.ColorIndex=3;
Worksheet.Range("C16").Value=678.9;
Worksheet.Range("C16").Font.ColorIndex=3;
Worksheet.Range("A17").Value="Analytics object";!}
Worksheet.Range("B17").Value=123.45;
Worksheet.Range("C17").Value=678.9;
Worksheet.Range("A18").Value="Analytics object";!}
Worksheet.Range("B18").Value=123.45;
Worksheet.Range("C18").Value=678.9;
//Setting the frame
For Nostr=5 to 18 Cycle
For s=7 by 10 Loop
Worksheet.Range("A"+Number of Lines).Borders(s).LineStyle=1;
Worksheet.Range("B"+Number of Lines).Borders(s).LineStyle=1;
Worksheet.Range("C"+Number of Lines).Borders(s).LineStyle=1;
EndCycle;
EndCycle;
//Group rows
Worksheet.Range("7:8").Rows.Group();
Worksheet.Range("10:11").Rows.Group();
Worksheet.Range("14:15").Rows.Group();
Worksheet.Range("17:18").Rows.Group();
Worksheet.Range("6:11").Rows.Group();
Worksheet.Range("13:18").Rows.Group();
//Contract groupings to the first level
Worksheet.Outline.ShowLevels(1);
//Setting the number format
Attempt
Worksheet.Range("B5:C18").NumberFormat="# ##0.00";
Exception
Attempt
Worksheet.Range("B5:C18").NumberFormat="# ##0.00";
Exception
End of Attempt;
End of Attempt;
//Setting the visibility of the application and its window
Application.Visible=-1;
Window.Visible=-1;
//Pinning area
Worksheet.Range("A5").S_elect();
Window.FreezePanes = -1;
EndProcedure //Output
Despite the fact that 1C is the most popular, convenient and reliable information system, which has in its line a set of solutions for automating and processing absolutely all business processes at enterprises of any size and field of activity, users still need to upload data from 1C every day. to third-party programs or files. In this article, we will consider what unloading from 1C is and show how to unload from 1C and what problems may arise in this case.
Data that can be downloaded from 1C
1With any configuration, it supports uploading data such as:
- Printed forms;
- Reports;
- Tables and lists.
Uploading data from 1C 8.3 is possible in many popular formats:
- Microsoft Excel;
- Microsoft Word;
- Upload to CSV;
- HTML and others.
Uploading printed forms and reports
Any printed form or report in 1C can be saved in the desired format. To do this, you need to open a form or report, then select in the Main menu File - Save as.
After that, a window for saving the file will open, in which the name and type of the file are indicated:

Possible problems when unloading from 1C

This is because the printable or report is not currently active. To make the printable available for saving, you just need to click anywhere on it:

Export to Excel
Processing data in the most popular tabular format requires appropriate uploading. In order to save the required data in Excel format, you need to specify the Excel2007-...(*.xlsx) Sheet type in the file save dialog. Less often, you need to save the data in the old Excel Sheet (*.xls) format:
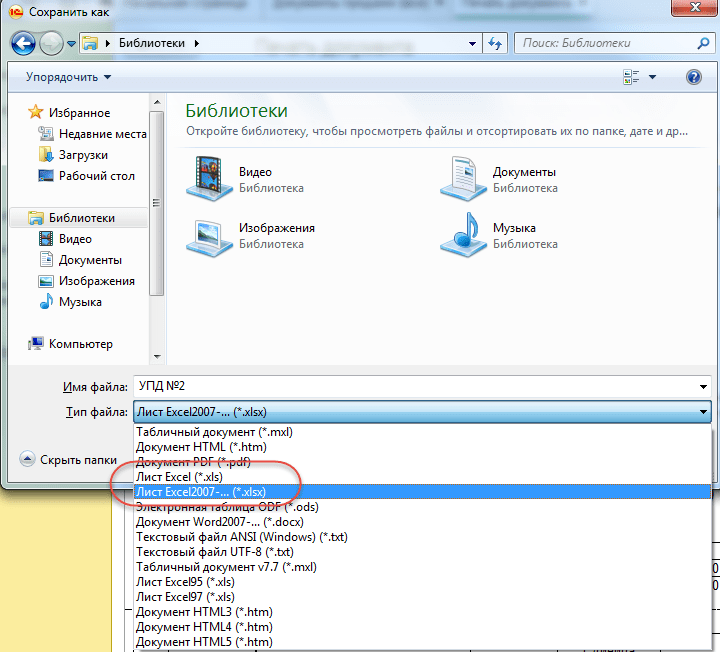
Similarly, by choosing the desired format, you can upload from 1C to PDF, from 1C to WORD, from 1C to CSV, and also to other formats.
Unloading arbitrary tables from 1C
This section will show you how you can upload any data, as long as you have the rights to do so.
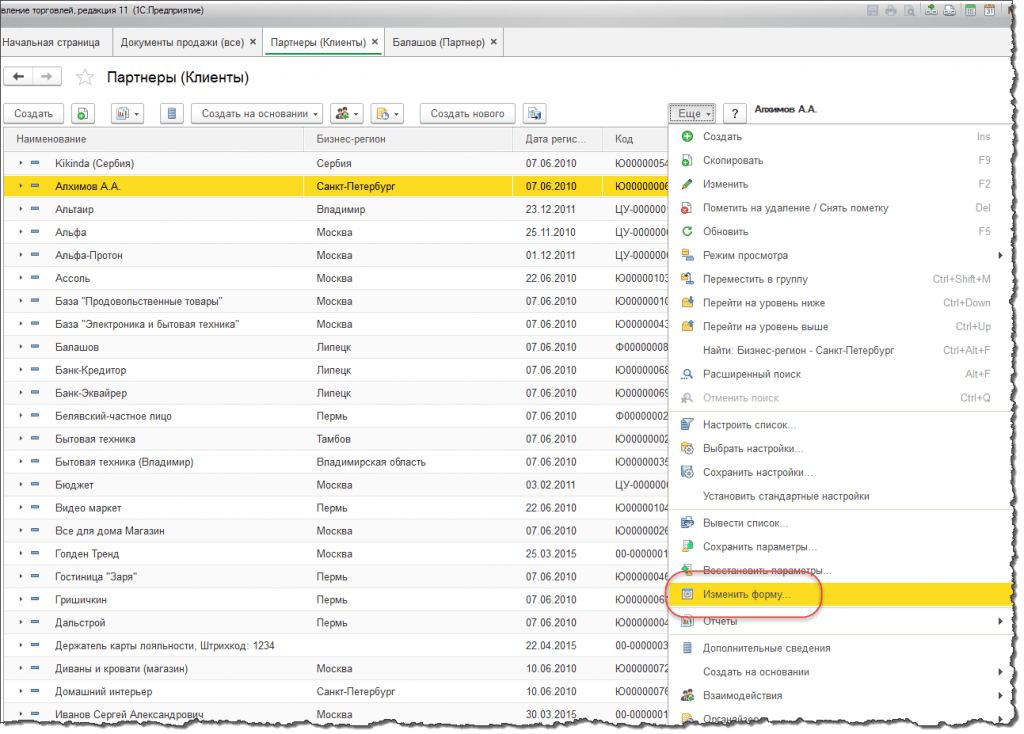
1C has developed a regular mechanism that allows you to upload any list (for example, a list of documents or directory elements). To do this, in the command panel of any list, in the group "More" command available "Display list":


The information will be displayed in a special spreadsheet document. This document looks just like any other report in 1C, and it can be unloaded in exactly the same way using the command File - Save As:

How to upload data that is not visible in the list
Often, the task of uploading a list is accompanied by the need to add columns there that are definitely in the document (directory), but for some reason they are not visible in the current list. Example: in the "Clients" list, add the "Phone" field for uploading, which is displayed only in the additional panel on the right:

In order for the phone to be unloaded from 1C, it must first be added to the list. To do this, call the command "More - Reshape". Next, we need to find the desired column in the list of columns. There is one trick here: developers of typical configurations almost always add a field "Link". If you stand on it and then press the button then we will see all possible fields of this directory. Finding a field "Telephone" and check the box for use.

After that, the database of clients with phones can be uploaded to a file using the regular command "Display List" and sell to competitors.
Quite often, users need to save data from 1C 8.3 to a file, for example, pdf, Word, Excel and other formats. For example, send a report by e-mail to another person, make calculations in Excel. Unfortunately, not all users know that it is very easy to upload such data from 1C on their own without outside help.
Often there is a need to upload a list of any data from the tabular part of a document, a list form, a document journal, etc. Such tasks are often isolated, and it is not advisable to involve a specialist to write a report.
For example, you need to get the entire item with the "Materials" type, while only the "Nomenclature" and "Unit" columns are needed.
In the case when you need to upload data with their filtering, first of all, you need to configure the list in the "More" menu of the tabular section.
In the window that appears, from the left side (available fields), you must select those by which you will make a selection (in this case, “Nomenclature type”). In the right part of the window, the values of the selection parameters are set. Moreover, the type of comparison is not limited to equality alone.

After the turnover has been set, only those positions that meet the specified condition will be displayed in the list form of the "Nomenclature" reference book.
The next step is to display this list in a spreadsheet document.
From the More menu, select Show List.

If you need to display not all columns, as in our example, then check the boxes only for those that are necessary.

As a result, you get, in fact, a report that we can save in any available format. How to do this will be discussed below. Similarly, you can upload tabular parts of documents and directories, data from document journals, list forms, and more.
Uploading reports and printables from 1C
Any report, printable form, spreadsheet document (for example, which we received in our example) in 1C 8.3 can be uploaded to an external file in two clicks.
On the top panel of the program there is a button to save to an external file ("Taxi" interface). It will be active on any reports and printables where saving is available.


Unloading the entire 1C database
This method is necessary in cases where the entire 1C database needs to be unloaded, for example, to create a test copy.
Go to the required infobase in the configurator mode.

In the "Administration" menu, select the "Unload infobase" item.

Specify a different file name and save path if necessary.

The resulting uploaded data file with the *.dt extension is very easy to download in the future. To do this, in the configurator mode in the "Administration" menu, select the "Load infobase" item and open the *.dt file obtained earlier.
Very often it is required to get data from 1C 8.3 and save the information to an external file, in other words, to upload from 1C enterprise. The task is almost always feasible without the involvement of 1C programmers.
Consider a number of useful tips with which you can upload data from 1C to an external information system.
In 1C, there are several methods by which you can get information without involving specialists:
- Unloading the entire database from 1C 8.3 - for subsequent download on another computer
- Save reports and printables to Excel, Word or PDF
- Unloading tables from 1C
- Getting Information Using the Query Console
More about them:
How to unload the entire database from 1s 8.3 (to a .dt file)
To do this, you need to enter the configurator mode, then select the item "Administration" - "Unload infobase" in the main menu:
Then you only need to specify the name of the future file and its location on the disk.
For subsequent upload to another database, click on the "Upload infobase" button and select the previously uploaded file.
Unloading reports and printables from 1C to Excel
This method is universal and very simple. To do this, it is enough when you open a printable form or report.
For example, open the TORG 12 printable, press ctrl+S (or in the menu File - Save As) and select the file type and its name:

For the same system operates - the report is unloaded in two clicks:

Get 267 1C video lessons for free:
Saving to the main formats is available - excel, word, pdf, html, txt, etc.
Unloading tables from 1C 8.3
Often there are such banal tasks as “get a list of payments for the current year”, “unload a book of purchases or sales”, or “unload goods from invoice No. 256”. Solving such problems is quite simple.
For example, I need to receive all receipts from the "Vector" counterparty with an amount of more than 1000. Let's open the list form and set the necessary filters in the list:


The system will offer an output option - to a spreadsheet document or a text document, we will select a spreadsheet. The 1C program will display information in such a spreadsheet document, which, like reports, can be saved in the format we need:

Similar actions can be performed for almost any tabular part in 1C 8.2. For example, we needed to upload a list of goods from receipt No. МСК00003, no problem. This is done very simply - open the document, call the context menu and after a couple of clicks we get the desired upload in the desired format:

Uploading a journal of transactions from 1C to Excel:
Getting Information Using the Query Console
However, not all information can be found in a simple tabular part of 1C 8.2. Sometimes you need to collect data from several data sources, connect them by some fields.
This method is suitable for tech-savvy people who know the basics of the query language. It consists in getting the result of the query using and saving it in the format we need.
For example, it is required to receive all contractors-suppliers and their telephone number. To do this, write the following query:

The resulting table can also be uploaded to the desired file format:

You can upload the received data to another 1C database using "". Watch the video instruction on the example of the nomenclature:


