How to rotate an image in Photoshop. How to rotate an image clockwise or counterclockwise in Photoshop Photoshop how to rotate an image
Since a layer in Photoshop has no dimensions, it has neither width nor height, it turns out that it cannot be rotated. This must be understood for general, so to speak, development. But Photoshop still knows how to rotate!
“Rotate layer” is a phrase that makes it easier to understand each other. It has nothing to do with the reality of ongoing processes. I'm being nerdy now, but I think it's important to explain the fundamental rules of Photoshop during the learning process. In fact, in fact, Photoshop rotates only the current contents of the layer!
Let's say we created a new document and placed some picture in it. That's it, we have this object on a separate layer, with which we can then do anything, including rotate it.
In my case, the new image turned out to be larger than the created document. But this is not a problem, at the same time we will repeat the material from one of the previous articles - especially since rotation and size are related operations.
To rotate the contents of a layer and/or change its size - use the menu command Editing -, or press the keyboard shortcut Ctrl+T.
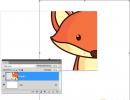
So, make sure that the layer with the object that you want to rotate is in the Layers palette.
In my example, I press Ctrl+T and a bounding box appears around the fox. By the way, if the frame does not fit into the viewing area, reduce the scale of this area by pressing the Ctrl + - (minus) keys.

Now, to reduce the size, you need to pull the marker in the lower right corner inside the frame. In this case, you need to hold down the Shift key so that the width and height dimensions change proportionally.
Note
As long as the border around the image is activated, you can move it around the document.
Ways to rotate layer content
When you are satisfied with the dimensions, you can begin to rotate the image.
Method 1 Manual mode
To do this, move the mouse cursor to any corner of the bounding box. But you need to point not directly at the marker in the corner, but slightly away from it on the outside of the frame. If done correctly, the mouse pointer will take the form of a curved arrow. This means that the contents of the frame are ready to be rotated. 
Click the left mouse button and, without releasing the button, begin moving your hand. Soon you will figure out which direction you need to move to get the desired angle of rotation. Essentially, the image will begin to spin around its center. Release the mouse button to stop rotation. To apply the changes, press the Enter key or the checkmark button on the options bar Free transformation.

Note
Notice that there is another handle in the center of the bounding box. This is a pointer around which the image will rotate. By default it is in the center. But you can move it by clicking on it and dragging it to the desired location. After this, the rotation will occur relative to the new specified point.
Method 2 Automatic mode
This method is needed when the image needs to be rotated strictly by a certain degree, for example, 45 degrees, and no more and no less.
To do this, when you call the command Free Transformation, look at its options panel. There will be a window in which the value of the required rotation angle is entered.

The contents of the layer will automatically rotate by the specified angle. It remains only to recall that a complete rotation of a circle around its axis is 360 degrees.
If you notice an error in the text, select it and press Ctrl + Enter. Thank you!
Hello! In today's lesson on learning Photoshop, we will learn several ways to rotate a picture in Photoshop. Imagine this situation. You photograph your campaign, but if you hold the camera level, the entire campaign won’t fit. So you are forced to turn the camera sideways so that the whole company can fit in. Another case. A very drunk or very creative person took a photo of you holding the camera upside down. All these situations are displayed on the computer monitor, when viewing them you have to turn your head, now to the left, now to the right. Today Photoshop will help us deal with this problem. Since you still have no idea how difficult and dangerous this activity is, we’ll probably start with simple things.
There are several ways to rotate an image in Adobe PhotoShop. I will now show you the simplest and most accessible of them. We stretch our arms in front of us towards the screen and with a light and graceful movement we take our monitor by the upper left and lower right corners. Slightly lift the monitor above the table and turn it the required number of degrees in the direction you are interested in. Now we can proudly say that we have completed this difficult task.
But don’t be upset if this method doesn’t suit you, there is another way. Let's start with the simplest thing. We look for the word “Image” in the top panel, it is on the third line from the left. Click on it with the left mouse button. And what do we see? A menu appears in which there are buttons such as “Crop” “Trimming” “Canvas Size” and so on. Here we need to find a button like “Rotate canvas”, it is the ninth one both from the bottom and from the top. Remember, if a small triangle is drawn next to such a button on the right, it means that a menu drops out of it. And so we click on the “Rotate canvas” button and see in it the following actions: “180 degrees”, “90 degrees clockwise”, “90 degrees counterclockwise”, “Arbitrary”. There are two more points, but we will look at them later.

If we press "180 degrees", the image that we opened at the beginning of the task is turned upside down.

If we click “90 degrees clockwise”, then our image turns out to be rotated with the right edge towards the bottom.

If we click “90 degrees counterclockwise,” then the image is rotated with the left edge down and the right edge up.

There is another interesting item here: “At will”. Having selected it, a window appears in which we can independently set the degree of rotation. Also in this window you can select in which direction the rotation will be made.

We've sorted this out. Let's get down to those mysterious two buttons that I talked about earlier: “Flip Canvas Horizontally” and “Flip Canvas Vertically”. If you want to make a mirror image of this picture, then these two magic keys will help us. Let’s select the “Flip canvas horizontally” option and what do we get? The effect is as if a mirror was placed next to our picture on the right.

We will see the same effect, only the mirror will no longer be on the right, but on top, if we select the “Flip canvas vertically” option.

But remember that with these methods we rotated the entire canvas. And in order to rotate only the image you have selected in the “Layers” window, you need to go to the “Edit” - “Transform” menu. In this menu you will find everything the same as in the canvas rotation menu. It is worth remembering that a pinned image cannot be rotated this way. The pinned image has a padlock next to the mini icon in the “Layers” window. In order to unlock it, you need to click on the mini image in the “Layers” window and, in the window that appears, click “OK”.
Hurray, we figured out the first method of turning. We will continue to learn the boundaries of image rotation in the following lessons. You can watch them right now. In the article “How to enlarge an image in Photoshop? ” you can find another way to rotate the image. See you soon!
You can rotate the image, tilt it, change the scale, distort it, deform it, create a perspective effect, flip it vertically or horizontally using the command Transformation(path: Edit – Transform).
Let's consider all operations separately.
How to rotate an image in Photoshop?
There are 2 ways to rotate an image. The first method is carried out using the commands Image (Image) - Rotate canvas (Rotate Canvas) - 180°, 90° clockwise, 90° counterclockwise or arbitrarily (Arbitrary):

In this case, the entire image with all layers is rotated.
To rotate the image by an arbitrary degree, you need to select the Arbitrary... item and in the window that appears, enter the required degree of rotation and indicate clockwise or counterclockwise to rotate:

Using the second method (Edit – Transform – Rotate), you can rotate a separate image layer or even a selected object in the picture:

In this example, I created a new layer with a man on a transparent background for clarity and rotated the man on the top layer. It should be noted that for the background (the layer with the lock) the transformation function is not active in the program. If we want to rotate the entire image using it, we need to first select everything (Ctrl+A) or remove the lock from the background, for which we . When you select the “Rotate” function from the “Transform” group of commands, the following square selection along the contour of the image with anchor points will appear, by dragging which you can rotate the object:

In the process of photo retouching, web design and preparing layouts for printing, there is often a need for vertical or horizontal, as well as rotate an image by a certain angle clockwise or counterclockwise. Both tasks are trivial and can be solved in Photoshop in a couple of clicks.
Let's say we have some fantasy image of a girl hanging from a tree:
We want her to sit astride a tree. To do this we will need to download Photoshop and rotate the image 90 degrees counterclockwise. I offer you detailed instructions with visual illustrations on how to do this.
How to rotate a photo or image in Photoshop
1. Open the program Adobe Photoshop and open the image we need in it ( File -> Open…).
2. After the image has loaded, rotate it 90 degrees counterclockwise. To do this, select from the main menu Image -> Rotate canvas -> 90 CCW:

3. As a result, we get a vertically oriented image:

A similar result can be obtained by using it in Russian.
Of course, Photoshop can rotate an image not only 90 degrees. To rotate the image an arbitrary number of degrees clockwise, select in the main menu Photoshop Image -> Rotate canvas -> Arbitrary… and in the window that appears, specify the rotation angle you need:

For example, after rotating the image by 10 degrees, we get a non-standardly positioned image:

After this, you can make a new picture, continue editing the illustration at your discretion, or cancel the rotation using Ctrl+Z or Ctrl+Alt+Z.
4. Save the result of rotating the image in Photoshop ( File -> Save for Web and Devices…).
Do you have several visited sites and are you looking for reliable servers to host them? High-quality vps hosting can be purchased on the website vds64.com. Qualified Russian-speaking technical support, as well as a pleasant bonus program are included.
Good time everyone! Today we will learn how to rotate pictures in Photoshop. We may not need this function so often, but when photomontaging or creating collages, rotating photographs or pictures is simply irreplaceable. Personally, I've always been fascinated by how well some people can create impressive posters and cards by arranging several images on one.
You can rotate the image in different ways. This can be a rotation of 90 or 180 degrees, as well as any other value. It can also be a mirror image, or display horizontally and vertically, and rotation around its axis. We will consider each of these options and use different tools.
How to flip a picture?
Mirroring of a picture is carried out in two planes: horizontally and vertically. There is nothing complicated about this procedure. Everything is done in a couple of clicks. But in the beginning...
Load the image into Photoshop and duplicate the layer with it. We did the same thing. Or right-click on the layer with the image and select “ Duplicate Layer", or do the same in the work area in the "Layers" tab.
As a result, we will get a layer open for editing, unlike the original one, where it has a castle drawn. The original layer is called “Background”, and the working layer is called “Background Copy”. In principle, for convenience, you can rename your layers.

In addition, the icon to the left of the layer image in the form of an eye displays the visibility of the layer. To prevent the original one from being displayed when working with the second layer, you need to click on the “eye” and turn it off.

After all these manipulations, you can begin the procedure of displaying the image horizontally and vertically, that is, mirrored. To do this, go to the “Editing” menu, click on “Transform” and in the menu that opens at the very bottom we see two lines: “Display vertically” and “Display horizontally”.

By clicking on each of these inscriptions we will display the picture in the corresponding position. The results of this mapping are shown below. That's the whole procedure, as you can see, nothing complicated.
Rotate the image a few degrees
Sometimes we need to rotate a picture by a certain number of degrees as an artistic technique. This operation is performed through the “Editing” and “Transforming” menus. Only here we see lines of rotation by 180 degrees, as well as by 90 clockwise and counterclockwise.

To rotate a picture to a different value in degrees, you must similarly open the “Transformation” tab through the “Editing” menu and select “Rotate” there.

- Move along X or Y coordinates, that is, up, down, or right, left.
- Changes the size in width and height as a percentage.
- Rotate using pan angle, vertical tilt, and horizontal tilt.

There is a frame around the picture and if you move the cursor to one of its corners, you will see a curved arrow appear. By holding down the left mouse button, you can rotate the image in any direction. Again, for more accurate rotation, indicate the required rotation angle values on the top panel:
As for changes in the vertical and horizontal tilt values, they cause distortion of the picture in the corresponding directions. So, by changing the above indicators, you can rotate the picture by the required number of degrees. Here is a short video on the topic of the article:
Rotating an image around an axis in Photoshop
Rotating the image around its axis is carried out using the same transformation, which is located in the “Editing” menu. You can also use “Free Transformation” located here. This command can also be called using hotkeys " Ctrl + T».

Thus, we load the image, create a duplicate of the layer with which we will work and call the “Free Transform” menu (“ Ctrl + T"). A frame appeared around the picture with squares in the corners and in the middle. There is also the same marker in the center.

Since we need to rotate the image, we will need markers in the corners—any kind. We move the cursor to it, it changes to a curved arrow. Holding the left mouse button, pull it in any direction and see how the picture rotates. But here lies the main point.
There is a marker in the center. So, the picture revolves around him. If it is located exactly in the middle, then the picture will rotate symmetrically. If you move this marker to any place in the picture with the mouse, it will already rotate relative to this point. For example, we move it to the left to the upper corner and rotate the image.
The picture is no longer rotated symmetrically. Thus, using these features, you can rotate the image around its axis as necessary and make original
How to rotate an image horizontally in Photoshop
We have already discussed above how to rotate an image horizontally or flip it using the “Transform” - “Flip Horizontal” command, which is located in the “Edit” menu. But you can also do this from the “Image” menu. Open the tab and find “Image rotation” – “Display horizontally”.
Using this command we will rotate the image horizontally. These are the techniques we covered today. Good luck to you!