Utilities for quick comparison of documents. How to compare contents of two text documents Comparing 2 text files
Need to compare two files Microsoft Excel? Here are two simple ways to do this.
There are many reasons why you might want to take one Excel document and compare it to another. This can be a labor intensive task.
it requires a lot of concentration, but there are ways to make your life easier.
Do you need to take a close look by hand or do you want Excel to do some heavy lifting
on your behalf, here are two easy ways to compare multiple sheets.
How to Compare Excel Files
Excel allows users to display two versions of a document at once to quickly distinguish between them:
- First, open the workbooks to be compared.
- Switch to View > Window > Side View.
Comparing Excel files by eye
To get started, open Excel and any workbooks you want to compare. We can use the same technique to compare sheets in the same document
or completely different files.
If more than one sheet is received from the same book, it must be separated in advance. To do this, go to View > Window > New Window.

This won't split the individual sheets permanently, just open a new instance of your document.

This menu will list all tables that are currently open. If you only have two open, they will be selected automatically.

Make your choice and click Good. You will see both tables appear on the screen.

If it's more convenient you can use Arrange everything button to switch between vertical and horizontal configuration.

One important option to be aware of is Synchronous scrolling switching.

Enabling this setting ensures that when one window scrolls, the other will move in sync. This is important if you are working with a large table.
and you want to keep testing one against the other. If for some reason the two sheets are not aligned, just click Reset window position.
Comparing Excel Files Using Conditional Formatting
In many cases The best way comparing two spreadsheets might be as simple as displaying them on the screen at the same time. However, it is possible to automate the process somewhat.
Using Conditional Formatting
We can check Excel for discrepancies between two sheets. This can save a lot of time if all you need to find are the differences between one version and another.
For this method, we need to make sure that the two sheets we are working with are part of the same workbook. To do this, right-click on the sheet name you want to transfer and select Move or copy.

Here you can use the drop down menu to decide which document it will be pasted into.

Select all the cells that are filled in on the worksheet where you want any differences to be highlighted. Fast way to do this is to click the cell in the top left corner and then use the shortcut
Ctrl+Shift+End.
Switch to Home> Styles> Conditional Formatting> New Rule.

Choose Use a formula to determine which cells to format and enter the following:
A1sheet_name!A1
Just don't forget to lay out "sheet_name" for any other sheet name. This formula only checks when a cell on one sheet does not exactly match a corresponding cell on another sheet, and flags each instance.

Above you can see the results. All cells containing changes have been highlighted in red, making it quick and easy to compare two sheets.
Let Excel do the hard work
The above technique demonstrates one way you can let Excel handle some of the heavy lifting. Even if you pay close attention, there is a chance that you may miss a change if you do this task manually. Thanks to conditional formatting, you can be sure that nothing is leaking onto the network.
Excel is good at monotonous and detail oriented work. Once you get the hang of it, you can save yourself some time and effort by using techniques like conditional formatting and a little ingenuity.
Do you have any advice for comparing documents in Excel? Or do you need help with the processes in this guide? In any case, why not join the conversation in the comments section below?
When working with text documents, you often have to compare them by content. This need arises if several people worked on the document or the document was sent to the teacher for approval and editing, you need to quickly find all the changes made by the second party. But the user himself can create several copies of the document and get confused: which version is the latest, and what corrections have been made. Let's consider all the possibilities of a quick, and most importantly, automatic comparison of two documents.
1. Comparison of two documents in MSWord (starting from MSWord 2007, 2010, 2013)
Let's use the function legal note, which allows you to automatically compare documents.
We launch the MS Word program. Open a tab on the ribbon Peer review, choose a section Compare and expand possible command options Compare…(see Figure 1), select the first command - Comparing Two Versions of a Document (Legal Note).
Figure 1 Launching automatic COMPARE of two text documents

A window will open in which you specify the path to store the original and modified documents. To specify the path, use the yellow folder icon, as shown in Figure 2.
Figure 2 Appearance windows Comparison of versions

command button More>>(Figure 2) provides more advanced options for displaying (highlighting) the changes made. When activated, the window Version comparisons will take the following form (see Figure 3)
Figure 3 Additional features when automatically comparing text documents

In the window that opens, in the section Comparison Options tick off those changes that you want to display in the process of automatic comparison of documents.
Default window Comparisons as follows.
Figure 4. Window for automatic comparison of two document versions

Consider the areas of the window for automatic comparison of documents in Legal note.
- On the left is Fix summary: what exactly was corrected and by whom (if the username is specified in the Word settings).
- In the center - Comparable Document– a document with corrections made (shown in red: adding and deleting words).
- Top right: source document, and lower - modified document.
Reconciliation area Fix summary can be configured as a horizontal review bar. To do this, execute the following commands in sequence: insert Review => Review Area => Horizontal Review Bar.
Figure 5. Setting up the Horizontal Review Bar

In this case, the window for automatic comparison of two documents will look like this:
Figure 6. Window for automatic comparison of documents with a horizontal review panel

You can navigate through corrections either with the left mouse button by clicking on the text in the desired place in the document, or with the help of the Tab Review - The scope of the review.
Figure 7 Working with the CHANGE option

The identified changes need either To accept so that it stays in the modified document and no longer shows up as a fix, or Reject if you don't agree. You can navigate through the corrections using the keys: Back and Further(see Figure 7).
To reject or accept all corrections, use the command Accept (or Reject). Using the left mouse button, open the list of options for the Accept / Reject command (down arrow) and select the required one from the proposed options, for example: Apply (Reject) all changes in the document.
Figure 8 ACCEPT command window

2. Comparing two blocks of text in an internet browser
When comparing the contents of two documents, you can also use specialized services provided by Internet browsers. They are convenient when determining differences in texts of both English-language documents and when working with Russian-language texts, for example: Text-Compare (http://text-compare.com/), TextDiff (http://www.textdiff.com/) and Quick Diff (http://www.quickdiff.com/). With their help, you can compare text fragments, tables, and even program code.
Let's briefly consider the technology of comparing documents in each of the three recommended services. What they have in common is placing two fragments in their respective windows and then initializing the comparison process.
Text Compare(http://text-compare.com/). To compare two fragments in this service, it is enough to copy these fragments to the corresponding windows, and then start the comparison process (command button Compare). Fragments of text that are different or missing in one of the compared documents will be highlighted (different elements are highlighted in color when comparing tables, lines with differences are additionally marked in program codes when comparing).
Figure 9 Text-Compare windows before and after the comparison operation

TextDiff(http://www.textdiff.com/). The service window is two windows in which the compared fragments of text, table or program code are placed.
Figure 10 TextDiff service window

The results of mapping the comparison process using TextDiff are one the resulting fragment, in which the text that appeared in the second fragment (that is, absent in the first one) is highlighted in green, and the deleted text is highlighted in red.
Compare with the previous service: when comparing text blocks and small tables, such a result can be convenient, for comparing large tables, such a result is difficult to read differences, since the differences found are displayed line by line in text format without line numbers and preserving the visibility of columns.
Figure 11 Comparison result using the TextDiff service

The principle of presenting results in Quick Diff is exactly the same as in TextDiff. The difference is that the data deleted from the second fragment is not only displayed in a different color, but also crossed out. At the same time, a problem is added to the difficulties of text comparison - incorrect recognition of the Cyrillic alphabet (see Figure 12).
Figure 12. The Quick Diff service window after performing the comparison operation

Let's summarize:
- the Text-Compare service can be used to compare texts, tables and program code without any restrictions;
- the TextDiff service can be used to compare texts, program codes and small table fragments;
- The Quick Diff service perfectly compares texts (not in Russian), program codes and can be used to compare small table fragments.
The material was prepared by Shutilina L.A., methodologist of the GMC DOgM
To update the parent. The problem was that I was making edits to the style.css file of the parent theme. And, of course, I don’t remember what exactly I changed there (and you don’t need to remember it).
But now, the moment has come when there was a new version themes for wordpress. I, of course, wanted to see what was new there. But, before updating it, first it was necessary to save the changes made to the styles. Therefore, I had to remember the name of the program that compares files.
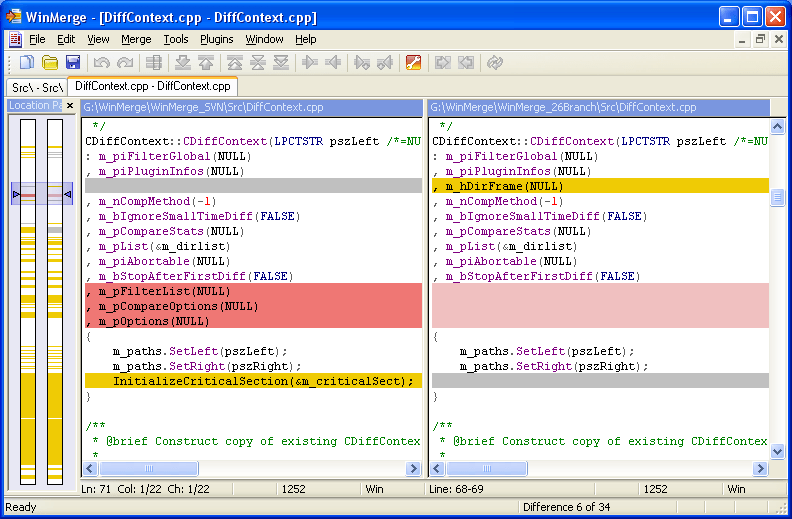
WinMerge
Previously, I used the WinMerge desktop program (winmerge.org). She helped out a lot when it was necessary to compare two files. This is what its interface looks like. Heaped cool, programmer.

But there is something more advanced.
Quick Diff
But I was too lazy to look for WinMerge on my computer and I decided to use the wonderful online service "Quick Diff". He helped to quickly conduct a comparative analysis of two fragments of text and find all the differences.
Benefits of online service
- Simple and clear interface.
- Comparison of files occurs in a matter of seconds.
- No pre-registration.
- Nothing needs to be downloaded and installed.
- Absolutely free.
How to compare two text snippets
For comparison, it is enough to copy the necessary fragments into the corresponding fields Left and Right (no difference) and press the button

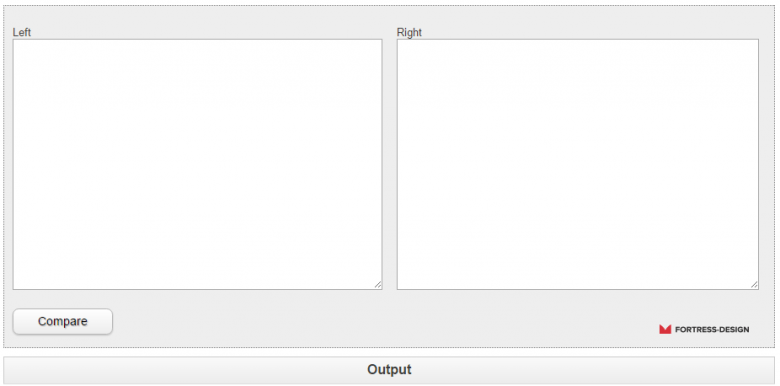
The result will be below, under the heading Output.
Explanations
What is not in the updated file is highlighted in red, the changes made to the original file are highlighted in green.
But in this example, the only difference is that the modified fragment contains spaces at the beginning of the line. Therefore, it is highlighted in green. Perhaps this code was cut out, but then when it was inserted back, it turned out with an offset and extra spaces appeared.

 Fragment of compared files in the Quick Diff online service (www.quickdiff.com)
 In general, be careful, see what changes are significant and matter to you. Here I showed an example of using the service to compare two style files. But you can use this service to compare what changes the proofreader made to the text, yes, you never know what it will come in handy for.
Online service for comparing two texts by the percentage of similarity in content. Comparison of texts is based on the coincidence of individual words in texts, ignoring stop words, and permutations of words in places. This method of verification is the most accurate in comparison with other methods.
For comparison, fill in both fields of the form.
Comparison of two texts
Text comparison analysis will be of interest to optimizers, copywriters and rewriters. Stop and the same words, for convenience and better perception, are highlighted with the ability to change the color. It is possible to analyze text up to 20,000 characters long. Statistics are kept on the total number of words in both texts and vocabulary (without noisy words). If the percentage of similarity is about 50%, then most likely the search engines will ignore the article, considering it a duplicate. We should strive for at least 20% similarity or 80% difference in comparative texts.
To compare texts, you do not need to download and install additional programs. Our resource is available 24/7 and is free to use.
Instructions for using the service:
- Enter the reference text in the first field.
- Enter the modified text in the second field.
- Click the button compare texts.
In a moment you will get the result of text similarity comparison.
In addition to webmasters, the tool will also be useful for students.
Everyone knows that Word is a multifunctional text editor. Many of its features go far beyond this article. This article will talk about how to compare two Word files in the program itself. This procedure is quite simple, but few people know about it at all. It can come in handy in different cases, for example, when there are two files on the computer: your work and its draft. In order not to make a mistake and not send a draft to the customer, it is best to use a comparison of two files.
Step 1: preparatory stage
It is noteworthy that after you compare two files, they will remain unchanged, and all inconsistencies will be shown in another (new) document, which will open automatically. But first things first. First, let's figure out what you need to do first before comparing two Word files.
The first thing to do is to prepare. Before two Word files can be compared, they must be opened. Therefore, find them on your computer and double-click on them.
Now we need to open the tool we need in one of the files. It is located in the "Review" tab in the "Comparison" tool group. The tool is called "Compare", so click on it and select the item of the same name in the drop-down menu.

So, you are in place, now you can go directly to how to compare two Word files for differences or matches.
Step 2: Selecting Documents to Compare
You now have a window called "Version comparison" open. As you can see, it has two areas: "Original Document" and "Modified Document". Accordingly, in the first you must place the original document, and in the second - its corrected version.
To select a document, you need to click on the folder icon next to After clicking, an explorer will open in which you need to pave the path to the file you are looking for. Once this is done, repeat the steps for the second file as well.
So we have selected the necessary documents for comparison, but do not rush to click the "OK" button to start the analysis process. In order to get the desired result, it would be better to set the desired parameters. Let's talk about how to do this now.
Step 3: set the necessary parameters for comparison
So, before comparing two Word files, it would be wiser to set the parameters on which the analysis will be based. This will allow you to find the inconsistencies that you want to find.
To open the options menu, you need to click on the "More" button, all in the same "Version comparison" window.
In the menu that unfolded, you can see a bunch of settings. Now let's pay attention to the "Comparison Options" group. In it, you need to select those elements that will be compared in two documents. By the way, the fewer checkboxes are set, the faster the comparison process will be. So if you're looking for formatting changes, it's wise to highlight just this one and leave the others out.

In the "Show changes" group, choose whether to look for them in characters or words. Also, do not forget to specify in which of the documents to show the result. In the source, modified file or new.
After you set all the parameters you need, you can safely click the "OK" button to start the analysis process. It does not last very long, even if all comparison points have been selected.
Step 4: check the result
As a result, you will be shown the result. Depending on your choice, it will be shown in one of the two documents or in a new, third one.
Places that do not match will be marked with a red line. Which is very convenient - by clicking on the line, you will be shown the difference. It will be crossed out with a red line.
By the way, if you did not know how to compare two Word files for matches, then, unfortunately, this will not work in the program. However, special services can be used for this purpose.


