Fundamentals of working with phpMyAdmin. MySQL foreign keys and setting them in phpMyAdmin Phpmyadmin create rows in table
Last update: 12/22/2017
Typically, databases are used as data storage. PHP allows you to use various database management systems, but the most popular today in conjunction with PHP is MySQL. MySQL Introduces Free software, which allows you to interact with databases using SQL commands. Previously, the process of installing and configuring MySQL has already been considered.
To simplify our work with MySQL databases, we will install a special set of phpMyAdmin scripts. phpMyAdmin provides an intuitive web interface for managing MySQL databases. Using this tool, it is much easier to work with databases than to manage MySQL through the console.
To install phpMyAdmin, download the archive and unpack it into a folder c:\localhost where are the docs for php. Let's rename the unpacked folder to phpMyAdmin for short.
In the unpacked phpMyAdmin directory, create a file config.inc.php with the following content:
And to make sure that everything is set up correctly, in the browser, let's go to phpMyAdmin, for example, http://localhost:8080/phpmyadmin:
In the left column, you can see all the available databases on the MySQL server. Even if you haven't created any databases yet, the server already has some set of default databases.
The right side of the phpMyAdmin interface contains the basic database management tools, as well as various configuration information.
Creating a MySQL database in phpMyAdmin
To communicate with the MySQL server (save, modify, delete, retrieve data), we naturally need a database. We can create a database from the MySQL console, as well as from the phpMyAdmin visual interface.
Let's open the phpMyAdmin interface. Let's go to the Databases tab. Under the label Create database enter some name for the new database, for example, compstore and click on the "Create" button.
And after that we will receive a message about the successful creation of a new database, and it will be added to the database lists.
The new database is currently empty and contains nothing. Let's add a table to it that will store the data. To do this, click on the name of the database and we will get to the "Structure" tab, where we will be offered options for a new table. Enter the name of the new table in the "Name" field. Let the table store data about smartphone models, so let's enter the name "phones", and enter the number 3 as the number of columns:
To create a table, click on the "Forward" button. After that, we will have a set of cells for setting column parameters. Specify the following for the column names in sequence: id, name, company. For the id columns, we specify the INT type as the type, and the VARCHAR type for the name and company columns. For the name and company columns, in the "Length / Values" field, specify the number 200 - it will indicate the maximum length of the string in characters. Also, for the id column, specify PRIMARY in the "Index" field, and check the box in the "A_I" (AutoIncrement) field:
So the table will have columns for unique id, phone name and manufacturer name. And then click on the "Save" button below.
After creating the table, we can see the table and its columns in the database column:
This is not the only way to create tables in phpMyAdmin as here we can manage the database with SQL queries. So, select our database in the list of databases and go to the "SQL" tab. It displays a field for entering a command in the SQL query language. Enter the following command into it:
CREATE Table phones1 (id INT NOT NULL AUTO_INCREMENT PRIMARY KEY, name VARCHAR(200) NOT NULL, company VARCHAR(200) NOT NULL)
This is the standard SQL command to create a table. The CREATE Table keywords are followed by the name of the table to be created, followed by the column definitions separated by commas in brackets.
Each column definition contains the name of the column, its type, and a number of additional values. For example, in the definition of the id column (id INT NOT NULL AUTO_INCREMENT PRIMARY KEY), the column name is specified, the type is INT, and that the column must have a value - NOT NULL, that its value will automatically increase by one with the addition of a new object - AUTO_INCREMENT, and that it plays the role of a primary key - PRIMARY KEY.
In general, the table created in this way will be equivalent to the one that was created earlier. Click the "Go" button and the second table phones1 will be created.
In this article I will teach you manage tables in PHPMyAdmin, i.e. create, edit and delete tables in the database. This article is very important and you should definitely read it.
Let's start with creating a table in PHPMyAdmin:

There is something to talk about here. Let's start with the settings for the table fields:
- Name I think you can ask. The only thing is, do not run into a reserved word. That is, you can not give the field, for example, such a name " index".
- Type. The types of fields were discussed in detail in this article: , so I will not add anything.
- Lengths/Values. Here you can specify limit values (lengths) of variables. For example, I often use this feature to save resources. For example, for a password, I set the type VARCHAR and the maximum number of characters - 32 . Whereas, by default, VARCHAR allows you to store up to 255 characters.
- Encoding. Of course, this setting is relevant only for string types. If you will store strings from only the Russian and Latin alphabets in this field, then use Cyrillic (cp1251_general_ci), and if you can store other characters, then use unicode (utf8_general_ci).
- Attributes. Applies to numbers only. If you have a positive number, then enable the option " UNSIGNED", which will expand the positive range of values of the selected type. There is also an option " UNSIGNED ZEROFILL", which is rarely used, but it does the following: it fills with zeros all unused high digits. That is, let's say you have a number 4 , however, will be stored: " 000000004 ", where the number of zeros is determined by the free bits of the selected type.
- Zero. This option allows you to enable the value " null". Remember: " null" - is not 0 , and not the empty string. This is an empty object, that is, nothing!
- Default. A useful option that allows you to set a default value for a field.
- Additionally. Allows you to set " auto_increment". This is a very important feature that you will enable, I think that in each table. This option allows you to automatically increase by adding a new record by 1 field value. Ideal option for ID (unique identifier), which must be unique for each entry. And in order not to think about the uniqueness of this field, just enable the option " auto_increment".
- Next come the radio switches:
- primary key. As a rule, this key is assigned to the field ID. This key means that the value of the field is unique for the entire table, moreover, an index is created on this field. We will talk about what an index is and why it is needed in one of the following articles.
- Index. Actually, whether or not to create an index for this field.
- Unique. If you set this option, then the value of this field must be unique.
- And checkbox FullText" means whether to create a full-text index or not.
- Comments. You can fill in this field at your discretion.
- MIME type. This field must be filled in if you have some special value stored in the field, for example, an image. As a rule, put " auto-detect".
- Browser Transforms. I will not describe this, since it is used extremely rarely. But if you want, you can read in the very PHPMyAdmin, it is very well written about it, and it will not be difficult to figure it out.
- Browser transformation options. Here you can set the parameters for the transformation, if you use them.
Table settings are much simpler:
- Table comment. You can fill in, or you can not write anything.
- Table type:
- MyISAM. The most popular table type in MySQL, and it is suitable for most tasks.
- Heap. The peculiarity of this table is that it is stored in memory, as a result given type tables are processed VERY quickly. Ideal for temporary tables. Of course, if the operation fails, all data will be lost.
- Merge. This type is a collection of regular tables MyISAM. I myself have not used this type yet, so I can’t say anything more, moreover, this type is still an innovation, and, therefore, no one vouches for stability.
- Table encoding. Absolutely the same rules as for setting the encoding for the fields.
So, we figured out the creation of tables, and now let's talk about how how to change table settings in PHPMyAdmin.
Good day to all! Today I will tell you about how to create a database inphpmyadmin. And so, first of all, we start the server and go to phpMyAdmin. If you have server installed on local computer , That in Danwer phpMyAdmin is located at http://localhost/tools/phpmyadmin/, and in WAMP and on other servers, phpMyAdmin is available at http://localhost/phpmyadmin/
On live hosting, phpMyadmin is available at a different address. For which one you need to find out from the hosting provider.
In version 5.5 it looks like this:

Next, in the field the name of the new database, enter the name of our database, for example test. In the comparison field, select the database encoding, utf8_general_ci. If we do not specify the encoding, that is, we leave the "comparison" as it is, then this encoding is selected by default. After filling in these fields, click on the button create.

A message will appear in the middle of the screen that the test database has been created. It will appear in the list with created databases. We find it in this list, click on its name and get inside the created database. Initially it is empty, so let's create a table.
There are two ways to create tables:
First way: In the left column, click on create table

And this window will appear:

Set a name for the table and a name for each field. For example, we want to create a table with the categories of a site. Therefore, we set the table name categories. For this table, we only need 2 fields, these are id and category name name) According to the rules in any table, the first field is always called id, that is, an identifier. For this field, be sure to select the INT type and set the value length in numbers, for example 2. Choose the index PRIMARY, so we set the primary key for it and check the A_I (Auto Increment) checkbox so that its value automatically increases by one.
For the category name field, select the VARCHAR type and set the maximum length to 255 characters.
If you want to add one or more fields, then in the field add, enter the number that corresponds to the number of fields you want to add and click ok.
We do not need four fields, but only two, so we filled in only two fields, and left the rest empty. Only completed fields will be added to the table. After you have filled in all the required fields, move down the page a little lower and click on Save.

That's all, the table with the name categories created. It will appear in the list of tables on the left side of the screen.

Second way:
As soon as we entered the database, we see such a block Create table. This block has 2 fields where we can enter the name of the table and the number of columns in the table. Let's create, for example, a table with registered users, let's call this table users. This table will have the following fields: id, login, password, e-mail, f_name, s_name, In the number of columns field, enter 6 and press ok.

The same window will appear as in the first method.

After filling in all the fields, go down a little lower and click on the button save.
All table users created. It was also added to the left list with created databases.
That's all for today. Now you know, how to create MySQL database and tables in phpmyadmin without difficulties and puzzles. I wish you all good luck!
Liked the article?
Hello, first post of 2017! While everyone is finishing up their salads, I decided to write a little note about the restrictions of foreign keys in the MySQL database.
Why foreign keys are needed in a table
Foreign keys govern relationships between tables. Thanks to them, control over the structure of the database is greatly simplified, the application code is reduced and simplified, because we shift most of the responsibility for this from our shoulders to the database itself. Properly configured foreign keys are a guarantee that data integrity will increase by reducing redundancy.
In a nutshell, foreign keys have a lot of advantages, so it is useful to know how to operate with them.
Setting up foreign keys
I will demonstrate the setting in my favorite because it is very convenient, in addition, the admin does not hide the generated request code and you can always see it( remember, copy, criticize).
ManyToOne and OneToMany example
Two tables: goods(id, name, catalog_id) and catalogs(id, name) . In one directory a bunch of goods(OneToMany), and any number of goods can be in one directory(ManyToOne). The foreign key in this example is the catalog_id field in the goods table.
Creating tables in phpmyadmin
Generated Requests
CREATE TABLEmybd.goods (id name VARCHAR(255) NOT NULL , catalog_id INT NOT NULL , PRIMARY KEY ( id), INDEX ( catalog_id)) ENGINE = InnoDB; CREATE TABLE mybd.catalogs (id INT NOT NULL AUTO_INCREMENT , name VARCHAR(255) NOT NULL , PRIMARY KEY ( id)) ENGINE = InnoDB; Customizing the catalog_id foreign key
It's time to create a link between products and catalogs. Open the goods table, go to the "structure" tab and look for the "connections" button.
In the "foreign key constraints" section, fill in the rows and select the "ON DELETE" and "ON UPDATE" actions.
Generated Request
ALTER TABLEgoods ADD FOREIGN KEY ( catalog_id) REFERENCES mybd.catalogs(id) ON DELETE CASCADE ON UPDATE RESTRICT; ON DELETE and ON UPDATE values
CASCADE- Cascading deletion and editing. This setting means that when the catalog is deleted, all products from it will also be deleted. When editing, if we change the catalog id, the products will automatically change the "catalog_id" field.
RESTRICT- With this setting, if we try to delete a directory that contains products, or change its id, the database will give us an error and the deletion will not take place.
SET NULL- From the name it is clear that if the catalog with this id disappears (deletes or changes), then the value of the goods in the "catalog_id" field will be set to NULL. You need to be careful with this setting because indexes are "NOT NULL" by default.
NO ACTION- Ignore deleting and editing the catalog, and let there be a non-existent identifier in the "catalog_id" field, just ignore it.
ManyToMany example
The case is more complicated, in which, in order not to duplicate records, a separate link table is created, which usually consists of two fields. Consider an example: authors(id, name) , books(id, name) , author_book(author_id, book_id). A book can be written by co-authors, and an author can have multiple books—a great example of the ManyToMany relationship.
Creating a link table
In phpmyadmin
Generated Request
CREATE TABLElibrary.author_book (author_id INT NOT NULL , book_id INT NOT NULL , INDEX ( author_id, book_id)) ENGINE = InnoDB; author_id and book_id together are a composite index, all that's left is to add restrictions on each of them in the "links" tab and you're done!
Conclusion
Don't miss the opportunity to put more responsibilities on the database to make it easier for yourself to work on the application, and think about its structure, not about the control of table relationships. Good luck with your database design, thanks for reading!
phpMyAdmin contains a tool called Designer. This tool allows you to simplify the work of creating tables in the database and relationships between tables.
First, create a database and log in with the received user data to phpMyAdmin.
Phase I: Create a configuration store
Stage II. Working with a Designer
- In the left field with a list of databases, select the newly created
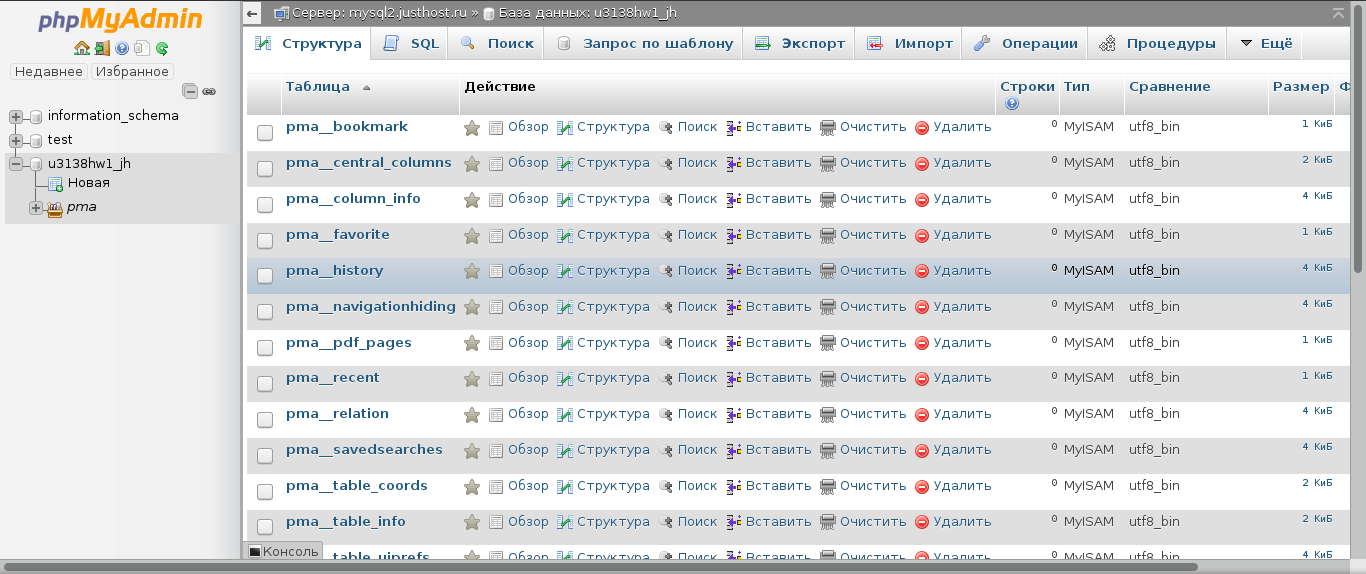
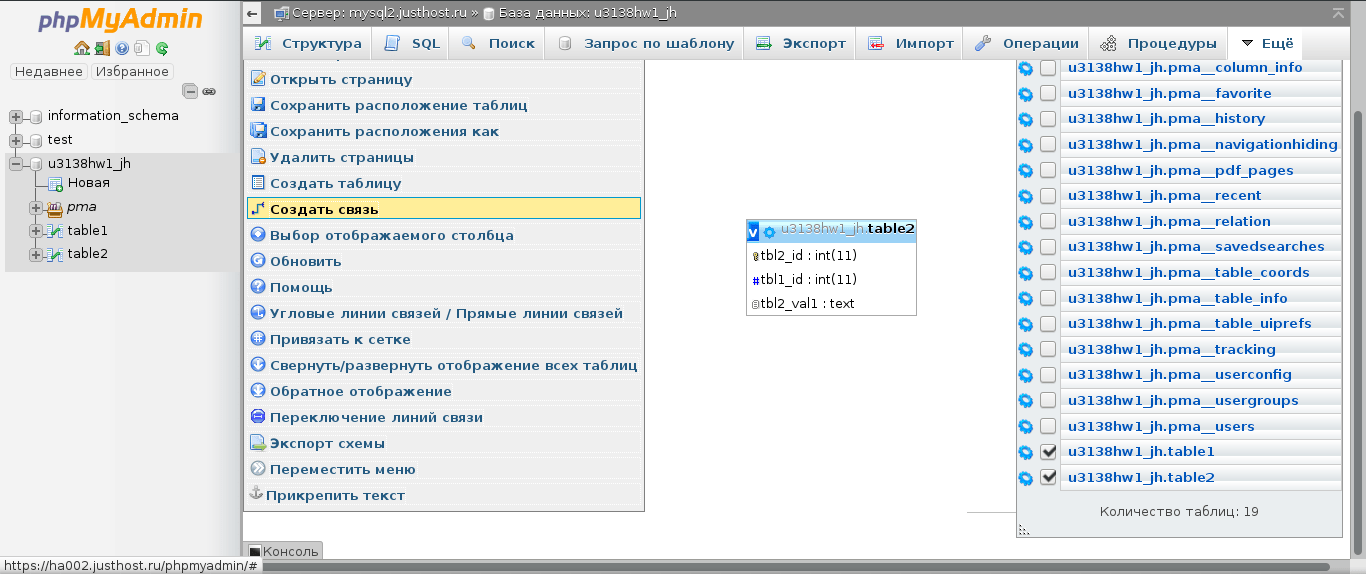
- Go to the menu More and submenu Designer

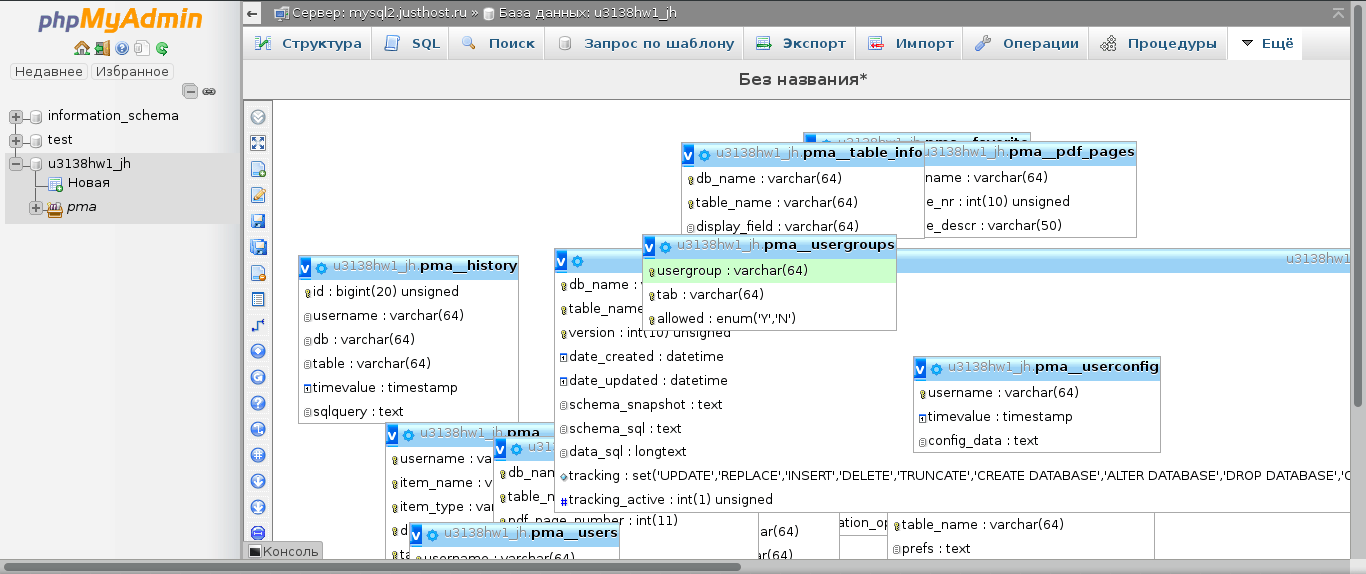
- In the toolbar on the right, select Show/Hide list of tables
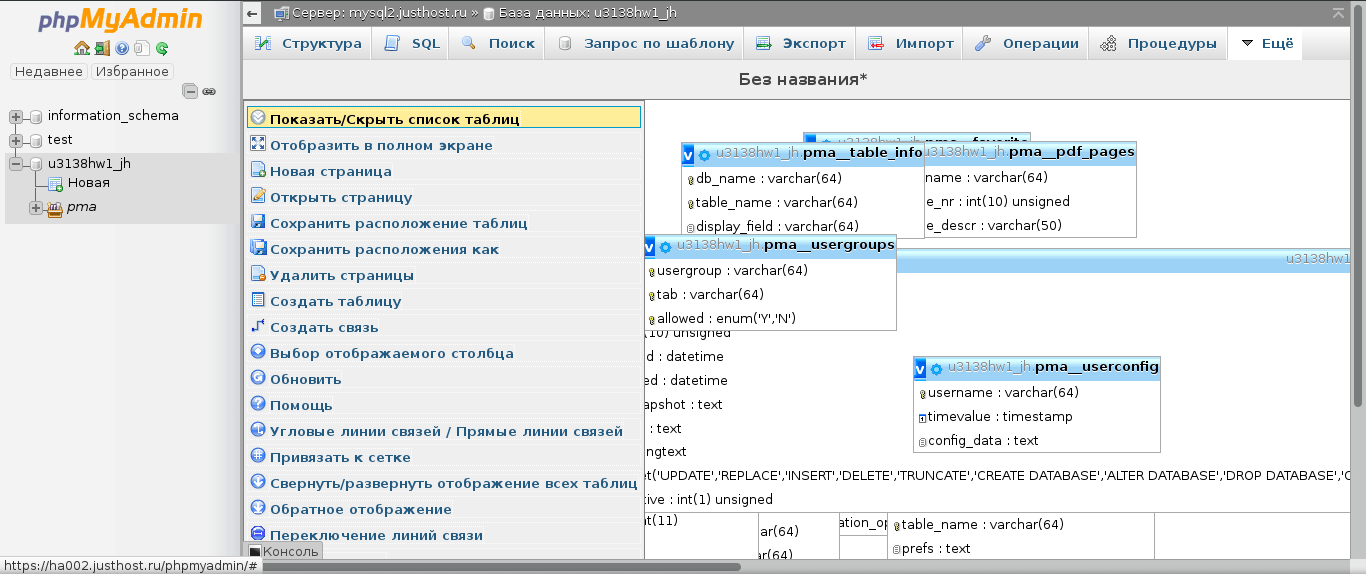
- A panel with a list of tables will open on the left. Hide/show unnecessary tables related to Settings store (pma), you can remove / set the corresponding checkbox

Create a connection
- Select the tables between which you want to set up relationships
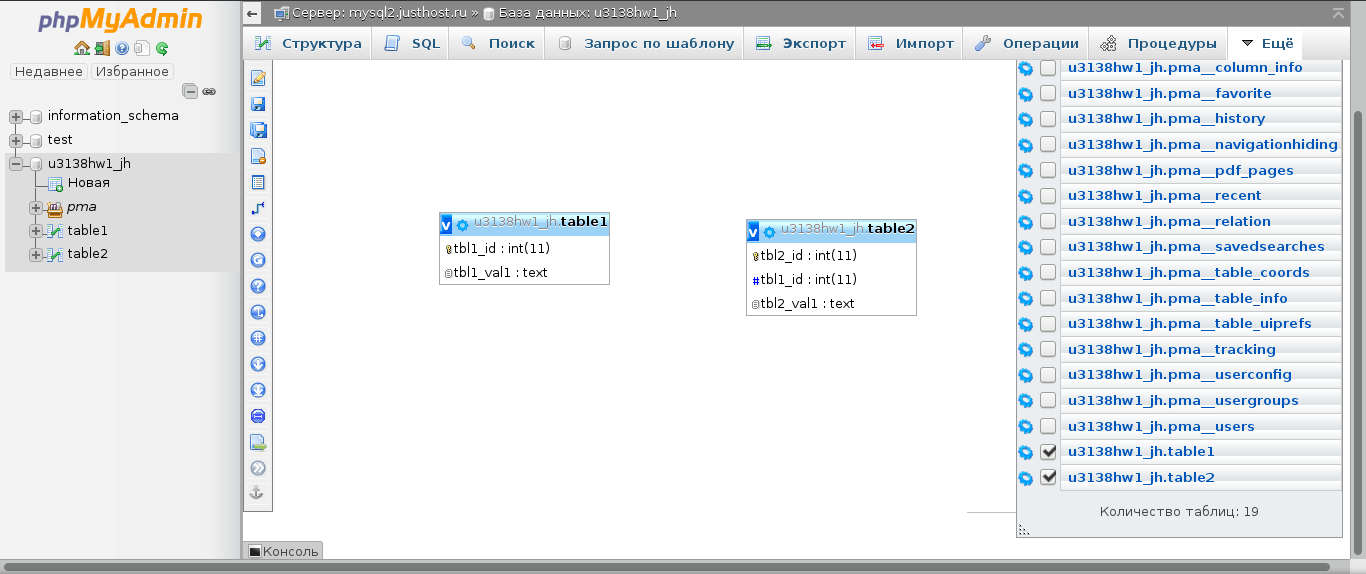
- Click Create connection in the toolbar
- Next, the arrow will be labeled Select a reference key. You need to click on the primary key of the table. In our case, this is the key tbl1_id in the table table1
- The arrow will change the label to Select foreign key. You need to click on the corresponding field of the linked table. In our case, this is the tbl1_id field in the table table2
- In the dialog box, select OK