The keyboard on the computer does not work: reasons, what to do. Keyboard repair and restoration Restore default keyboard
The keyboard is a device that is at particular risk when the user is working with a computer. It is the keyboard that most often suffers from frantic gamers, lovers of meals in front of the monitor screen, or slobs who are not used to keeping their equipment clean and tidy. What could be simpler than replacing a damaged keyboard when it comes to a desktop PC? A connected keyboard is far from the most expensive device, especially if we talk about simple models. A laptop keyboard is a completely different matter. Repairing a laptop that has been subjected to a mechanical shock or on which liquid has been spilled can cost a significant amount of money. If, after an incident with a laptop, the result is only a couple of non-working or missing buttons on the keyboard, while the device continues to function fully, we can safely talk about luck. After all, broken or missing buttons can be reassigned and others that are not affected can be used instead.
Below we will look at how to reassign keys on a keyboard with broken or missing buttons on Windows devices. A small free program called MapKeyboard will help in solving this issue.
About MapKeyboard
MapKeyboard is a minimalistic portable utility designed to solve one specific problem - the system replacement of some keys with others. The program is also able to help if the right mouse button does not work. The latter can be reassigned to selected keyboard keys.
MapKeyboard does not need to be constantly running in the background on Windows. The program works on the principle of making changes to the system registry. It starts up once, does its job and no longer needs activity. MapKeyboard is launched only when it is necessary to reassign keys or return the keyboard layout to its original state.
You can download the program completely free of charge on the website of its developer.
Key remapping
MapKeyboard is downloaded from the official website in an archive. After unpacking the archive, run the program as administrator.

We will see the MapKeyboard interface in the form of a virtual keyboard.
How do I reassign missing or broken keys? First, you need to decide which keys will be reassigned to those that have fallen out or do not work. Since reassigned keys will work like missing or non-working keys, it is natural that the first ones must be unused or rarely used. These keys are typically Scroll Lock, Pause (Break), Insert, Home, End, Page Up and Page Down. Also, for reassignment, you can sacrifice the number pad keys along with its Num Lock activation key.
Having selected the best options for replacing keys, we can proceed directly to the process itself. The first thing on the keyboard of the MapKeyboard program is to press the replacement key - the one that will act as the missing or non-working key. In our case, one of the rarely used keys is selected for reassignment - Scroll Lock. This key can now be pressed instead of the missing key of the letter W, and with it the letter C in the Russian-language keyboard layout. Next, in the drop-down list box at the bottom of the MapKeyboard window, you need to select, in fact, the missing or non-working key itself - the letter W in our case. After this selection, the reassigned key will light green.


After which we will see a window where it is notified that when confirming the changes, you will be logged out of the system. Click “Yes”.

After logging out, you must log in again. And you can already test the operation of the reassigned keys.
Returning the keyboard layout to its original state
After replacing or repairing the keyboard, the layout with reassigned keys can be returned to its original state. This is also done in the MapKeyboard program. On the program’s virtual keyboard, click “Reset keyboard layout”. Then, in the dialog box that appears, confirm the return of the keyboard layout to its original state - click “Yes”.


But there will be no exit from Windows, but a reboot of the computer. After a reboot, the keyboard layout will be returned to its original state.
Have a great day!
A standard keyboard usually doesn't need any special setup to work in Windows 7: to start using it, you just need to connect it to your PC. But, as with any device, problems sometimes occur with keyboards. Most often this is a complete or partial failure, as well as incorrect operation. In addition, some users find the default keyboard setting inconvenient and want to change it.
We have prepared a story on how to troubleshoot your keyboard yourself and how to configure it for more convenient use in Windows 7.
The most common types of keyboard problems and methods for resolving them
- The keyboard doesn't work at all.
- Windows 7 does not recognize the keyboard.
- The keyboard works, but the wrong characters are printed when typing.
- The keyboard does not respond to pressing individual keys.
- The system does not recognize keyboard shortcuts.
The keyboard does not work, is not recognized by the system, the indicator lights do not light up
This problem indicates that the device is not connected to power or is faulty. To exclude the first reason:
- connect the keyboard to a known working USB or PS/2 port of the computer without adapters and other “intermediate” devices (connection to PS/2 can only be made when the power to the system unit is turned off);
- make sure the connection is secure.
If the keyboard still does not show signs of “life,” it is likely that the keyboard itself is faulty or its cable is damaged.
This condition of the wireless keyboard may indicate a discharge or lack of batteries.
The keyboard does not work exclusively on Windows. It works before the system boots, as well as on other computers
The keyboard is working, but does not work due to a system failure. The reasons may be:
- driver problems;
- blocking the device with software;
- viral infection;
- changes in the registry and damage to system files.
If the problem did not occur immediately after installing Windows 7 (the keyboard worked fine on this computer before), try removing its driver:
- open Control Panel -> Device Manager;

- Find the keyboard in the list, expand its context menu and select “Delete”.

- restart your computer.
These steps will help Windows 7 re-recognize the connected device and reinstall it.
Other mentioned problems with Windows 7 and programs that caused the keyboard to fail can be fixed with a system restore. To do this, go to Start, expand All Programs ->> Accessories ->> System Tools and click “System Restore”.

Select an appropriate checkpoint that was created before the failure date.
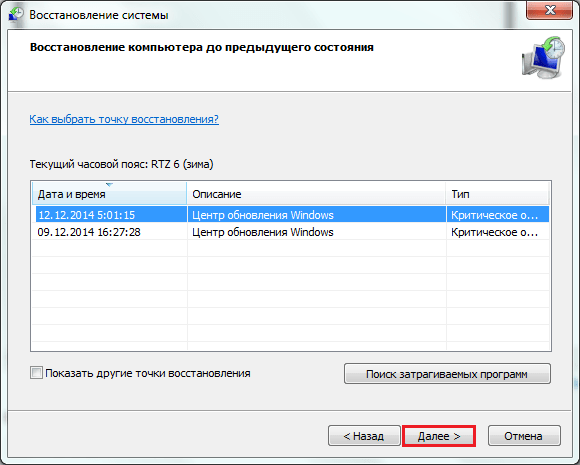
Confirm your intention by clicking the “Done” button.
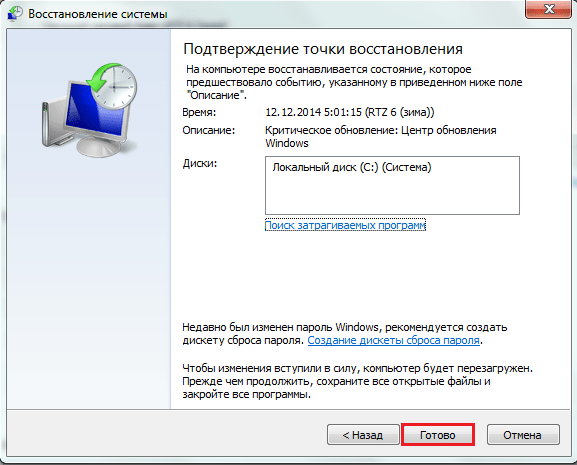
Wait for the recovery to complete. All changes, which include installing and configuring software, adjusting the registry, installing Windows 7 updates, etc., will be canceled, and what was blocking the keyboard will no longer work.
If the possible cause is a virus infection, scan the system.
Windows 7 does not “see” the keyboard. It is detected as an unknown device
This often happens with non-standard keyboards that use their own drivers. Installing the required driver from the disk that came with the keyboard upon purchase or from the manufacturer’s website will help solve the problem.
The standard Microsoft keyboard driver can be downloaded from here.
Keys cannot be pressed or different characters are printed
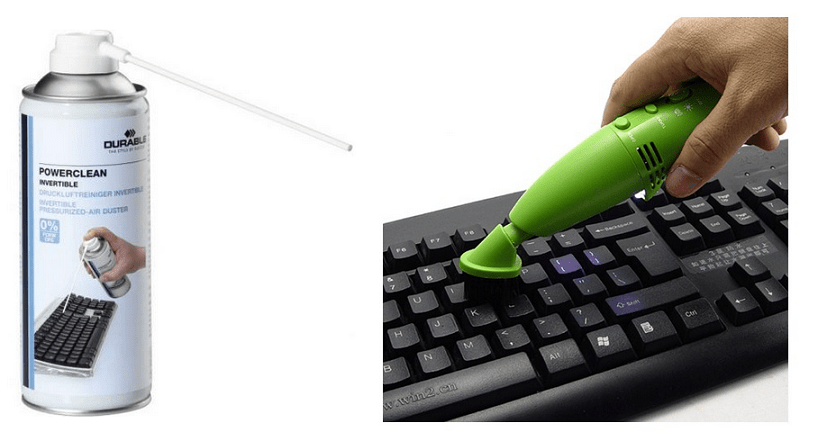
Most often this is the result of the keyboard getting dirty and liquids getting inside it. You can clean the device from crumbs and other debris that accumulates under the keys using a special vacuum cleaner or a can of compressed air.
If the keyboard does not work after liquid has entered it, it must be disassembled, washed and dried.
If a problem similar to this occurs when connecting any keyboard to the computer, the source of the problem may be the port (PS/2 or USB) or the motherboard.
The functionality of individual keys can be checked using test applications, for example MS Key, which is included in the Microsoft IntelliType software suite, or online services Key-test, Keyboard Tester and the like.
Some keyboard shortcuts don't work
The reason for this is often third-party software for controlling the keyboard. Moreover, the application does not necessarily work on your system; perhaps it was installed before and was removed incorrectly. Sometimes the problem is caused by incorrect configuration of such programs.
To check this version, start Windows 7 in safe mode (programs from the startup list will not start under it). If the keyboard works normally, the assumption is correct.
Configuring Keyboard Settings in Windows 7
Layout settings
In the notification area on the taskbar, click the input language button and select the layout you want.

Or press a specified key combination. If you don't know it, open the Windows 7 Control Panel ->> Regional and Language Options.

On the “Languages and keyboards” tab, the “Change keyboard” option is available. Click the button.

In the “Switching keyboard” section, the key combination that changes the layout settings is indicated.

Set the delay before entering characters, input speed, and cursor blink rate
Open the Keyboard app in Control Panel.

Character input options in Windows 7 are located on the “Speed” tab. Move the sliders to find the settings that work best for you. You can check how this works in a special input field in the same window.
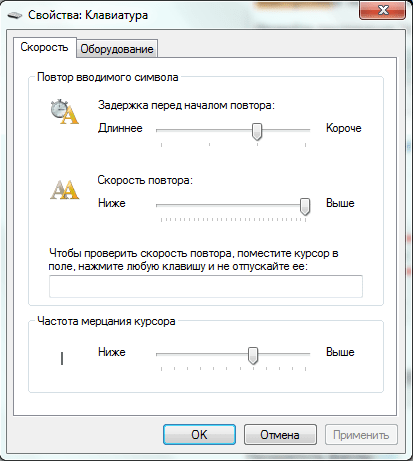
Here, below, you can set the cursor blinking frequency when entering text. It can also be changed by moving the slider left and right.
Content:
If your keyboard stops printing the correct characters, or not all keys respond when pressed, you may need to reset your keyboard. If the default language has been changed, the keyboard may not print the characters you expect. A faulty keyboard can also be the cause of your troubles.
Steps
1 Customize keyboard settings (Windows)
- 1 Open Control Panel. Control Panel opens from the menu Start.
- 2 Select an option Keyboard. Switch the option view to Badges if you can't find Keyboard in links Categories.
- 3 Change your repeat settings.
- 4 Change the blinking speed of the cursor. Move the slider at the bottom of the screen and set the required speed.
- 5
Check your keyboard driver. If the driver is damaged, it may cause the keyboard to not work properly.
- Click.Equipment .
- Select your keyboard from the hardware list.
- Click.Properties .
- Click the button.Driver .
- Click the button.Rollback .
2 Customize keyboard settings (OS X)
- 1 Open the Apple menu.
- 2 Select System Settings (System Preferences).
- 3 Select Keyboard and mouse (Keyboard & Mouse).
- 4
Change your repeat settings. You can change the repeat time, that is, the speed at which characters typed on the keyboard are repeated, and the delay before the repeat starts, using the slider.
- Check the changes by placing the cursor in the field and pressing and holding any key.
- 5 Turn on/off the keyboard backlight (if there is such an option). If your Mac supports keyboard backlighting, turn on the switch when the backlight is off and see if it turns off when the keyboard is not in use.
- 6
Click a modifier key to change the key's primary purpose. This is especially useful if you are using a PC keyboard with a Mac computer.
- Click on each menu to set new key values that will be convenient for you personally.
3 Change language settings (Windows)
- 1
Open Control Panel.
If your keyboard doesn't display the correct characters when you press certain keys, your language settings have been changed. If you select the wrong region, the language settings will be adjusted accordingly. To return your language settings, go to Control Panel.
- Control Panel opens from the menu Start. In Windows 8 you can right click on the Windows button and select Control Panel from the menu.
- 2
Open Language settings.
How to get to this option depends on your computer's operating system.
- Windows 8 - if you have a view open Categories, select Change input methods by tab Clock, language and region. If you have a view Badges, select Languages.
- Windows Vista and 7 - if you have a view open Categories, select Changing the keyboard layout and other input methods in the tab Clock, language and region. If the view is open Badges, select , then open the tab Languages and keyboards. Click the Change Keyboard... button.
- Windows XP - select language and regional standards, open the tab Languages, click Details....
- 3 Choose language. Use the menu to set the default language that you need. On Windows Vista and 7, select your language from the drop-down menu Default input language. In Windows 8, move the desired input language to the top of the list.
4 Change language settings (Mac)
- 1
Click on the flag next to the clock. If many languages were selected in the settings, you can select the one you need by simply clicking on the checkbox. A list of available languages will appear in front of you. Select your preferred input language.
- If you don't have such a menu, follow step 2 to find the language menu and set the language.
- 2 Open menu System Settings (System Preferences). If your keyboard doesn't display the correct characters when you press certain keys, your language settings have been changed. If you select the wrong region, the language settings will be adjusted accordingly. To return your language settings, open the Apple menu and select System Settings.
- 3 Select Language and text. Here you can select the languages that OS X can use.
- 4 Click the button Input sources. A list of languages for OS X will appear in front of you. Uncheck those languages that you do not use, check the languages that you need.
5 Troubleshooting a non-working keyboard
- 1 Try a different keyboard. Connect another USB keyboard to your computer and see if it works. If the second keyboard works, then the first one is broken. If the second keyboard does not work, then there is a problem with the computer.
- 2
Check the connection. If the problem is with the keyboard, check that the connection to the computer is correct.
- If the keyboard is connected via USB, check whether the cable is worn out and how well it connects to the USB port.
- If you use a wireless keyboard, make sure your computer's keyboard is updated and that the wireless transmitter is working. Make sure the keyboard batteries are not dead.
- 3 Replace the keyboard. If all efforts fail, it may be time to change your keyboard. The keyboard is constantly used, it experiences physical impact, and naturally, over time it breaks. If you use a laptop, replacing the keyboard will not be so easy, but it is still possible.
In this article I will tell you:
- how to set up the keyboard on Android
- turn off phone vibration
- what to do if the keyboard on a Samsung smartphone is missing
- how to install a replacement for a standard keyboard (change the keyboard shell).
How to remove vibration on the Android keyboard
When you enter text, your phone vibrates. At first it is comfortable, then it slowly begins to irritate. It’s also annoying that it can’t be disabled directly in the keyboard layout settings. Here are step-by-step instructions on how to quickly turn off vibration on your Android keyboard:
- Go to Settings - General settings - section "Language and input".
- On the page that appears, select the keyboard you are using
- Scroll through the list of keyboard options and uncheck the box next to "Vibrate when typing."
If you are using Samsung, vibration can be turned off as follows:
- Settings - General settings - Language and input section
- On-screen keyboard - Samsung keyboard - Touch feedback - Vibration
- Slide the Vibration switch to the left
This is how you can turn off vibration response on most devices with the latest versions of Android. In older versions, some settings may differ, but we believe you can easily find them.
The keyboard has disappeared on Android (Samsung) - what to do?
What to do if the keyboard has disappeared on your Android (and this application is mega-important for many)? You can quickly return the keyboard on Samsung models and others to its place using one of the following methods.
Google Play has dozens of great keyboards for tablets and smartphones. Each of them can become a full-fledged replacement for a standard keyboard. Many of them are free to download, but require nominal money for add-ons. We recommend reading our review if you want to change the keyboard on Android.
How to install a keyboard on Android
The standard Android keyboard does not suit all users. Although it improves with each new version of the OS (in terms of ergonomics, i.e., ease of use), in terms of customization, the stock keyboard is very limited. So, you will not be able to download additional themes, change the sound of the keys, select stickers and numerous emoticons.
In order to install an additional keyboard, you need:
- Download the desired application from Google Play
- Run the installer (usually this happens immediately after downloading)
- Launch the installed application by finding it by name on the Android start screen.
- All further actions (changing the standard keyboard and activating another through the Android settings) will be described in the application window.
How to change the keyboard on Android
If you have several alternative keyboards installed on your tablet or smartphone and would like to switch from your current keyboard add-on to another, there are two ways to do this.
1) You can change the keyboard on Android through the standard settings in the Android OS. To change the current keyboard, follow these steps:
- Go to Settings - General settings - Language and input
- Default keyboard
- In the Select Keyboard window, select the keyboard you want to display when you enter text. Just set the switch next to its name.
2) You can also change the shell directly through the settings of the installed Android keyboard - when you launch the application. For this
- Install a new keyboard by downloading it from Google Play or another resource
- Follow the step-by-step setup wizard built into the keyboard shell (usually, developers provide this option)
- Agree to access permissions
- Activate the keyboard add-on
The computer keyboard is the perfect information input device. The keyboard, due to low user productivity, turns out to be the “bottleneck” of the PC today, especially when it works inefficiently - the keys stick or require a strong press. On all PC keyboards, the arrangement of letter keys is standard and corresponds to the QWERTY standard (according to the first Latin letters from left to right located on the keyboard).
In addition to the standard keyboard, specialized keyboards are common. Among them are special keyboards for the blind with tangible dots on the keys; keyboards for point of sale, equipped with devices for reading bar codes or reading magnetic cards; touch sensitive, which have an additional coating of the keys with a special touch foil as protection against harmful influences (shavings, ash); keyboards for medical institutions with devices for reading information (for example, from insurance cards).
Standardization in the size and arrangement of keys is needed so that the user can work “blindly” on any keyboard without relearning. The blind ten-finger method of work is the most productive, professional and effective.
How a PC keyboard works
The keyboard is a matrix of keys combined into a single unit, and an electronic unit for converting key strokes into binary code. Keyboards use various types of keys, of which capacitive and contact are the most widely used.
Due to daily and long hours of work, when a PC turns into an indispensable business tool, the attention of both beginners and experienced users sometimes becomes dull. Such troubles often happen when the moon is waxing; apparently, a person is subject to the influence of this night luminary, which has not yet been fully studied. And then stores selling components exceed their sales plan.
Some ignorance can be forgiven for housewives, but let's get to the bottom of it: the inexpensive keyboards that flood the market today are devices, as a rule, made in China and Korea and made in Thailand. Moreover, they may differ in connection method (PS/2, USB) and have different names (for example, Chicony KB 9810, KB 9850, KWD820, Microsoft RT 9480, GodeGen 1307, 1616, Cherry and the like), but they are all united by internal structure. Inside the case, the keys press on flat films pressed against each other, with conductive paths and contact points applied to them.
Such keyboards are distinguished by a relatively low price - from 100 to 500 rubles. Other keyboards (including wireless ones), which have a higher cost (are made “humanly”), are based on normal closing contacts (capacitive and contact). Let's consider a keyboard that is connected to the PC motherboard via a special 6-pin connector (PS/2 - shown in Fig. 4).
When the user presses a key (while the computer is active), the keyboard sends (exchanges with the PC) a sequence of pulses of negative polarity, which can be recorded on pin 2 of this connector. The Enhanced 101-key keyboard scan codes are fully compatible with the 83-key keyboard codes, and additional keys are coded with the remaining numbers in the seven-digit code.
In addition to pressing, the keyboard also marks the release of each key, sending the processor an interrupt signal with the corresponding code. When you press a key, the keyboard generates a one-byte press code, and when you release a key, it generates a one-byte release code. The keystroke code is the same as the scan code.
Rice. 7. Optical mouse with signal transmission via radio channel with batteries removed
The device had enough power from the USB port to receive and charge the batteries. The radio receiver has a special switch that allows the user to select one of two wave reception channels. A4Tech company marks its manipulators with an individual electronic code, thanks to which up to 256 mice or keyboards can coexist on one reception channel.
Such a technical solution, of course, narrows the data transmission bandwidth, but with a maximum radius of reliable reception of 2 m, this is not critical.
The RP-650Z mouse (from A4Tech) has two reprogrammable additional keys. The radio data exchange channel switch is located inside the manipulator body and can only be accessed when the batteries are removed (Fig. 7).
It is possible to charge batteries for a mouse and keyboard with a standard charger, the housing of which also houses a signal transceiver, but it is not very effective. The fact is that the charger is powered from the US B port, the maximum current of which does not exceed 100 mA.
Naturally, in order to fully gain the full capacity of a standard AA 1400 mAh battery, it will take more than one day (especially if the battery is “not fresh”). If we assume that the average PC user works with such a wireless mouse + keyboard set for 2 hours a day, then fully charged mouse batteries last in practice for 5 days, then they need to be recharged again. The switch provided on the body of the charger, which protects the batteries from discharge through the circuits of the transceiver, does not really help the situation. This situation with constantly changing batteries and installing them in a charger cannot be called acceptable.
The keyboard, which is also powered by two batteries of the same type with a capacity of 1400 mAh, works even less (current consumption is greater than that of a wireless mouse), and this time barely exceeds 2 days (taking into account work of 2-3 hours a day). The wireless keyboard from the kit in question does not even have a power switch, so the batteries constantly release energy. Much more advantageous in this regard are wireless mouse + keyboard sets, which can be charged without removing the batteries, but simply by inserting the mouse into an adapter - a charger powered by a 220 V network.
The wireless set looks very effective, allows you to feel comfortable at your desk, move the keyboard as you like within 2.5 m from the transceiver (which can be convenient even in space in zero gravity), but it also has some disadvantages (cons) which we will consider below.
conclusions
1. It is better to power the wireless keyboard with standard batteries (AA batteries) with minimal self-discharge parameters, for example, GP Ultra Alkaline Battery or similar ones with a notice on the battery case “0% mercury & cadmium”. They are a little more expensive than regular ones, but they allow you to forget about recharging the batteries (in the keyboard) for 7-8 months. This is despite the fact that the keyboard is not turned off by a separate power switch (as noted above), but is constantly in operating mode, i.e. receives and transmits a radio signal (when pressing keys) regardless of whether the PC is turned on or not. The same batteries are quite suitable for use in a mouse combined with a radio wave transceiver unit.
2. It’s better to charge mouse batteries (if you don’t use the previous advice) not with a standard charger (USB-powered, especially since when the PC is turned off, the batteries consume energy through the charger circuit), but with a separate AC-powered charger 220 V, which today can be purchased in any store for a symbolic price of 100 Russian rubles. The power of such a universal charger for NiCd and NiMH batteries is such that the batteries will reach their full capacity in 6-7 hours (i.e. overnight).
3. When the PC is loaded with various programs, poor control over the state of the HDD (rare defragmentation, absence or rare “cleaning” of the registry from old programs and files, frequent installation and uninstallation of programs and games), as well as unreliable operation of the hardware of the PC itself , a wireless keyboard and a pointing device (such as a mouse) only provide additional options for system failures. Thus, eliminating both software and hardware malfunctions in a PC system is much easier and more convenient when all possible causes of failures are localized - with the usual, simplest typing (classic wired keyboard with the same optical mouse). This will also be said by any professional PC user who constantly experiments with hardware and utility programs, achieving optimal results from their PC. This is why wireless kits are difficult to see among practicing PC repair specialists, in offices and in “reputable companies.” And they don’t have a problem with money for new know-how.
4. Using a wireless kit is truly beneficial and convenient in laptops (actively working on a standard laptop keyboard with text and graphics for several hours a day is not pleasant). The wireless kit adapts perfectly to the USB bus, and thanks to the wireless capability, the user can successfully work with a laptop with a regular 101 (102)-key “large” keyboard and mouse, having the ability to install the keyboard and mouse as desired, removing them from the laptop to a reasonable distance without worrying about connecting wires.


