How to arrange page numbers in Microsoft Word. How to number pages in Word How to put the desired page in Word
Microsoft Word is the most popular word processor, one of the main components of the MS Office suite, recognized as the generally accepted standard in the world of office products. This is a multifunctional program, without which it is impossible to imagine working with text, all the capabilities and functions of which cannot be fit into one article, however, the most pressing questions cannot be left unanswered.
Thus, one of the common tasks that users may encounter is the need to set page numbers in Word. Indeed, no matter what you do in this program, be it writing an essay, term paper or dissertation, report, book or regular, large text, you almost always need to number pages. Moreover, even in cases where you don’t really need it and no one requires it, it will be very difficult to work with these sheets in the future.
Imagine that you decide to print this document on a printer - if you don’t immediately staple or staple it, how will you then find the right page? If there are a maximum of 10 such pages, this, of course, is not a problem, but what if there are several dozen or hundreds of them? How much time will you spend organizing them if something happens? Below we will talk about how to number pages in Word using the 2016 version as an example, but you can number pages in Word 2010, as in any other version of the product, in exactly the same way - the steps may differ visually, but not thematically.
1. Having opened the document that you want to number (or an empty one that you just plan to work with), go to the tab "Insert".

2. In the submenu "Header and footer" find the item "Page number".

3. By clicking on it, you can select the type of numbering (location of numbers on the page).

4. Having selected the appropriate numbering type, you need to approve it - to do this, click "Close the header and footer window".

5. The pages are now numbered and the number is in the location corresponding to the type you selected.

How to number all pages in Word, except the title page?
Most text documents in which you may need to number pages have a title page. This happens in essays, diplomas, reports, etc. The first page in this case acts as a kind of cover, which indicates the name of the author, title, name of the boss or teacher. Therefore, numbering the title page is not only not necessary, but also not recommended. By the way, many people use a corrector for this, simply covering up the number, but this is definitely not our method.
So, to exclude the numbering of the title page, left-click twice on the number of this page (it should be the first).

In the menu that opens at the top, find the section "Options", and in it put a tick opposite the item "Special footer for this page".

The number from the first page will disappear, and page number 2 will now become 1. Now you can work on the title page as you see fit, as needed, or in accordance with what is required of you.
How to add numbering like “Page X of Y”?
Sometimes, next to the current page number, you need to indicate the total number of pages in the document. To do this in Word, follow the instructions below:
1. Click on the “Page Number” button located in the tab "Insert".

2. From the drop-down menu, select the location where this number should appear on each page.

Note: When selecting an item "Current location", the page number will be placed at the location where the cursor is located in the document.
3. In the submenu of the item you selected, find the item "Page X of Y" select the required numbering option.
4. To change the numbering style, in the tab "Constructor" located in the main tab "Working with headers and footers", find and click the button "Page number", where in the drop-down menu you should select "Page Number Format".

5. Once you've selected the style you want, click "OK".

6. Close the window for working with headers and footers by clicking on the outermost button on the control panel.

7. The page will be numbered in the format and style you selected.

How to add even and odd page numbers?
Odd page numbers can be added to the right footer, and even page numbers can be added to the left footer. To do this in Word you need to do the following:

1. Click on the odd page. This could be the first page of a document that you want to number.
2. In a group "Header and footer", which is located in the tab "Constructor", click on the button "Footer".

3. In the drop-down menu with lists of formatting options, find "Built-in" and then select "Aspect (odd page)".

4. In the tab "Constructor" ("Working with headers and footers") check the box next to the item "Different headers and footers for even and odd pages".

Advice: If you want to exclude the numbering of the first (title) page of the document, in the “Design” tab you need to check the box next to “Special header for the first page”.

5. In the tab "Constructor" click the button "Forward"- This will move the cursor to the footer for even-numbered pages.

6. Click "Footer" located in the same tab "Constructor".

7. In the drop-down list, find and select "Aspect (even page)".

How to number different sections?
In large documents, it is often necessary to set different numbering for pages from different sections. For example, there should be no number on the title (first) page; pages with a table of contents should be numbered with Roman numerals ( I, II, III...), and the main text of the document must be numbered in Arabic numerals ( 1, 2, 3… ). We will tell you below how to number different formats on pages of different types in Word.
1. First you need to display hidden symbols, to do this you need to click the corresponding button on the control panel in the tab "Home". Thanks to this, you will be able to see the section breaks, but at this stage we just have to add them.

2. Scroll the mouse wheel or use the slider on the right side of the program window to scroll down the first (title) page.

3. In the tab "Layout" click on the button "Breaks", go to point "Section breaks" and select "Next page".

4. This will make the title page the first section, and the rest of the document will become Section 2.
5. Now go down to the end of the first page of Section 2 (in our case this will be used for the table of contents). Double-click on the bottom of the page to open the header and footer mode. A link will appear on the sheet "Same as previous section"- this is the connection that we have to remove.

6. Having first made sure that the mouse cursor is located in the footer, in the tab "Constructor"(chapter "Working with headers and footers"), where you need to select "Same as previous section". This action will break the connection between the title section (1) and the table of contents (2).

7. Scroll to the bottom of the last page of the table of contents (Section 2).

8. Click on the button "Breaks" located in the tab "Layout" and under the point "Section breaks" select "Next page". Section 3 will appear in the document.

9. With the mouse cursor in the footer, go to the tab "Constructor", where again you need to select "Same as previous section". This action will break the connection between Sections 2 and 3.

10. Click anywhere in Section 2 (table of contents) to close the header/footer mode (or click the button on the control panel in Word), go to the tab "Insert", then find and click "Page number", where in the drop-down menu select "At the bottom of the page". In the drop-down list, select "Easy number 2".
11. Expanding the tab "Constructor", press "Page number" then select from the drop-down menu "Page Number Format".

12. In paragraph "Number format" select roman numerals ( i, ii, iii), then click "OK".

13. Scroll down to the footer of the first page of the entire remaining document (Section 3).

14. Open a tab "Insert", select "Page number", then "At the bottom of the page" And "Easy number 2".

Note: Most likely, the displayed number will be different from the number 1; to change this, you must follow the steps described below.

15. The document page numbering will be changed and arranged in accordance with the necessary requirements.
As you can see, numbering pages in Microsoft Word (everything except the title page, as well as pages of various sections in different formats) is not as difficult as it might seem at first. Now you know a little more. We wish you successful studies and productive work.
We don’t use page numbering in Word very often. And maybe I would never have needed this if I had not started writing my book. And here numbering is simply necessary. It is also necessary when writing a dissertation or term paper.
And it won’t hurt in a simple abstract either. Without delaying the matter, let's try to number the pages right now. The first thing you need to do is to find the “Insert” line in Word itself and click on it.
After this action, such a panel will open in front of us, where we just need to find this row, under which there is the signature “Header and Footers”. In this row of three lines, we are interested in the very last “Page Number”.  After this, you need to click on this line with the mouse. When this action is completed, a new panel will appear in front of us again.
  Here we see exactly how the numbers will be arranged. Let's choose an example and look at the result.
  And this is what we got on the Word sheet itself (Word)
  That's it, the sheet is numbered. All other pages of your document will be numbered in the same way, from the very first to the very last. But there is also one “but” here. Where have you seen a document begin with page number 1? That's right, there is practically nothing like this anywhere. Because number 1 is the title page. And we don't number it. And what should we do then? It's simple. In order to solve this problem, you need to click on this line “Page Number Format”
  And this image appears before us:
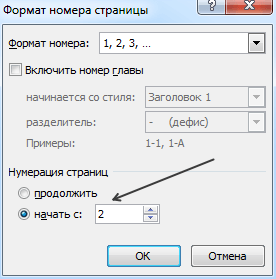
  What do we need here? Just one – “Page Numbering” and “Start With”.
  Here you just need to put the number with which the book, dissertation or abstract begins.
  That's it, we have the numbering done as it should be. Now let's try to analyze this question. When we carry out all these actions, we get a strip like this.
  How can I remove it? Everything is very simple. To do this, click on the “Close footer window” box. Where can I look for it? And here it is.
  After this action, we will only have one numbering left.
How to number pages in Word, for example, with Roman numerals or even letters? Oh, and that's no problem! Numbering pages in Word this way is very easy. Again, display this “Page Number Format” box and select Roman numerals in the “Number Format” line.  And this is what we got:
  Well, how can you completely remove all numbering? And this problem is very easy to solve. To do this, click “Delete numbers” in the footer column.
  So, easily and simply, and most importantly, understandable for everyone, we have solved one of the main problems of Word users - how to number pages. I think now you definitely won’t have any difficulties with this!
The Word text editor is one of the most popular typing programs. It is difficult to find a Windows-based computer that does not have this program installed. The popularity of this program is confirmed by the number of questions about it that users ask on this and other sites on the Internet.
In this article we will look at one of the most requested features in the Microsoft program. Here you can learn how to put page numbers in Word.
How to put page numbers in Word 2007, 2010 or 2013
In 2007, Microsoft Word switched to the so-called ribbon interface. The main feature of this interface is that all program functions are distributed across different tabs. In order to activate a particular function, the user needs to go to the desired tab and find a button there that is responsible for the function the user needs.
For example, in order to put page numbers, you need to go to the “Insert” tab and click on the “Page Number” button.
After clicking on the “Page Number” button, a drop-down menu will appear in which you can choose how to place the page number: at the top of the page, at the bottom of the page, or in the margins.
Here you can also. To do this, click on the “Page Number” button and select “Delete Page Numbers”.

How to put page numbers in Word 2003
If you are using Word from 2003, then in order to add page numbers you need to open the “Insert” menu and select “Page Numbers”.

This will open a small window called “Page Numbers”. Here you can choose where you want the page number to appear (top of page, bottom of page, right, left, or middle).

After selecting the appropriate location, click on the “OK” button and numbering will appear on the pages of your document. If you want to start numbering from a different number or change the number format on the page, then you need to click on the “Format” button in the “Page Numbers” window.

After this, a small window called “Page Number Format” will appear. Here you can change the number format, enable chapter numbering, and also select the number from which the numbering should begin.
In order to remove page numbering in Word 2003, you need to open the “View” menu and select “Header and Footers”. After this, you need to manually erase the page number on any page of the document and close the “Header and Footer” editing mode.
Microsoft Word, which users simply call Word, is rightfully considered one of the most popular programs for working with texts. A wide variety of functions allows you to solve very different problems that relate to typing and formatting text documents. A simple intuitive menu makes work possible for people of any age and level of knowledge.
Very often, when typing a document with several pages, users are faced with a seemingly simple task - page numbering. But not everyone is able to immediately find the function they need, despite the fact that this is quite simple to do. Also, not everyone can immediately figure out how to arrange the page number according to any special requirements for the document, which happens quite often. Let's figure out how to number pages in Word of different versions.
Let's first look at how to number pages in Word 2003, since this version of the program is still quite popular and is used by a large number of users.
After starting the program, go to the “Insert” tab and then select “Page Numbers” from the drop-down list.

In the window that appears, you can specify the numbering parameters:
- position - above or below;
- alignment - left, right, center, inside, outside.

It is also possible to specify the format of the page number, namely, numbers or letters, which page to start numbering from.
Page numbering in Word 2007, 2010, 2013
Word versions later than 2007 have a very thoughtful and user-friendly interface. It is designed in such a way that a huge number of functions are logically distributed across several tabs. In order to start numbering pages, you need to go to the “Insert” tab.

Here you need to click on the “Page Number” line, after which you can adjust the location of the page number in the drop-down menu (at the top of the page, at the bottom or in the margins).

In the same menu there is a line “Page Number Format”, by selecting which you can specify the page number from which numbering will begin.

To do this, you need to place a marker on the bottom displayed line (“start”) and enter in the box the number from which the document numbering should begin.
Another problem that Word users often encounter is page numbering without a title page. This means that you need to number pages starting not from the first page (title page), but from the next one, and the numbering should start from two, because the first page is considered the cover.
This is quite simple to do - you first need to enter the page number of the document as usual, after which each of the pages will be numbered. Now we turn off the numbering of the title page.

To do this, from the “Insert” tab, go to the “Page Layout” tab. A little to the left of the center of the menu there will be a line “Page Options”, next to which there will be a small button in the form of a gray square with a cross. By clicking on this button, the user will be able to see the “Page Settings” window in front of him, where he must check the box next to the line “Differentiate headers and footers of the first page”.

After these steps, the number on the title page will disappear without disturbing the overall page numbering of the document.
Microsoft Word or simply Word is one of the most popular programs among users. Thanks to a large number of functions and a simple interface, Microsoft Word has become almost a standard among . Therefore, it is rare to find a computer with the Windows operating system, but without the Word program.
One of the typical tasks that users encounter while working with this program is page numbering. Many users simply cannot find this feature. In this article we will talk about how to enable and configure page numbering in Word.
How to enable page numbering in Word 2007, 2010 or 2013
Since 2007, Word has used a so-called ribbon interface. In this interface, all program functions are distributed over several tabs. The Page Numbering feature is located on the Insert tab.
By clicking on the “Page Numbering” button you will see a drop-down menu in which you can select the arrangement of numbers. For example, page numbers can be placed at the top of the page, at the bottom of the page, or in the margins. To add page numbering in Word, select one of the proposed layout options.
If you want the page numbering to start with another number rather than one, you can specify this in the “Page Number Format” menu.

Open the Page Number drop-down menu and select Page Number Format. In the window that opens, you need to enable the “Start” function and specify the number from which page numbering should begin in Word.
Page numbering in Word 2007, 2010, or 2013 without a cover page
Another possible problem with page numbering is numbering without a title page. Users simply don't know how to disable pagination on the first page of a document.
To set up page numbering without a cover page (first page), you must first number all pages as described above. After a number appears on all pages of your document, you just need to turn off the display of numbering on the first page.
To do this, go to the “Page Layout” tab and click on the small button to the right of the “Page Settings” inscription.

After this, a window called “Page Options” should open in front of you. Here you need to check the box next to the “Mark headers and footers on the first page” function. As a result, the page numbering will disappear from the first page of your document.

In the article “” you can learn how to make the first page without a number, and the second with the number “1”.