How to add or remove an audio track in Sony Vegas. How to remove an audio track from a video How to remove an audio track from an avi file
When playing video files on hardware players or on the built-in player of a TV, a problem sometimes arises: the equipment may not allow you to select an audio track. And if, moreover, the first track is in the original language, then you won’t be able to watch the film comfortably.
How to remove audio track from mkv
To delete any media data included in the most popular formats, it is best to use a very simple and functional program Mkvmerge. This free, open-source utility has a very simple and intuitive Russian-language interface. Download, install and launch it. In the main window, click the “add” button or drag the desired video file that we want to process into the “input files” section.
In the lower section “Tracks, chapters and tags” we see all the tracks included in the file.
From those tracks that we do not need, we simply uncheck them. Exactly the same principle can be used remove subtitles from mkv.
All that remains is to set the name of the output file and click on “Start processing”. At the output, the program will produce a mkv file with the changes.
How to add an audio track to mkv
Adding tracks is also very easy to implement. In “Input Files” we add the desired track in a compatible format.
You can add a container without first extracting audio from it.

If earlier editing even a short video took a lot of time and required a certain skill, then modern tools for working with video files allow you to do anything with them without having any special knowledge. As a result, any user can create their own film, video instruction or presentation, independently completing all stages from filming to presentation to the public.
But, despite the apparent simplicity, some actions still raise questions. For example, many users ask how to remove sound from a video.
This kind of operation will be useful to you if you want to add music to a video sequence or, for example, voice a video by first deleting the original track.
Below are several programs that will help you cut sound from a video. You can find online services that offer similar functionality, but they only work with small files, so it is much more convenient to use multimedia editors.
Windows Movie Studio
Computers used to have Windows Movie Maker, which everyone tried to create something with. However, modern versions of Windows (starting with Windows 7) do not have it. Movie Maker has been replaced by the Windows Movie Studio program, which, however, requires additional installation from the Microsoft website.
Windows Movie Studio can work with all popular video formats.
You will quickly figure out installing the editor: there is nothing unusual in this process. Let's take a closer look at deleting an audio track:

The audio track has been removed - now you can connect a microphone to your computer and add your own voiceover. A little difficult for the first time, but once you get the hang of it, you'll be deleting audio tracks in a matter of moments.
SUPER© converter
If working with Windows Movie Studio seems too confusing to you, then try installing SUPER© Converter on your computer. This free conversion utility also supports all popular video formats, so you can edit your video without any problems:

SUPER© Converter is one of the simplest and most convenient tools for removing sound. But if you don't like that its interface is presented in English, try using another program called VideoMASTER
VideoMASTER
This is a powerful Russian-language editor that offers many possibilities - from regular conversion to burning to DVDs or settings for posting a video on the Internet. Unfortunately, VideoMASTER is a paid program, but you can use it for free for 10 days, so you will have time to remove the sound from the video:

As a result of performing the steps described above, the program will erase the audio track from the video file, saving a new video on the hard drive.
Conclusion
The programs described above are only a small part of the video editors that allow you to remove sound from videos and perform other similar actions.
The VideoMASTER, SUPER© and Windows Movie Studio applications were chosen because they support most formats, but there are other, more specialized utilities.
An example is the AVI Trimmer + MKV 2.1 and YAMB programs. They work with a limited number of formats (AVI. MKV. MP4, TS, MOV), but they also perfectly perform their tasks. Therefore, the choice of a specific editor is a matter for each user.
Let's say you have a video and you want to remove the sound from it, completely cut out the audio track. This can be done using various video editors, such as Sony Vegas, Movie Maker, Adobe Premier, etc. But because of this generally banal operation, is it worth installing additional software on your computer, which, by the way, is not at all free? In this case, it is much easier and more effective to use online services!
In order to remove sound from a video, we will use Cloudconvert.com. This is a cloud service with which you can convert anything into anything :) Although we are not going to convert anything, by and large, this online service is ideal for our needs. Why? Now I’ll tell you everything.
Go to Cloudconvert.com and click on the “Select files” button.
Select the desired video file on your computer’s hard drive. It is also possible to provide a link to it on the Internet or download it from:
- DropBox
- Google Drive
- OneDrive
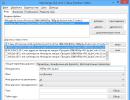
After this, a page will open where the file name will be indicated (in my case Webinar), its format (in my case MP4), and there will be a button with an icon in the form of a wrench. We click on it.

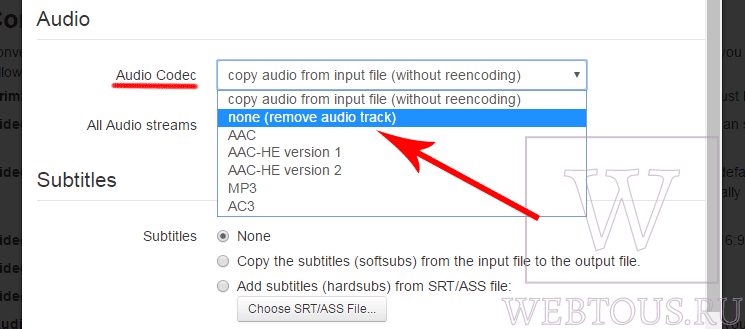
In the window that opens, in the AUDIO section there will be an item “Audio Codec”. In the drop-down menu, select the “none (remove audio track)” option. By doing so, we indicate that we intend to remove the audio track from the video.
If you wish, you can do additional options with the video:
- Convert it to another format
- Cut/add subtitles

After this, click on the “Start Conversion” button, and after a certain time (depending on the size of the source file) you will receive a result that can be downloaded to your computer.

Start playing the video and make sure it is already without sound :)
You can use the Cloudconvert.com online service completely free of charge. The maximum video upload size is 1 GB. You have a daily limit of 25 conversion units.

So, for example, the conversion of one text file or image is equal to one unit. But in the case of video files, as far as I understand from the description, one conversion unit is equal to one minute of the time spent by the service on conversion. Maybe I'm wrong. If you know from experience how things really stand with this, write in the comments.
Hello friends!
In this article I want to show you how you can separate audio from video in Sony Vegas and, if necessary, remove the audio track or do some other manipulations with it.
You've probably already noticed that when we add video to a project for later editing, it is loaded together with the audio and they are glued together. And if we try to do some manipulations with one of the tracks (with video, for example), then the same thing will happen with the other (with sound).
So, it’s clear that this can be very, very inconvenient. I want to tell you right away that when editing video in Vegas Pro, you often have to separate audio and video tracks.
To be able to work with each of these tracks separately, we must first “unstick” them, i.e. separate audio and video. In Sony Vegas this is done very simply.
Watch the video tutorial on how to separate audio and video in Sony Vegas, as well as how to remove an audio track from a Vegas Pro project:
Well, friends, well, we have learned how to separate audio and video tracks in Sony Vegas pro. We also learned how to remove the audio track from the Sony Vegas project.
That's all for me. I hope this tutorial was helpful to you.
Have you recorded a panorama with an expressive landscape, but extraneous sounds spoil the whole harmony? Don’t rush to send the file to the trash – the problem can be easily fixed using a video editor. From this article you will learn how to remove sound from a video and replace it in the VideoMONTAGE program.
A couple of clicks and there is no sound
“VideoMONTAZH” is an editor designed to make video processing as easy as possible for beginners. Its functionality includes all the basic tools necessary to obtain high-quality results. In addition to comprehensive improvement of video footage, the software provides a number of functions for working with audio. To erase an audio track from a file, install the editor on your PC and follow the instructions below.
☛ №1. After launching the video editor, click the button labeled "New project" in the start window. The next step, the software will offer to set the format of the future video file, you can select one of the proposed options or leave the option "Install automatically".
You can choose one of the standard formats or enter the value manually
☛ №2. Drag the clip from which you want to remove audio to the bar at the bottom of the screen. Use the command "Import video", if you want to copy a video track from a DVD. After the desired file has been downloaded, go to the tab "Edit" and select "Sound replacement".

If you add several videos, each of them needs to be edited separately
☛ №3. To completely remove sound from a video, you need to click on the command Add Audio > Select Music from Collection. A window with a list of compositions will appear in front of you, find the track among them "Silence" and apply it. The name of the audio track speaks for itself - the sound will completely disappear from the video.

If the video lasts less than 15 minutes, trim the “Silence” track; if longer, add it to the list again
The lack of sound can cause discomfort and sometimes anxiety when viewing. Directors often use a similar technique to create so-called suspense, completely immersing the viewer in what is happening on the screen. And if in a movie such an artistic technique works like a charm, then in an ordinary video it looks as if the creator forgot to attach a sound track. If you do not intend to add tension to watching the video, we recommend adding music to the background.
In addition to “Silence” in the collection you will find several more melodies that suit different moods - calm and cheerful, quiet and louder. Select an audio recording that matches the content of the video, or upload your own by clicking "Select a file". If the video recording is long, you can connect several tracks or loop one, adding it again.

You can select any part of the audio track; it is not at all necessary to trim the melody only from the beginning or end
The program also allows you to create from several excerpts, applying a single musical background to the entire project. To do this, you need to place video fragments on the slide bar and open the tab "Music". By clicking on the plus icon, select music files, adjust their duration and sequence. To remove the original audio tracks from all videos at once, simply uncheck the command “Add music to the original sound”. If you wish, you can leave this function enabled, in which case the background melody will be overlaid on top of the original one.

You can edit the sound of background music, make it loud or, conversely, barely audible
Correct and improve your video in 5 minutes
Now you know how to remove sound from a video and forget about spoiled footage forever. However, installing the “VideoMONTAZH” program will open up many more possibilities for you in terms of processing video files! Just a couple of minutes is enough to polish and improve even an unremarkable video.
- Trim off excess
After uploading a clip, you can reduce the size of the video and cut out excess, simply by marking the boundaries of the segment that you want to leave. Move the black marks on the timeline or fill the time period manually.

The program will allow you to remove unnecessary things from the video while maintaining high quality
If an extra object ruins the composition, use cropping, so you can highlight the desired area of the image, focusing on the main thing.

The same option will help you get rid of horizontal or vertical black bars in your video.
- Adjust the speed
Manage time the way you want - speed up the clouds slowly creeping across the sky or, conversely, slow down the falling leaves from a tree. Correctly adjusted speed can greatly increase the expressiveness of a clip. To change it, just select the appropriate command from the drop-down list. So you can speed up or slow down the clip by 1.5, 2 or 3 times with just one click!

Videos sped up or slowed down in the program will also not lose quality
- Improve image quality
“Video Montage” will eliminate jitter in the frame in seconds using the option "Image stabilization", which you will find in the tab "Improvements". Check the box next to the corresponding line and evaluate how much the image has changed. In the same section, you can make the picture brighter, increase the saturation of shades, or, conversely, eliminate overexposure by darkening the frame. In the “Cropping” section you can either rotate the video 90 degrees or cut off the excess.

Using auto-enhancement tools, you can adjust the color balance in your video in just one click
- Apply effects
Go to the tab "Effects"– and you will see dozens of filters, ready to instantly make your video original and atmospheric. The presets are divided into thematic categories - vintage, romantic, children's. To apply an effect, just select it with one click.

With stylish filters from the program's collection, your video will look more professional
If you wish, you can use manual settings and develop your own unique filter from scratch. To do this, you need to select several improvements and adjust the parameters of each of them. The video editing program offers to tint the image, age it, apply film grain, color noise, spray or engraving effects, apply masks, highlights or flares.

By combining different effects, you can use completely new, unique filters in each of your projects.
The program is not limited to the described functions - replace the background, create music video cards, record with a webcam. With the VideoMONTAGE editor, nothing is impossible or inaccessible - download the software, and working with video files will become your favorite hobby!