Web camera installation instructions. How to install a webcam on your computer correctly and without unnecessary problems? How to set up a webcam on a laptop
Quite often, situations may arise when video surveillance needs to be installed only near the computer, for example, at a workplace, within an apartment, at the entrance, and similar cases. Buying and additional equipment (DVR, hard drive, etc.) is expensive, plus installation and configuration will take a lot of time. In such cases, you can use a simpler and cheaper option - install video surveillance via a web camera. An old, simple web camera is quite suitable for these purposes, and buying a more modern model now does not represent a large financial outlay, and by installing several web cameras, you can deploy a full-fledged video surveillance system.
Do-it-yourself video surveillance using a web camera
To create a simple video surveillance system based on a web camera, we will need the following elements:
- The web camera itself (or several), which can now be purchased for around 1000 rubles;
- Computer or laptop to which the camera will be connected;
- Device drivers and software for setting up video surveillance;
- USB extension cable for using the camera at some distance from the computer.

Video surveillance with web camera
Next, we place the camera in the planned location: we hang it up, or we implement hidden video surveillance via a web camera - we hide it in any secluded place so that the camera can calmly monitor what is happening, while remaining unnoticed.
Connecting the camera to a PC and setting up image broadcasting will be quite simple: connect the cable to the USB output of the computer, install the necessary and additional software, and, if desired, set up video surveillance via the Internet.
Often, the usual recording of a video stream from a web camera to the disk space of a computer with further viewing of the archive is not enough, and you want to view what is happening remotely, as they say, online. In such cases, it is necessary to set up remote video surveillance via a web camera, with further viewing on any device connected to the Internet, anywhere.
Remote monitoring allows you to implement the following capabilities:
- Access to the camera and view what is happening from any device remotely;
- Recording an archive on a remote developer server with further viewing via the Internet, which saves disk space;
- Possibility of remote listening and recording of sound;
- Setting up sending alarm signals to the owner’s mobile phone or email in case of movement or noise in the frame.
 is implemented through various programs, of which there are now a great many, both free with simple functionality and paid, with quite extensive capabilities. Let's look at the fairly popular IVideon program, with which you can easily organize remote video surveillance via a web camera, as well as several free programs with simple functionality.
Program for video surveillance via web camera
In order for the camera to start transmitting the image to the computer, and even broadcast it to the Internet with the possibility of further viewing on any device, we need software. As a rule, the software that comes with it allows you to implement only simple basic functions of a web camera, which include the ability to communicate via the Internet. To set up additional features like motion recording, online broadcasting, alarms and other useful things, we will need more serious video surveillance programs.
Let's take an example of IVideon software from the cloud service of the same name. First, we need to download the IVideon Server program, install it on a PC or laptop and run it. Download IVideon Server and IVideon Client programs you can visit the official website using this link.
1. When you first launch the program, you will be asked to go through a simple registration procedure: in the first window, mark the “New configuration” dot, and then simply enter your email address and password in the window that appears.


2. After registration, a list of cameras connected to the computer will appear in the next window - if you have not yet connected the camera to the computer, then be sure to do it now, and after its name appears in the list of cameras, click on the “Next” button.

3. In the next window, settings for video archive parameters will appear, where you will need to allocate the desired amount of disk space that will be used for recording video. It is advisable to allocate more than 50 GB to ensure 24/7 camera operation.


5. If you did everything correctly, the program will open with a list of your cameras. By right-clicking on the desired camera and selecting the settings item, you can configure some useful functions - recording by motion, sound, schedule, etc., don’t be lazy to go through the settings to see everything clearly, everything is intuitive there.


Thus, you can easily set up covert surveillance via a laptop’s web camera by installing it anywhere in the apartment, even in plain sight, launch the program and turn off the screen backlight. The program will work as normal, and no one will even guess what is going on, and you can monitor what is happening remotely (the main thing is that the laptop or computer is turned on), through an additional service program which we will discuss later.

IVideon client program for remote access to cameras (available for enlargement)
We installed the IVideon Server program so that you can conduct video surveillance via a web camera online only from your computer, or in the browser interface through a service account. In order to remotely monitor what is happening from your mobile phone or another computer, you need to download a second program - Ivideon Client.
Downloading is available for devices based on Android, iOS, Windows, Ubuntu using the link we provided above when we talked about IVideon Server. After installing the program on your mobile phone, you will need to enter your account login and password, after which you will immediately have access to the image from the web camera connected to it. It is important that your computer is turned on and the IVideon Server program is running on it.
What other video surveillance programs are there?
You can also try the following video surveillance software.
WebcamXP. The free version is usually limited to one stream, so with this utility you can implement video surveillance from only one camera. The interface is in English, but it is not difficult to understand. You can set up motion-based recording (in the paid version) to save memory, or implement an online broadcast to the developer’s website with further viewing on another device remotely. Website: http://www.webcamxp.com
 Xeoma
. This utility works without installation and supports analog, wireless, IP and all popular manufacturers. Its functionality includes sending alarm messages with photographs of what is happening to your email address or mobile phone when a motion detector is triggered, and a loud signal may be heard from the computer speakers. Xeoma can be used as a webcam program, has the ability to connect an alarm siren and supports high-resolution cameras. The trial version allows you to connect up to 4 CCTV cameras. You can download it on the website: http://felenasoft.com
Xeoma
. This utility works without installation and supports analog, wireless, IP and all popular manufacturers. Its functionality includes sending alarm messages with photographs of what is happening to your email address or mobile phone when a motion detector is triggered, and a loud signal may be heard from the computer speakers. Xeoma can be used as a webcam program, has the ability to connect an alarm siren and supports high-resolution cameras. The trial version allows you to connect up to 4 CCTV cameras. You can download it on the website: http://felenasoft.com
AbelCam. The simple application is not limited to just capturing video from surveillance cameras, but also allows you to edit recorded files. What’s depressing is the ability to connect only one camera in the trial version, but for most simple cases its functionality is quite enough. The program has a motion detector, the ability to select a recording format - AVI or WMV, and supports all types of cameras (IP, web cameras, wireless). Program website: http://download.abelcam.com
Globoss. This is a powerful program that supports not only the web, but also . In the free version, the ability to connect cameras is limited to 2 devices; when purchasing a license, you can connect up to 12 cameras. This program has a full set of functional components: motion sensor, noise sensor, time recording, etc. It is also possible to set up remote video surveillance via a web camera using the developer’s service. You can download from the site http://kodos.ru
WebCamMonitor. A simple single-threaded program that only supports web cameras. It has the ability to configure recording by motion or sound. You can set it to react to motion only in certain areas of the frame. You can also set it to shoot only at specified time intervals. This program has the ability to notify about alarming events - if movement or loud noise occurs, it will send you an alert by email or mobile phone.
A web camera (“webcam”) is a digital device for recording video information that can be transmitted over the network. “Webcam” is an attribute of any laptop: manufacturers equip their products with web cameras “by default.” Also, many types of them are sold separately.
The difference between “webcams” and full-fledged video cameras is their focus on the capabilities of network programs with multimedia functions, that is, the emphasis is not on the quality of shooting, but on the ability to quickly transfer images to the network. Therefore, the majority of models have low resolution, not the best color rendition and a minimum of settings. The most expensive web cameras are capable of shooting at the level of a “mid-range” camera.
How to install and configure a webcam on Windows 7
Installing and configuring the built-in camera
The built-in web cameras of laptops are usually ready to work right away; just launch a network application, for example, Skype, and set the desired video parameters in it.

If the program reports that you do not have a camera, but you are definitely sure otherwise, it means that it is disabled or not installed. On some laptop models, first of all, you need to physically turn on the web - simultaneously press the Fn key + one of the keys in the F1-F12 row. A miniature in the form of a camera drawn on the button will help you determine the desired combination.

Find “Image Processing Devices” in the list of equipment and expand the tab. If the web camera is installed but not active, you will see an icon next to it in the form of a circle with an arrow.
To enable a device, expand its context menu and click “Enable”. When prompted by Windows, restart your computer and the camera will start working.

If there is no web camera in the device manager, but there is unidentified hardware, as in the picture, then you need to install a driver.
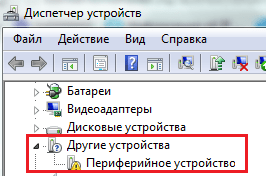
You can try to install the driver for the webcam using the system - most likely, Windows will find something suitable in its databases, and the device will work. To do this, select the “Update drivers” command from the context menu of the unknown hardware.

and specify the search method - automatically or manually. If you have not previously installed a web camera, then there are probably no suitable drivers on your computer. Automatic search will allow you to find them on the Internet.

You can also find out the model of the “webcam” from the documentation for the laptop, go to the website of its manufacturer and download drivers from there.
Not always, but often, a program for configuring the built-in web camera is installed along with the driver. For example, Cyberlink YouCam on HP laptops:

With its help, you can not only adjust shooting parameters, but also edit the image.
Installing and configuring an external camera
By external we mean a “webcam” as a separate device that is connected externally to a peripheral port of the computer. Most of these cameras have a USB interface, that is, they are universal, capable of working on any PC, not just Windows.

External “webcams” come in completely different designs and shapes, many are equipped with a built-in microphone, and some have a separate switch on the body. To connect them, it is best to use active extension cables that can additionally power the device, thereby improving the signal quality. An active cable allows you to distance the camera from the computer by a distance of 10 meters or more, and a passive (regular) cable allows you to distance it by a maximum of 5 m.

The delivery package of an external web camera always includes a CD/DVD with drivers and software from the manufacturer. To set up the camera, just connect it to the PC port, turn it on if there is a button for this, insert the disc into the drive and install the software. The program included in the set will allow you to configure shooting parameters, as well as turn on or off options such as microphone volume, password protection and much more.

However, thanks to plug&play technology, most web sites can work without manually installing drivers. Once physically connected, Windows recognizes and configures them automatically.
Programs for working with web cameras
If the webcam control program is not included in the package, you can install it separately. There are many applications for Windows 7 that make it possible to configure the camera more finely than the standard ones. And their additional features will make video chatting more fun.
ManyCam

This program will not only improve the quality of the picture transmitted to the interlocutor, but will also add a special charm to your appearance - cartoon eyes or mouth, glasses, mustache, beard, horns, etc. Or change the background of the room, for example, to a seascape. The program can detect motion, so all visual overlays will move with your face. In addition, ManyCam allows you to draw on an image directly online.
If you are video chatting with several interlocutors, you can enable a separate window with different special effects for each.
ManyCam is fully compatible with Windows 7.
iSpy

iSpy is a video surveillance program with the function of transmitting footage over the Internet. Allows you to partially replace the more expensive IP video surveillance technology and can be used to protect premises and outdoor areas.
To work with iSpy, you can configure an unlimited number of web cameras, including those connected to different computers on the same local network. The recorded material is saved in Flash format and transferred to the server for storage. The user can view both archives and real-time images at any time, as well as remotely turn on or off the cameras.
The first thing you need to do is make sure that your webcam included And installed necessary drivers. In the case of a laptop, we will talk about integrated; with a computer, we will talk about connected via an external USB port.
Opening Dispatcher right click on the icon Computer – Properties, then .

Pay attention to the section Processing devices images. 
As you can see, in this case the integrated webcam disabled. For inclusion you need to right-click on the camera icon and select “ Engage». 
If you have installed Windows 10– the next thing you need to do is check whether the camera is turned on privacy settings.
Start / Options / Confidentiality 
Chapter Camera- just move it slider to the right, if the camera was turned off there before. 
If we are talking about drivers, then usually for a built-in camera they are installed along with the system installation, but if this is not the case, then you will need download them from the official website and install.
Using a webcam on a computer
Using the cord that usually comes with the kit, connect device to a free USB port on your computer. 
The system can pick up the device automatically(by installing drivers from your database) in this case, in the lower right corner you will see a notification about successful installation. 
Or you will see a notification in the center of the screen that it is ready to use. 
Otherwise, you will need install drivers cameras. They should also be included in the kit (on CD), if not - download from the official website and install. Installation, in both cases, should not raise any questions - everything is extremely simple.
For example, for modern Logitech webcams, the software installation wizard as follows. 
User agrees with a license agreement, selects a place to install drivers. Then, after waiting for the installation process to complete successfully, they may ask reboot Your computer. After a reboot, all changes will take effect. 
If you couldn’t find drivers for your model on the network, you can search by ID(identification number) of the device, this often gives a positive result.
To find out, you need to go to dispatcher– right-click on the icon of an unidentified device – Properties.
On the tab Intelligence select from the dropdown list Equipment ID.
Below in the value field you will see the PID, try using it in the search find required drivers.
As in the case of the built-in laptop, the manager should also check whether the device is turned on. When disabled – engage.
If something goes wrong and the device is not detected by the computer, the first thing to do is check condition of the wire; during operation it may become worn out and produce a poor-quality connection. Check it on other USB devices. If there is still no connection, you should change the wire.
If everything is fine with the wire and the latest drivers are installed, but the camera is not active, check in the manager to see if there is an exclamation mark next to the webcam icon - if so, then you should try restart device and reinstall the drivers. 
Webcam settings
If there is sound, but no picture, help here settings applications that use the camera.
Often with driver installation is installed a special program in which you can configure device options. You can find it in the button Start – Programs or using a shortcut on the desktop.
Adjust some options can be done using the standard Camera application, integrated into the latest versions of Windows.
To run it, simply enter search word " Camera». 
In the upper right corner of the application working window you will find a button with settings, by clicking which you will be able to adjust them. Unfortunately, there are not as many options as we would like. For more options it uses third-party software.
The most popular third-party webcam application is Skype. Here in the main select video settings. Then go to settings webcams. 
There is an opportunity to increase contrast, hue, saturation, brightness, clarity, and gain. 
There are many more special programs for working with the camera, with a wide range of functionality. For example, Webcam Plus Lite, WebcamXP (free), WebcamMax (paid for professionals).
We recommend a small free program with a simple interface, LiveWebCam. With its help you can take pictures, shoot and, of course, customize it to your requirements. 
To go to options click the button Settings programs. Next, select Image. 
Then settings Cameras.
Here you can change many different camera options, customizing it for yourself. 
More and more people use PCs not only for games and entertainment, but also for communication. In this regard, the question of how to set up a webcam is very relevant. After all, all communication is organized through this device. Poorly versed and novice users begin to panic at the mere mention of this operation and call a specialist to perform this procedure. In this case, a fairly substantial amount is paid. But everything is not so complicated, and you can set up a webcam yourself without any problems.
Hardware component
Conventionally, web cameras are divided into integrated and external. In the first case, the device is included in the personal computer by default. This design has found its application on laptops and netbooks. In this case, the camera is located above the screen, strictly in the middle of the frame. The second version is suitable exclusively for stationary system units, although in case of breakdown or insufficient quality, you can replace the integrated one with an external one and use only it. In this case, the camera is connected to the computer via a USB connector. Can be located on the front or back of the PC. Therefore, at the first stage of how to configure a webcam in this design, it is connected to the system unit. To do this, simply insert its connector into the socket of the system unit. And it doesn’t matter where it is - in front or behind. Here it is already necessary to proceed from the position of ease of use. Although practice shows that it is most rational to connect it from the back.
What will you need?
Before setting up your webcam, you need to prepare everything you need in advance. These are drivers for the motherboard and input device. The first should be on the CD that came with your PC. If it is not available, you can download it from the manufacturer’s official website and save it on your hard drive. In a similar way, you can find the necessary software for the input device. Also, having these instructions in front of your eyes is mandatory.

Installing drivers
The most important step in how to set up a webcam is installing drivers. If such an input device is not completely new, then the necessary software will be installed automatically. In this case, a corresponding message will appear in the right corner of the monitor. But when you have a new web camera, you need to carry out this operation manually. Immediately install the motherboard drivers completely, following the instructions of the wizard. This is necessary to be sure that the USB interface is working. Then install the drivers on the device itself in the same way.
Settings
Most software products have extensive configuration options for such devices. For example, the same Skype is no exception in this regard. It is with his example that we will consider this operation. After launching this program, go to the “Tools\Settings\Video Settings” menu. On the right side we should see our mirror image. And under it there will be a button “set up a web camera”. After clicking on it, a window will open. In it, on two tabs (video processor amplifier and web camera control), there are all the parameters with which you can easily and simply configure such an input device. Each value is selected experimentally until the desired result is achieved.

conclusions
This algorithm helps you understand how to configure the built-in webcam and an external one. Any user can cope with this task, regardless of skill level. Just follow the instructions - and you will definitely succeed.
You have long promised to call your relatives via video call, for example, or, instead of texting. And finally, you bought a web camera, brought it home, maybe even connected it to your computer, but it doesn’t work. And in general, how to install a webcam correctly and on the first try? Let's talk about this in order.
Sequence of installing a web camera on a computer
Essentially, there are more words than actions here. To install a webcam you need to take TWO steps:
- Physically connect the camera to the computer;
- (Often) a camera program that will allow the computer to recognize it as a device.
Connecting the camera
Web cameras are connected via a USB connector.
For example, let's connect the Genius FaceCam 1005 webcam. Find the required connector on the system unit case, it can be on the front panel and on the back or on the end faces of the laptop and plug the camera cord into it.
If Skype is already installed, you need to go to the menu "Tools" and after "Settings".
Select an item "Video Settings" and lo and behold, our web camera is already showing the image.
This means that it is already working and you can freely call friends and acquaintances.
But, if your camera is not visible in the list of Skype cameras, most likely the reason is due to the lack of a driver.
How to install a driver for a webcam?
The package, as in our case, always includes a disk with drivers for the web camera. Insert the disc into the drive.
Usually the disk always contains some kind of proprietary program for working with the camera, but for now we need a driver. That's what it's usually called, "Driver" or “Drivers” or “Camera name Drivers”. In our case, it was called Genius Utility.
Select and install as a regular program.