IDE-SATA, hard drive adapter: description, connection. When you need an IDE-SATA adapter Sata ide interface adapter adapter
In the last week, I received several letters with one problem, with approximately the same content, I’m sure your friends will be interested.
Note: If you need to connect a simple hard drive or an IDE or SATA interface drive to your laptop, or maybe you want to connect a laptop hard drive to a simple computer, then read our new articles:
- Our reader Alexander from Yaroslavl asks: How to connect a SATA hard drive to his motherboard, if it does not have such a connector at all, but there is a free IDE controller connector. Is it possible to find IDE-SATA adapter and solve his problem.
- Another letter. Hello, I have a question for you. There is a system unit, it contains two connectors for connecting SATA interface devices and they are naturally occupied, one connector is occupied by a disk drive, and the second by a hard drive, the capacity of which is only 250 GB. There is one more IDE controller connector - it is free. The other day, an acquaintance gave me a 250 GB SATA hard drive. True, it’s not new, but it’s quite working, so I’m asking you how I can connect it to my system unit so that two hard drives can work at once, then I’ll have 500 GB of total disk space. Friends suggested that there is an IDE-SATA adapter that can solve my problem. Is it so? My operating system is Windows 7. Also, is it possible to make the second hard drive visible in the BIOS and install a second operating system on it? Alexei.
- Now for a little attention. Another reader of ours asked a similar question, but on the contrary, he needs to connect a hard drive with an IDE interface, but he has only one IDE connector in the system unit on the motherboard and two devices are connected to it with one cable: a 250 GB hard drive and a DVD-ROM . There are also two free SATA controller connectors. A reader asks: is there a SATA-IDE adapter and can it be used to connect an additional IDE hard drive to its motherboard?
IDE-SATA adapter
The meaning of all the questions comes down to this: How to connect a device to the motherboard - there is no free connector for connecting it on this motherboard. And the first case is the most interesting; there is no connector on the motherboard at all to connect the device we need.
The solution for all problems will be the same. How, you ask? Read on. Friends, believe me, it’s best instead IDE-SATA adapter use, unfamiliar to many and sold in almost every computer store 3-port SATA and IDE controller - VIA VT6421A or it is also called - PCI Card SATA+IDE adapter (combo), it will cost us about 300-350 rubles. There are three connectors on it SATA and one IDE.
Today we don’t need such a number of hard drives, and with its help we will connect only two hard drives to our motherboard - one SATA interface, the other IDE, then turn on the computer and see how everything will work. Looking ahead, I will say that our two hard drives will operate in UDMA/133 The throughput of the hard drives will be 133 Mbit/sec, which, to be honest, is not that bad. Yes, I almost forgot, we have an article on how to use this adapter.
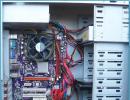
Let's take a simple system unit. We perform all actions with the computer turned off.

As you can see, two SATA controllers are busy. A Samsung hard drive is connected to one, a DVD is connected to the other. There is one more IDE interface connector, we will not specifically connect anything to it, we will complicate the task for ourselves, so to speak, we will make do with our PCI Card SATA+IDE (combo), hard in training, easy in battle.

Please note that, as mentioned above, there are three SATA connectors and one IDE connector.


We insert it into PCI controller connector our motherboard and secure it with a screw.


First we connect IDE interface cable Maxtor hard drive and PCI Card SATA+IDE adapter (combo). The end of the cable that needs to be connected to the motherboard is inserted into the IDE connector of our adapter. We connect the other end of the cable to our Maxtor hard drive.


Now it’s the turn of the second Western Digital SATA hard drive. It will be more convenient to first connect the power cable to the Western Digital hard drive. As you can see on my SATA-Western Digital hard drive there is a connector for connecting an IDE power cable, in your case this may not be (this is quite rare) and you will have to use a special IDE-SATA adapter.

We connect the power cable to our hard drive through the mentioned adapter.

Then we connect our PCI Card SATA+IDE (combo) adapter and the Western Digital hard drive using a SATA interface cable.

We check that everything is connected correctly and turn on the computer.

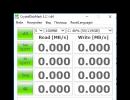
Immediately, a miracle does not happen in the parameter Hard Disk Drives we can only observe a Samsung hard drive connected directly to the SATA connector on the motherboard. Unfortunately, the BIOS did not see both of our hard drives connected to the PCI Card SATA+IDE (combo) adapter.

And friends, it’s almost impossible to make the BIOS see a hard drive connected via a PCI controller; unfortunately, the BIOS firmware won’t help either.
But both hard drives saw the program’s boot disk, which means that on both hard drives connected by our adapter, you can store system backups and, if necessary, deploy them to the main partition with Windows, which is what we did right away. First, we created a backup of the system, and then deployed it in place. The system booted successfully. Take this into consideration, friends.

We continue loading the operating system, by the way Windows 7.
The most difficult thing that awaits us is to find drivers for our adapter for Windows 7. If it doesn’t find the driver and install it automatically, you and I will have to surf the Internet in search of the right driver, but we also have good articles on this topic, so you guys have nothing to fear.
Windows 7 has loaded and we immediately go to Device Manager to see how we are doing. Equipment is being searched and installed. As we see, our adapter is defined in the device manager as VIA Bus Master IDE Controller,


and then the system installs drivers on our two Maxtor and Western Digital hard drives.

Instructions
Buy a SATA-IDE adapter.
Disconnect power and all connecting cables to your computer. Open the cover of the system unit. Touch the radiator for a few seconds. This is to remove static electricity from your hands, which could otherwise damage sensitive computer components.
Take a SATA cable - you will need it to connect your adapter to the motherboard. The SATA cable is usually about 25 centimeters in length, most often red. You can easily recognize it by its connector: about a centimeter wide, flat, with a slight bend on one edge. Both sides of the SATA cable are equal, so it doesn’t matter which side you plug it into the motherboard and which side into the adapter.
You will also need an IDE cable to connect your floppy drive or hard drive to the converter. The IDE cable is flat, about 5 centimeters wide, with hard plastic connectors in the form of two rows of holes. Usually has three connectors, one on top of the other two. This connector is used to connect to the motherboard or controller.
Find any free SATA connector on the motherboard. They are shaped like a SATA cable, only surrounded by a protective frame that will help you connect the cable correctly. Plug one end of the cable into the motherboard and the other into your adapter.
Connect your device (floppy drive or hard drive) and the SATA-IDE adapter with an IDE cable. Insert the far single end of the cable into the adapter, and one of the free connectors on the other side into the disk drive.
Please note: near the cable location on your drive there is a group of six contact pins that can be connected by a small plastic jumper. You will find the MA/SL/CS markings on the top or bottom of the drive near these pins. If you don't have a jumper, you don't need anything. If there is a jumper, pull it out and install it opposite the CS mark. This is necessary to correctly identify your device.
Connect the white rectangular connector from the power supply to your drive. If the adapter has a white rectangular socket with four pins, connect another connector from the power supply to it. Insert the disk drive or hard drive into the case of your system unit, if you removed it.
Plug in the power cable, keyboard, mouse and monitor cables. Turn on your computer - your adapter is ready to use.
Very often places on hard disk becomes small and there is a need to increase the amount of memory. One way to increase capacity is to install a hard drive.
You will need
- Knowledge about the structure of the system unit, a screwdriver.
Instructions
You purchased a new hard drive and brought it home to install it. To install, you must contact the manufacturer's service department if the case is under warranty and covered with stickers, or install. For self-installation, you need to remove the wall of the system unit.
Next you need to find the cable that goes to the hard drive. Usually in modern motherboards it is possible to install up to 8 or more rigid ones. Each of the cables has a cable that needs to be inserted into the connector on disk. There is only one correct connection option. Do not use force; if the cable does not insert, you may be doing something wrong. Make sure the keys on the cable match the hard one disk.
Video on the topic
note
Disconnect power from the computer before disassembling! Be careful, the internal elements are quite fragile.
The growth of digital technologies sets its pace in the world of computers and few are surprised that we have to increase the capacity of hard drives and their performance. However, old models can serve you along with the “newbies”. All that remains is to place them correctly in the computer and avoid the pitfalls that you may encounter with such a combination.

You will need
- - hard drive;
- - data cable with a suitable connector;
- - free space in the computer system unit.
Instructions
Place the new one in the computer case. To do this, turn off the computer, disconnect the power supply (turn off the button or unplug the power cord), remove both side covers of the system unit, install and secure the new hard drive into the free slots of the case with screws on both sides. Connect the data cable (flex cable) and power cable. Modern hard drives, as a rule, are connected via a SATA (Serial ATA) connector. Before purchasing, make sure that the motherboard of your computer has a similar connector. Otherwise, you need to use a hard drive with the old connection technology - IDE. Set the jumpers to the appropriate position (if it is the main disk, to the “Master” position, if the slave one is “Slave”). A sticker with the position of the jumpers is usually located on the hard drive case. Install the side covers of the system unit and connect the power.
Turn on the computer and enter the SETUP BIOS utility (usually this requires holding down the Del key at the beginning of boot). In the SETUP program you need to make sure that the new and old hard drives are correctly identified by the system and occupy the required order. This can be seen in the Standard CMOS Features menu. Having opened it, look at the list of detected devices, for each of which properties will be shown (size, number of cylinders, etc.). If you plan to boot from a new disk, then select the corresponding item next to your disk in the Advanced BIOS Features menu and indicate it first.
Restart your PC. Monitor the loading of the operating system and make sure there are no failures or abnormal situations (unexpected reboots). If everything went well, the system will detect the new hard drive with the first launch and allow you to work with it. If the drive is , then the cables are connected correctly and the SETUP is installed.
The found hard drive is ready for use: it can be formatted, created new partitions, assign logical drive letters. To easily use these features, open the Explorer program (WIN + E) and select the context menu by right-clicking on the new drive. Remember, all information on disks is destroyed! Take steps to archive or back up information to other hard drives or Flash devices.
note
Each hard drive requires its own personal cable (data cable). The number of allowed connections is determined by the availability of free slots (IDE or SATA) on the motherboard.
The SETUP utility can be entered using a key other than Del. To determine it, you should pay attention to the prompt about entering SETUP at the initial stage of loading the PC.
Helpful advice
There are a large number of specialized programs for working with hard drives. They allow you to create and delete logical partitions, format a disk for different operating systems, check the health of the hard drive and data integrity, test speed and much more.
Sources:
- how to connect a new hard drive
What to do in a situation if you do not have a sata connector installed on your motherboard, but you need to connect the equipment to this connector. Hard drives today are sold specifically for sata interfaces. But finding a hard drive with an IDE interface is problematic. Of course, this is possible, but finding such a hard drive may take a lot of time. In fact, the problem can be solved quite simply - buy and install sata- controller.

You will need
- Computer, sata controller, screwdriver
Instructions
Disconnect power from the computer. Unscrew the screws that secure the system unit cover and remove it. The controller must be installed in a PCI slot. If you don't know where the PCI slots are on your motherboard, you can look in the technical documentation for your computer. If you don’t have technical documentation, find them on the motherboard yourself: all slots on motherboards are labeled. As a rule, they are located in the lower left corner of the motherboard, next to the video card slot. Depending on the motherboard model, there may be a different number of PCI slots. There should be a minimum of three.
Simply insert the sata controller into one of the PCI slots and then secure it with a screw. You will see where to tighten the screw after you connect the controller to the PCI slot. Without closing the system unit cover, connect the computer to power and turn it on. When the operating system boots, it should recognize the controller automatically.
Almost all controllers have Plug & Play technology, so there is no need to configure them when connecting. When the device is recognized by the system, install its software. To do this, use the software disk that should come with the controller. Additional software will expand its capabilities.
Then turn off the computer and connect the necessary sata devices to the controller. Next you need to connect the power cable to them. See if your power supply has a cable with a sata interface. In the place where the cable is connected to the device, there should be an inscription sata. If the power supply does not have such a cable, you will not be able to connect power to the device. In this case, purchase an adapter for connecting sata power. These are available in any computer store.
To use older PCs, an IDE SATA adapter is increasingly needed, which allows you to connect old hard drives that were not originally designed for the SATA standard to new motherboards.
Businesses and home users still have computers in which the HDD is connected via the ATA (IDE) interface, developed in 1986. The user may have questions about how to connect a hard drive of this type to a new computer to save data or use (if the hdd is working). The simplest solution is to use an IDE to SATA adapter. This will allow you to use the drive with a more modern computer that supports the SATA standard. Such controllers make it possible to reduce the cost of updating the technical equipment of production workshops. For the average user, devices will help save important data.
Do you still have a hdd with an ATA-IDE interface and want to equip a new PC with it? Now this is problematic: PC manufacturers have stopped supporting this standard. It was supplanted by SATA, the first standard of which appeared in 2003, and the latest (version 3.0) in 2009.
If you need to connect an old hard drive, then you need a special controller; it can coordinate various PC components. Usually such a device is called a SATA to IDE adapter; without it, such a connection is simply impossible.
Outdated equipment running on the slow IDE standard is many times inferior in performance to new type devices, even those that support the very first edition of the SATA standard. But these devices were widespread and are found even now (DVD drives, hdd).
The use of old equipment is very important in the corporate segment. Many programmable machines and production lines used PCs with an IDE hard drive as the main data storage device. Typically the devices ran under MS-DOS or newer NT/9x systems. And for such operating systems, connecting to the hard drive using the old protocol is crucial for performance.
What do adapters provide?
Very often, industrial, expensive equipment runs on outdated software, which requires a special hardware configuration. If the hdd fails, programs can still be restored from the archive or obtained from equipment manufacturers, but old-type hdds are difficult to find. It's easier to use an IDE to SATA adapter and connect the cheapest new drive.
So, with minimal investment you can restore the functionality of an industrial computer. At home, a SATA to IDE adapter will be useful for downloading content from an outdated drive. You can use the old hdd only if it is fully operational. Also, its volume should be quite high (over 80 GB), and the cost should be higher than that of an IDE to SATA adapter, otherwise there is no point in using such a drive through an expensive adapter. In addition, when we connect the drive to the board through it, the productivity of the hdd decreases.
You won’t be able to make such an adapter yourself (it’s difficult and expensive). In addition, connection problems may arise with hardware incompatibility. And the overall costs of making such an adapter yourself are unreasonably high.
Using an old OS
For the old system and application programs to work correctly on more modern equipment (in particular, hdds), adapters are needed, for example, an IDE converter, which will allow you to connect an old drive to a new motherboard or make a new one work with the old system.
It must be remembered that it is not always possible to work correctly with particularly old programs through an adapter. It will help you read and save data, but outdated software may make it difficult to work.
When the SATA IDE converter is used for use on MS-DOS systems or older versions of Windows, errors and failures are possible. When purchasing such a device, it is advisable to pay attention to the compatibility and system requirements in the technical specifications. The vast majority of IDE SATA devices, or SATA to IDE devices, run on Windows XP, and in this system you can enable emulation of correct work with software written for MS-DOS. So such devices will help connect a SATA drive to an old industrial PC that does not initially support this standard. It will be cheaper than purchasing a completely new computer and fine-tuning it. How to connect the ide-sata adapter and the process of connecting it, see the video in more detail.
Hi all! Previously, I already wrote an article about how to connect an ide hard drive to the motherboard using a controller. Today I will share with you another great solution to connect an ide device to a new motherboard. In addition, this solution is inexpensive and quite universal.
While upgrading the hardware of one computer, I was faced with a choice: should I buy a new optical drive, or can I use an old one that has an IDE connector. Naturally, the new motherboard does not have this connector, and in response to my proposal not to install a drive at all, the computer owner firmly stated that he uses the drives often and with pleasure.
The cost of a new optical drive with a modern SATA connector is not so high - about 600-700 rubles, but then it is not clear what to do with the old device, because it works great. And the money saved is better spent on improving the performance of a new computer.
After surfing the Internet a little, I came across this wonderful thing:
Similar adapters can be ordered from China at ridiculous prices here: aliexpress.com is a proven, reliable store with a guarantee, the services of which I use quite often.
This is a SATA - IDE adapter and vice versa IDE - SATA. It is quite compact in size and costs only 200 rubles! Obviously, buying such an adapter is more profitable than buying a new drive.
The great thing is that it works both ways. That is, we can connect an old IDE device to a new motherboard, or vice versa, we can connect a SATA drive or hard drive to a motherboard that does not have SATA connectors. In both cases, we can save significantly.

In general, connecting a device through such an adapter does not cause difficulties, but you need to be careful here. The adapter has markings for SATA pins (see right photo above). One SATA connector is used when connecting an IDE device to the motherboard, the other, vice versa, if you need to connect a SATA device to an old motherboard.
In addition to various connectors, the controller has a jumper for selecting the mode:
- 2-3 IDE mainboard to SATA HDD;
- 1-2 SATA mainboard to IDE HDD.
Accordingly, by bridging the necessary contacts 2-3
or 1-2
, we tell the device exactly what type of connection we need.
In any case, by simply experimenting with the wires and jumper, you can achieve the desired result, and you don’t have to worry about something burning (tested from your own experience?).
Connecting an IDE hard drive or drive will look like this:

Having connected the optical drive through such an adapter, I decided to buy myself exactly the same one. Let it sit, I’m sure it will definitely come in handy for that price.)
Here is a simple and cheap solution for connecting IDE devices. I hope this article will help many people make the right choice)
P.S. For those who are unable to connect a hard drive through an adapter (not detected in the system or in the bios), they can try setting the jumpers on the IDE drive itself to the master or slave position. Try different options. Everything will definitely work out! (Thank you! for the addition to Alexey Shchukin)
SATA IDE adapter used to connect to a laptop instead of an old and expensive hard drive with an IDE connection interface, a more modern hard drive with a SATA connection interface
- New high quality product
- SATA hard drive can be detected and used as a standard 2.5" IDE hard drive
- Converts all types of SATA CD-ROM/CD-RW/DVD-ROM/DVD-RAM/DVD-RW/HDD devices to 2.5" IDE device
- SATA IDE adapter allows you to directly, without using cables, connect a 7+15-pin SATA connector to a 44-pin IDE connector
- One SATA 7 + 15-pin connector for connecting to a SATA hard drive
- One IDE 44P connector to connect to IDE 44P connector
- Complies with Serial ATA Specification 1.0
- Supports Serial ATA data transfer rates up to 1.5 Gb/s (150 Mb/s)
- Does not require drivers to install
- Has a compact design
- Compatible with DOS, Windows 98/98SE, Me, 2000, 2003, XP, Vista, Windows 7 and Linux
- Does not support Hot-Swap function
- Supplied without hard drive
- Buy a SATA IDE adapter available in our online store
- PCB dimensions: 70 x 26mm
Equipment:
1 x SATA IDE adapter No. 2
Without a box. Packed in a secure bubble bag
Delivery of SATA IDE adapter No. 2 and other products in the category Adapters, adapters in Moscow is carried out within 15-20 days. Delivery cost 199 rub. or FREE for orders over RUB 1,999.
You can pay for the purchase of goods by card, from a mobile phone account, in a terminal, in cash through a bank or with any electronic currency.
Payment
Delivery
- Delivery in Moscow, throughout Russia and the CIS
- Delivery = 199 rub. or FREE for orders over RUB 1,999.
- By mail to your nearest post office
- Dispatch from warehouse in China
- Delivery time about 15 working days
- Parcel tracking via the Internet
Guarantees
- 1 month to return goods/money
- Insurance against loss at the Post Office - FREE
- Shipping Damage Insurance - FREE
- Refund of goods in case of non-receipt
- Refund of the cost of goods if they do not correspond to the description